Category: america

  • 7 Heartwarming Grandma’s Depression-Era Recipes to Savor

    7 Heartwarming Grandma’s Depression-Era Recipes to Savor

    Grandma’s Depression-Era Recipes are what I reach for when life feels a little too expensive, a little too busy, or honestly just a little too loud. You know those weeks when you open the fridge and it looks like a random collection of odds and ends, not a plan? That is exactly when these recipes shine. They are simple, filling, and surprisingly comforting, even if you are not trying to be “old fashioned” on purpose. I grew up watching my grandma make meals out of almost nothing, and somehow everyone left the table happy. Let me share seven of my favorites and a few tricks she taught me along the way.
    Grandma’s Depression-Era Recipes

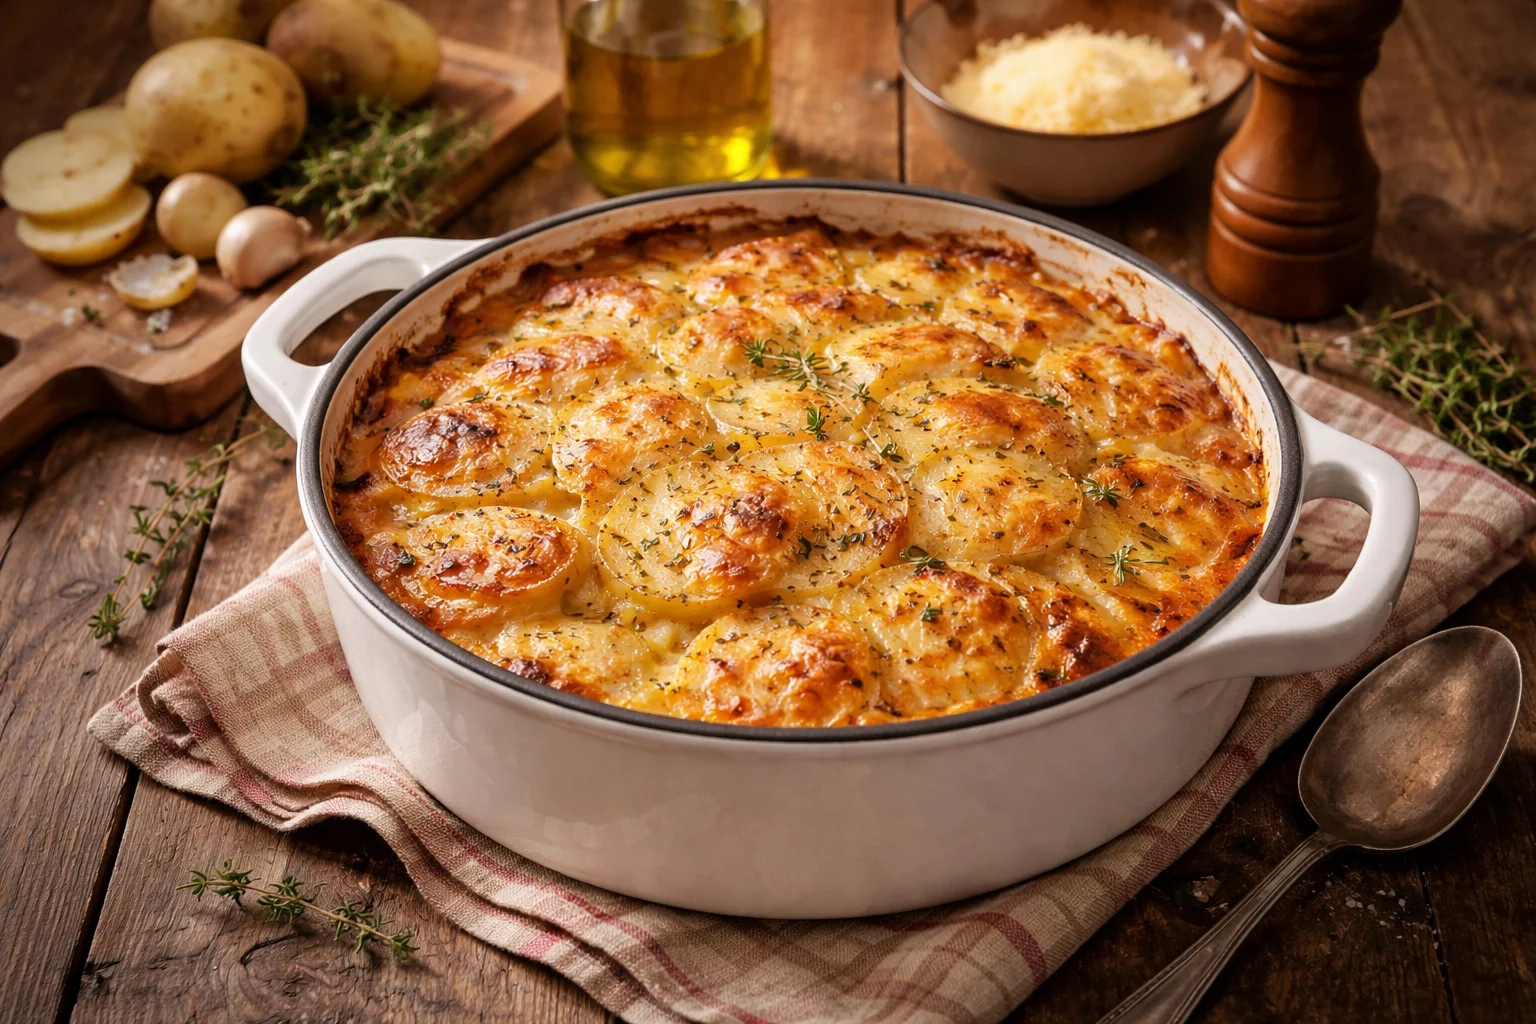
    Top Unique Recipes from the Great Depression

    These are my personal “greatest hits” from the family recipe box, the ones that still work in a modern kitchen without needing anything fancy. What I love most is how they stretch ingredients and still taste like real food. Also, they hit that cozy spot that makes you slow down for a second.

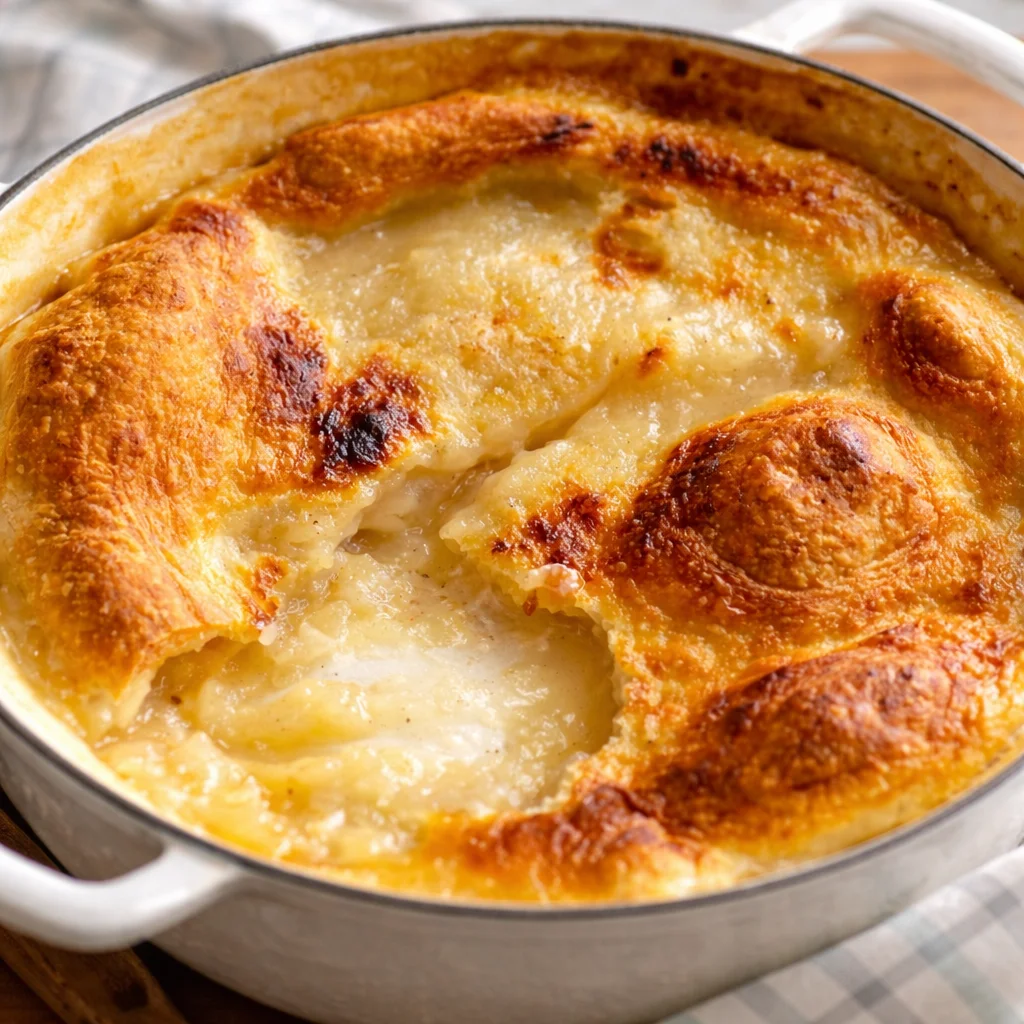
    1) Potato Soup with Milk and Onions

    This one feels like a warm blanket in a bowl. Grandma would say, “If you have potatoes, you have dinner.” She was not wrong.

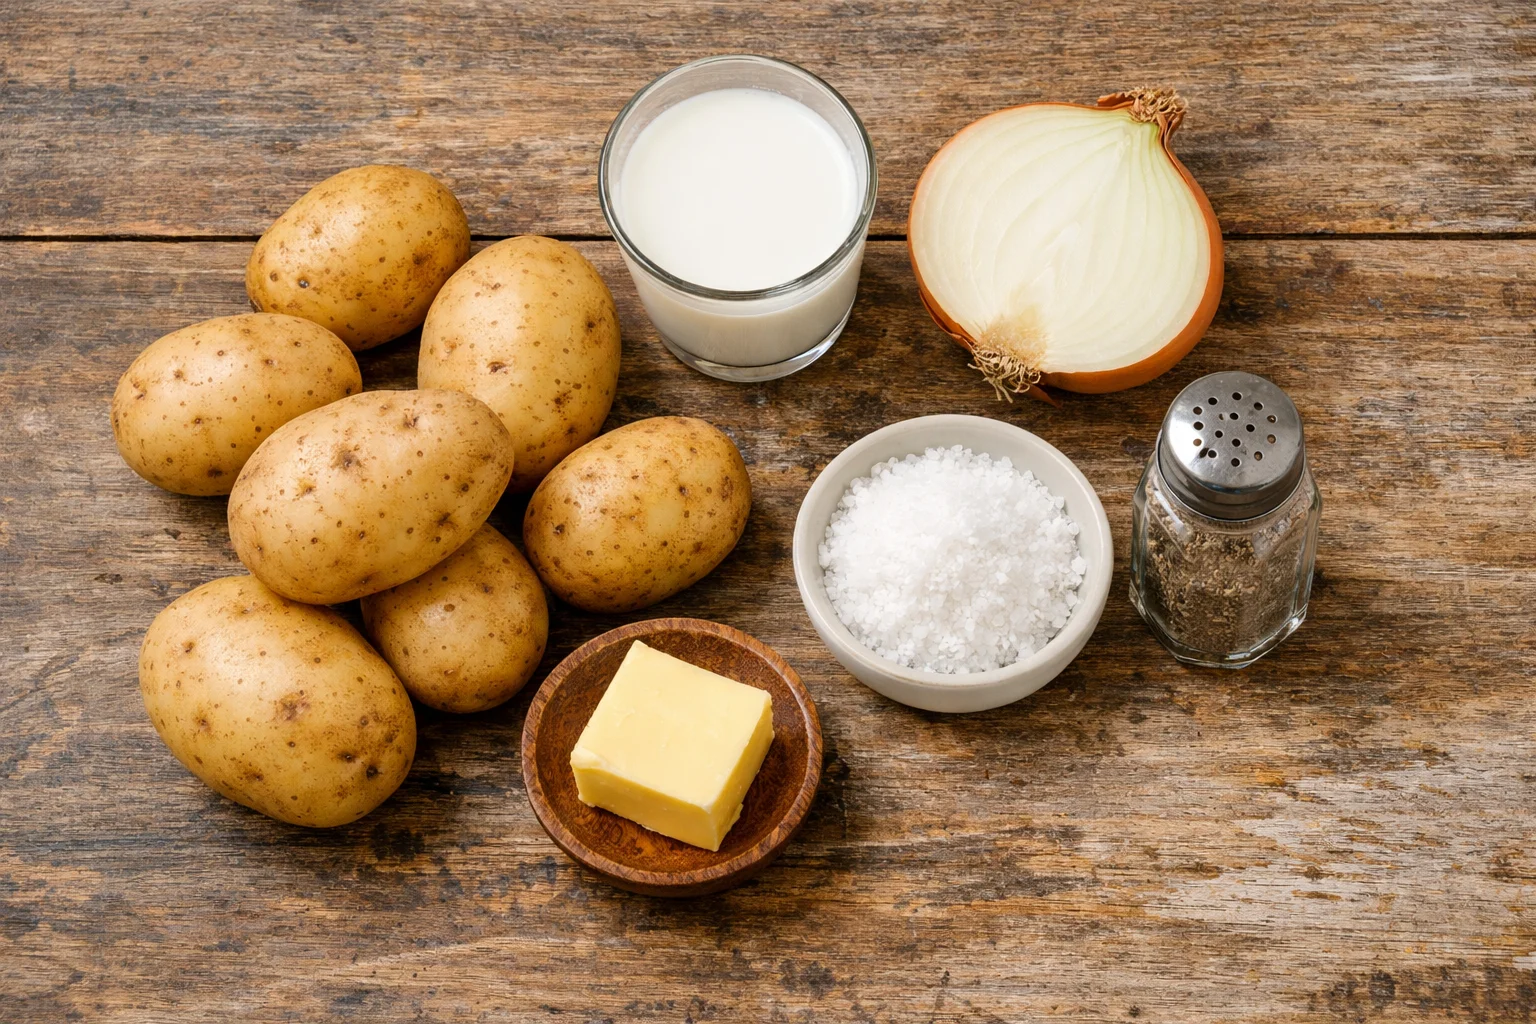
    • What you need: potatoes, onion, milk (or any milk substitute), salt, pepper, a little butter or drippings if you have it
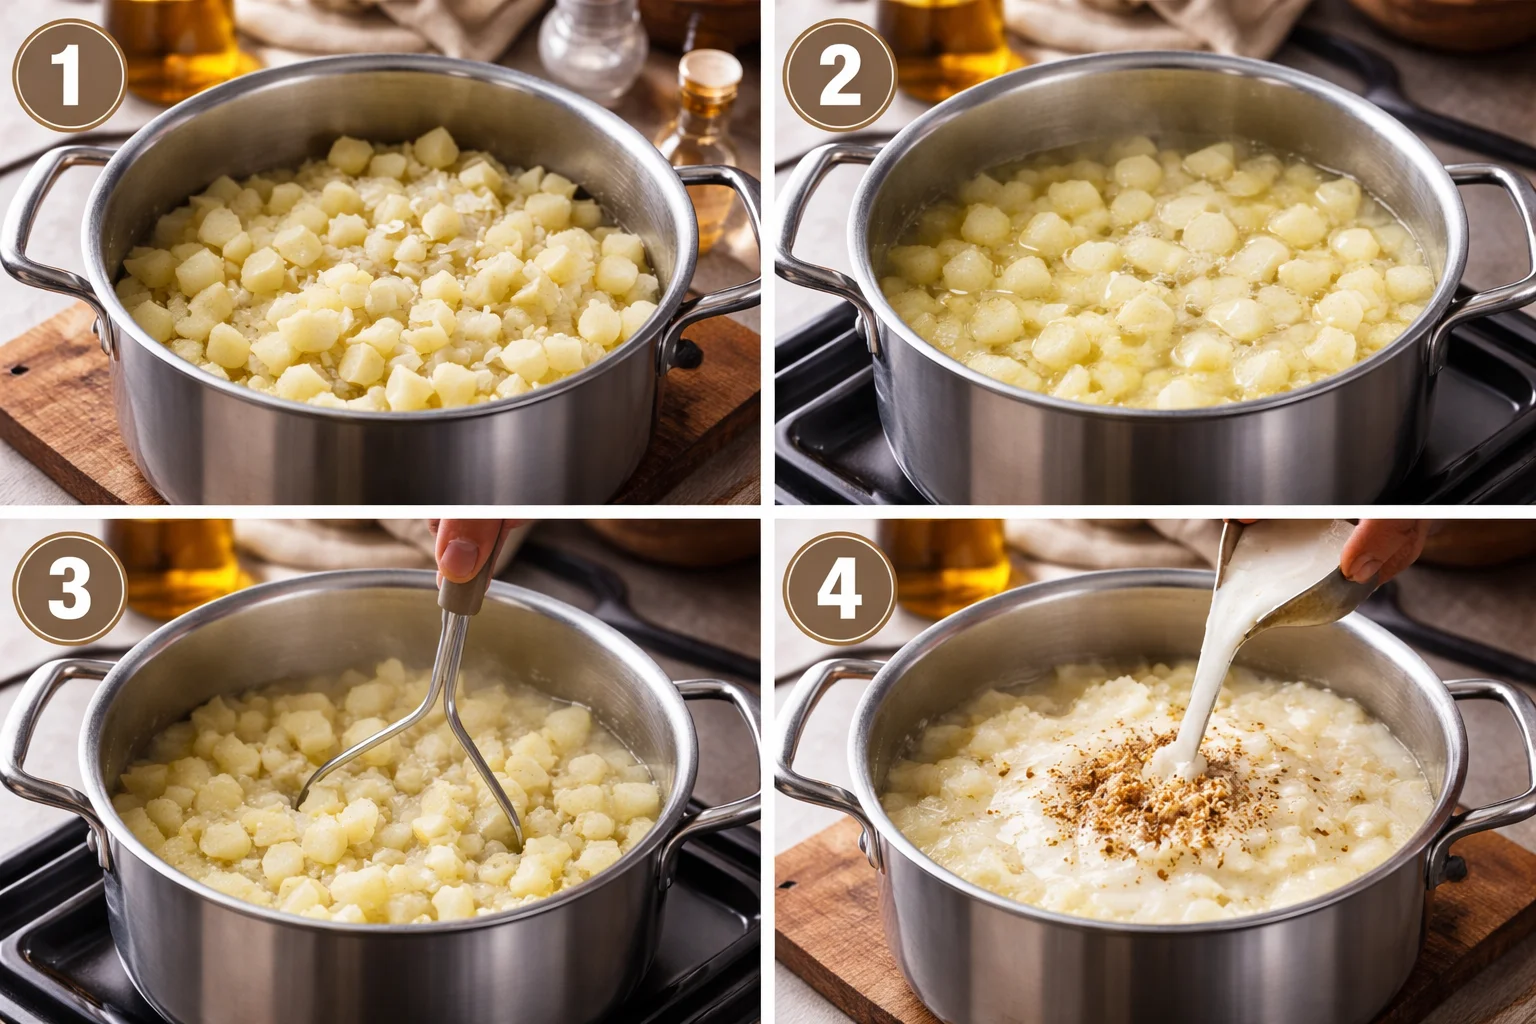
    • How I do it: dice potatoes and onions, simmer in water until soft, mash a little right in the pot, then stir in milk and season it well
    • Tip: if you have a lonely carrot or celery stalk, chop it in. Nobody complains.

    2) Creamed Chipped Beef on Toast, the “Sunday Special”

    Okay, this one sounds humble because it is. But it is also deeply satisfying. Grandma used dried beef, made a quick white sauce, and poured it over toast. If you have ever had it, you get it. If you have not, start with a small batch and see why people kept making it.

    3) Cornbread in a Skillet

    Skillet cornbread is one of those “smells like home” foods. It is cheap, fast, and it turns soup into a full meal. If you only have a little flour and cornmeal, this still works. I like mine with a crisp edge, so I preheat the pan with a dab of fat.

    4) Beans and Tomato “Stew”

    This is basically pantry magic. It is not complicated, but it tastes like you tried. You simmer beans with canned tomatoes, onion, and whatever spices you have. Grandma used a pinch of sugar if the tomatoes were too sharp. I still do that sometimes.

    5) Egg Drop Noodles, the Scrappy Comfort Bowl

    When there was flour and one egg, grandma made noodles. She would mix flour with egg and a splash of water, roll it thin, slice it up, and drop it into broth. Even plain salted water works in a pinch. It is the kind of meal that makes you feel taken care of.

    6) Fried Cabbage with Bacon Bits (or Not)

    If you can get cabbage on sale, grab it. Slice it, cook it down in a pan, and season it well. If you have bacon or sausage, great. If not, onion and a little butter still make it good. It is sweet, savory, and way more filling than it looks.

    7) “Wacky Cake” with No Eggs or Butter

    This is the recipe that always gets people. Chocolate cake with no eggs, no milk, no butter, and it still turns out soft. The reaction is always the same: “Wait, really?” Yes, really. It is perfect for tight weeks or when you are out of everything.

    One small note: I used to keep a separate page on my site for cozy comfort food, but my list is constantly changing. If you want something similar, you can always click around my recipe collection and see what is new.

    Grandma’s Depression-Era Recipes

    How to Adapt Great Depression Recipes for Modern Cooking

    Here is the thing. You do not have to live like it is 1933 to enjoy these meals. The goal is not struggle, the goal is comfort and smart cooking. I adapt them all the time based on what I have and how much time I have.

    My best practical updates are simple:

    • Use frozen veggies when fresh costs too much or goes bad too fast.
    • Lean on your pantry like canned tomatoes, beans, rice, oats, and flour.
    • Boost flavor fast with garlic powder, onion powder, paprika, or a splash of vinegar.
    • Make it a one pot meal when you are tired and do not want dishes.

    For example, that potato soup can become a full meal with frozen peas tossed in at the end. The beans and tomato stew can get a sprinkle of cheese if you have it, or a spoon of plain yogurt for a creamy twist. And wacky cake? I sometimes add instant coffee powder to deepen the chocolate flavor. Grandma would probably roll her eyes, but she would still eat a slice.

    “I started cooking my grandma’s old meals when groceries got expensive. I expected them to be bland, but they are actually comforting and they stretch for days. The wacky cake is now my go to birthday cake.”

    7 Heartwarming Grandma’s Depression-Era Recipes to Savor

    The Importance of Ingredient Substitutions

    Substitutions are basically the whole point of Grandma’s Depression-Era Recipes. People cooked what they could get, not what a recipe told them to buy. That mindset is still useful now, especially when prices jump around or you are trying to waste less food.

    Here are swaps I use all the time, without overthinking it:

    Milk: use powdered milk, evaporated milk diluted with water, or even unsweetened oat milk for soups and batters.

    Eggs: in baking, try a mashed banana, applesauce, or a little vinegar plus baking soda for lift in certain cakes like wacky cake.

    Meat: beans, lentils, or chopped mushrooms can stretch a small amount of ground meat.

    Butter: use oil, saved bacon fat, or even a little mayonnaise in some baking recipes.

    The key is to stay calm and focus on the job the ingredient is doing. Is it adding moisture? Richness? Holding things together? Once you know that, swapping gets easier. Grandma did not call it “food science,” but she understood it in a very real way.

    Tips for Cooking on a Budget

    I am not pretending these tips fix everything, but they do help. A lot. When I cook like my grandma taught me, I waste less and I feel more in control of the week.

    Here is what actually works in my kitchen:

    Plan for leftovers on purpose. That bean and tomato stew tastes better the next day, and it freezes well.

    Buy the “boring” staples. Rice, oats, flour, potatoes, and dried beans are still some of the cheapest ways to eat well.

    Cook once, eat twice. Make skillet cornbread with soup, then crumble the extra into breakfast with a little milk and cinnamon.

    Use smaller amounts of meat. A little bacon in fried cabbage can flavor a whole pan. You do not need a mountain of it.

    Keep a snack cake recipe handy. Wacky cake saves you from spending on dessert when you just want something sweet at home.

    And yes, Grandma’s Depression-Era Recipes are budget friendly, but they also help emotionally. There is something grounding about turning basics into a real meal. It makes the day feel more manageable.

    Personal Stories and Memories of the Great Depression

    I did not live through the Great Depression, but I grew up with someone who carried its lessons like they were stitched into her apron. Grandma would tell me how her mother saved bacon grease in a tin and treated it like gold. She talked about neighbors trading eggs for flour, and how nobody wanted pity, they just wanted to get through the week.

    The funny part is, she was not sad when she cooked these foods. She was proud. She would hum while stirring soup. She would wrap leftover cornbread like it was precious. She made “nothing much” feel like something good.

    When I make these meals now, I feel connected to that kind of steady strength. Grandma’s Depression-Era Recipes are not just cheap recipes. They are reminders that you can still feed people well, even when things are tight.

    Also, if you are cooking for family, these recipes invite stories. Somebody always says, “My grandma made that too,” and suddenly you are swapping memories instead of just eating dinner.

    Common Questions

    Are Grandma’s Depression-Era Recipes healthy?

    They can be. Many are heavy on beans, potatoes, oats, and simple soups. I balance them by adding a vegetable when I can and watching the salt in things like dried beef.

    What is the easiest one to start with?

    Potato soup or skillet cornbread. Both are forgiving, cheap, and you can adjust them with what you have.

    Can I make wacky cake gluten free?

    Yes, with a 1 to 1 gluten free flour blend. The texture changes a bit, but it is still good. Just do not overbake it.

    How do I make these recipes taste less bland?

    Season in layers. Salt, pepper, onion, garlic powder, and a tiny splash of vinegar or hot sauce can wake up a pot of soup fast.

    Do these recipes work for meal prep?

    Definitely. Beans and tomato stew, potato soup, and fried cabbage all reheat well. Cornbread freezes nicely too.

    A Cozy Ending and a Little Nudge to Try One

    If you have been craving comfort or trying to cut your grocery bill, Grandma’s Depression-Era Recipes are a sweet place to start. Pick one, use what you already have, and do not stress about making it perfect. I also like reading how other home cooks are rediscovering these ideas, like this piece on These Depression-Era Recipes Still Save Money Nearly 100 Years …, because it reminds me this kind of cooking still matters. Try the potato soup this week, or bake the wacky cake when you want something simple and chocolatey. Then tell someone about it, because these recipes are even better with a little story on the side.
    Grandma’s Depression-Era Recipes

  • Easy Cherry Pie

    Easy Cherry Pie

    why make this recipe

    This Easy Cherry Pie recipe is quick and simple. It uses few ingredients. You can make it with fresh, canned, or frozen cherries. The pie has a sweet, tart filling and a golden crust. It is a good choice for a fast dessert any day. For more simple ideas, see easy Mexican cassero recipes.

    introduction

    This pie is easy to make and tastes great. You do not need special skills. The filling cooks on the stove and the pie bakes in one pan. The almond and vanilla give a warm flavor. Serve it warm or cold.

    how to make Easy Cherry Pie

    Follow the simple steps below. The filling thickens on the stove. Then you bake the pie until the crust is golden.

    Ingredients :

    • 2 cups fresh, canned, or frozen cherries
    • 1 cup sugar
    • 2 tablespoons cornstarch
    • 1 tablespoon lemon juice
    • 1 teaspoon vanilla extract
    • 1 teaspoon almond extract
    • 1 pie crust (store-bought or homemade)
    • 1 tablespoon butter (optional)

    Directions :

    1. Preheat your oven to 425°F (220°C).
    2. In a medium saucepan, combine cherries, sugar, cornstarch, lemon juice, vanilla extract, and almond extract. Cook over medium heat until the mixture starts to bubble and thicken.
    3. Pour the cherry filling into the pie crust, spreading it evenly.
    4. Dot the filling with small pieces of butter, if desired.
    5. Cover with a top crust, seal the edges, and cut slits in the top to allow steam to escape.
    6. Bake in the preheated oven for 30-35 minutes or until the crust is golden brown.
    7. Let cool before serving.

    how to serve Easy Cherry Pie

    Let the pie cool a bit so the filling sets. Serve warm with vanilla ice cream or plain whipped cream. You can also serve slices at room temperature. Cut with a sharp knife for clean slices.

    how to store Easy Cherry Pie

    Cover the pie with plastic wrap or foil. Store at room temperature for one day. For longer storage, keep in the fridge up to 4 days. To freeze, wrap well and freeze for up to 2 months. Thaw in the fridge before reheating.

    tips to make Easy Cherry Pie

    • Use fresh, canned, or frozen cherries. Drain canned cherries well.
    • If filling is too thin, add a little more cornstarch.
    • Blind-bake the crust for a firmer bottom if you like.
    • Cut steam vents in the top crust to avoid overflow.
    • Let the pie cool so the filling firms up before slicing.

    variation (if any)

    • Add a pinch of cinnamon for warm spice.
    • Use lemon zest for brighter flavor.
    • Make a lattice top crust instead of a full top crust.
    • Mix half cherries and half berries for a mixed fruit pie.

    FAQs

    Q: Can I use frozen cherries without thawing?
    A: You can use frozen cherries. Thawing first helps the filling thicken evenly, but you can add them frozen and cook a little longer.

    Q: How can I make the filling less sweet?
    A: Reduce the sugar by 1/4 cup or add a bit more lemon juice to balance sweetness.

    Q: Can I use a gluten-free pie crust?
    A: Yes. Use a gluten-free crust and follow the same baking time, but check the crust for doneness as recipes vary.

    Q: Do I need to peel cherries?
    A: No. Cherry skins are fine and help the filling hold together.

    Q: How do I stop the crust from burning?
    A: If the crust browns too fast, cover the edges with foil after 15–20 minutes.

    Conclusion

    This Easy Cherry Pie is a simple, tasty dessert you can make any day. For another simple guide and more tips, see Simple Cherry Pie – Wyse Guide.

  • Easy Irish Soda Bread Scones

    Easy Irish Soda Bread Scones

    introduction

    This simple recipe makes soft, slightly sweet Irish soda bread scones. They bake fast and taste warm and homey. If you like quick breads, you may also enjoy other easy recipes like these easy Mexican casserole ideas.

    why make this recipe

    • It is quick and uses no yeast.
    • The scones are tender and flaky.
    • You can change flavors with fruit, citrus, or spices.
    • Good for a fast breakfast or a snack.

    how to make Easy Irish Soda Bread Scones

    1. Preheat the oven and line a baking sheet with parchment.
    2. Mix dry ingredients in a bowl: flour, sugars, baking soda, baking powder, and salt.
    3. Cut cold butter into the dry mix until it looks like coarse crumbs.
    4. Whisk buttermilk, egg, and vanilla in a small bowl. Stir in zest.
    5. Pour wet into dry and fold gently. Add currants or raisins. Do not overmix.
    6. Shape dough on a floured surface into a round about 1 inch thick. Cut into 8 wedges.
    7. Place wedges on the baking sheet. Brush with egg wash and sprinkle turbinado sugar.
    8. Bake until golden and a toothpick comes out clean, about 15–20 minutes.
    9. Cool a little on a rack before serving.

    Ingredients :

    • 2 cups all-purpose flour, spooned and leveled
    • 2 teaspoon sugar
    • 2 teaspoon brown sugar
    • 1 teaspoon baking soda
    • 2 teaspoons baking powder
    • 1/2 teaspoon salt
    • 1 stick (8 tablespoons) cold unsalted butter, cut into small cubes
    • 1/2 cup buttermilk
    • 1 egg
    • 1 teaspoon vanilla
    • 1 to 2 teaspoons lemon or orange zest, depending on your taste preference
    • 2/3 to 3/4 cup currants or raisins
    • Egg wash (1 egg plus 1 tablespoon of water) Optional, and is for brushing scones before baking.
    • Turbinado sugar for sprinkling. Optional. You can substitute brown or white sugar.

    Directions :

    For the Irish soda bread scones

    • Preheat oven to 400°F (200°C). Line a baking sheet.
    • Combine dry ingredients in a bowl. Cut in butter until mixture is crumbly.
    • Mix wet ingredients and add to dry. Fold in currants or raisins and zest.
    • Form dough into a disk and cut into wedges. Brush with egg wash and sprinkle sugar.
    • Bake 15–20 minutes until golden. Cool slightly before serving.

    how to serve Easy Irish Soda Bread Scones

    Serve warm with butter, jam, or clotted cream. They pair well with tea or coffee. Split and toast lightly for a firmer texture.

    how to store Easy Irish Soda Bread Scones

    • Room temperature: Keep in an airtight container for up to 2 days.
    • Refrigerator: Up to 5 days in a sealed container.
    • Freezer: Wrap well and freeze up to 2 months. Thaw and warm in oven.

    tips to make Easy Irish Soda Bread Scones

    • Keep the butter cold for flakier scones.
    • Do not overwork the dough; mix until just combined.
    • Use fresh baking powder and baking soda for best rise.
    • Chill the shaped dough for 10 minutes if it gets too soft.
    • Measure flour by spooning and leveling for accuracy.

    variation (if any)

    • Savory: add 1 cup grated cheddar and 1 tablespoon chopped chives, omit sugar.
    • Citrus-free: skip zest and add 1/2 teaspoon cinnamon for warm flavor.
    • Fruit swap: use dried cranberries or chopped apricots instead of currants.

    FAQs

    Q: Can I make these with regular milk?
    A: For best texture, use buttermilk. You can use milk plus 1 teaspoon vinegar as a substitute.

    Q: Can I make smaller scones?
    A: Yes. Reduce baking time by a few minutes and watch until golden.

    Q: Why did my scones come out dense?
    A: Likely overmixing or old leavening. Mix gently and use fresh baking soda/powder.

    Q: Can I skip the egg wash?
    A: Yes. The egg wash adds shine and helps sugar stick, but scones bake fine without it.

    Conclusion

    For another version and extra tips, see this detailed recipe from Irish Soda Bread Scones – Strawberry Blondie Kitchen.

  • Best Baked Potato

    Best Baked Potato

    why make this recipe

    A baked potato is warm, simple, and filling. It needs little time and few ingredients. You can use it as a main dish or a side. It works any day of the week.

    introduction

    This Best Baked Potato recipe gives a crisp skin and soft inside. It uses russet potatoes, olive oil, salt, and simple toppings. If you want a different potato side, try these baked garlic parmesan potato wedges for a change.

    how to make Best Baked Potato

    Follow clear steps and use hot oven heat. Rub the potatoes with oil and salt. Bake them directly on the oven rack so the skin gets crispy. Open the top and fluff the inside before adding butter and toppings.

    Ingredients :

    Large russet potatoes, Olive oil, Salt, Pepper, Butter, Sour cream, Cheese, Chives

    Directions :

    1. Preheat the oven to 425°F (220°C).
    2. Scrub the potatoes clean and pat them dry.
    3. Pierce each potato several times with a fork.
    4. Rub the potatoes with olive oil and sprinkle with salt and pepper.
    5. Place the potatoes directly on the oven rack and bake for about 45-60 minutes, until the skin is crispy and a fork easily goes through the flesh.
    6. Remove from the oven and let cool for a few minutes.
    7. Cut the tops open and fluff the insides with a fork.
    8. Add butter, sour cream, cheese, chives, or any of your favorite toppings.
    9. Serve warm.

    how to serve Best Baked Potato

    Serve the potato hot. Cut it open and add butter first so it melts. Add sour cream, cheese, and chives. You can add bacon bits, steamed broccoli, or chili for a fuller meal. Serve with a salad or roast vegetables.

    how to store Best Baked Potato

    Cool any leftover potato to room temperature. Wrap in foil or store in an airtight container. Keep in the fridge up to 3–4 days. Reheat in the oven at 350°F (175°C) for 10–15 minutes or until hot. Avoid microwaving for long, it can make the skin soggy.

    tips to make Best Baked Potato

    • Choose russet potatoes for a fluffy inside and crisp skin.
    • Dry the potatoes well before oiling to get a better crust.
    • Pierce the skin so steam escapes and the potato cooks evenly.
    • Bake directly on the oven rack for the best crisp skin.
    • Use hot oven heat (425°F) for a shorter, crisper bake.
    • Let them rest a few minutes before cutting to keep the steam inside.

    variation (if any)

    • Stuffed potato: scoop a bit of the inside and mix with cheese and herbs, then put back and bake briefly.
    • Herb butter: mix butter with garlic and parsley and add on top.
    • Loaded: add chili, bacon, green onions, and extra cheese.
    • Sweet potato version: use sweet potatoes and adjust bake time to get a soft center.

    FAQs

    Q: How do I know the potato is done?
    A: A fork should slide into the potato easily and the skin should feel crisp.

    Q: Can I cook potatoes at a lower temperature?
    A: Yes, you can bake at 375°F but it will take longer and the skin may not be as crisp.

    Q: Can I microwave potatoes first then bake?
    A: Yes. Microwave for 5–8 minutes to speed cooking, then rub with oil and bake 10–15 minutes to crisp the skin.

    Q: Do I need to oil the potatoes?
    A: Oil helps the skin crisp and hold the salt. It is recommended.

    Q: How long do baked potatoes last in the fridge?
    A: Store up to 3–4 days in an airtight container.

    Conclusion

    For a step-by-step alternative idea and more tips, see this Perfect Baked Potato Recipe – Love and Lemons.

  • peanut-butter-cheesecake-truffles

    peanut-butter-cheesecake-truffles


      • 1 8oz of philly cream cheese
      • 1 regular size jar of your favorite Peanut Butter
      • 1 Bag of melting Chocolate/chocolate bark
      • 1/2 Cup of Graham Cracker Crumbs
      • 1/4 cup of powdered sugar
      • Nuts (optional)


    How to Make It

    • Take your cream cheese, powdered sugar and peanut butter in your mixer and whip together using your paddle attachment. (you can hand mix if you would prefer) until fully incorporated.
    • Once combined, use your hands to create little balls, about an inch/inch and a half each
    • Roll each ball in the Graham Cracker Crumbs, then press them into each ball with your fingers (you dont want loose crumbs) .
    • Place each of the balls onto a baking sheet lined with parchment paper.
    • Freeze for 1-2 hours (or until solid, if you can wait that long).
    • Place the melting chocolate or bark in a bowl and microwave for 90 seconds. Stir and, if needed, heat an additional 15 seconds until it’s smooth and creamy. watch it closely, keep stopping to stir , it burns easily if you use this way! I recommend using a double boiler, easier and you always get perfect melting chocolate.
    • Using a fork, dip the balls into the melted chocolate. Tap your fork on the side of your bowl to remove the excess.
    • Place back on your parchment lined sheet
    • Refrigerate until it’s time to serve.

  • BAKED GARLIC PARMESAN POTATO WEDGES

    BAKED GARLIC PARMESAN POTATO WEDGES

      • 3-4 large russet potatoes, sliced into wedges
      • 4 tablespoons olive oil
      • 2 teaspoons salt
      • 2 teaspoons garlic powder
      • 2 teaspoons Italian seasoning
      • ½ cup shredded parmesan cheese
      • optional: fresh parsley (or cilantro), ranch or blue cheese dressing for dipping

    How to Make It

    • Preheat oven to 375. Lightly grease a large baking sheet and set aside.
    • Place potato wedges in a large bowl. Drizzle with olive oil and toss to coat. In a small bowl whisk together salt, garlic powder, and Italian seasoning. Sprinkle potato wedges with the shredded cheese, tossing to coat, then sprinkle with the seasoning mixture.
    • Place potato wedges on prepared baking sheet in a single layer with skin-sides-down. Bake for 25-35 minutes until potatoes are fork-tender and golden. Sprinkle with freshly chopped parsley and dressing for dipping.

  • gingerbread-cake-with-cinnamon-molasses-frosting

    gingerbread-cake-with-cinnamon-molasses-frosting


    • 1 1/2 cup all purpose flour
    • 1 tsp baking soda
    • 1 Tbs ground ginger
    • 1 tsp cinnamon
    • 1 tsp pumpkin pie spice
    • 1/2 cup butter cold and cut into small pieces
    • 1/2 cup molasses
    • 1/2 cup corn syrup
    • 1/2 cup packed brown sugar
    • 9 oz milk yes, 9 oz
    • 1 egg

    For the Frosting

    • 4 oz cream cheese
    • 1/4 cup butter softened
    • 1/2 tsp vanilla
    • 1 1/2 cup powdered sugar
    • 3 tsp molasses
    • 1/4 tsp cinnamon

    How to Make It

    • Preheat oven to 350° and butter a 9 x 5 baking pan. Line with parchment paper after buttering.
    • In a medium mixing bowl, whisk flour, baking soda, ginger, cinnamon, pumpkin pie spice together. Set aside.
    • In a small saucepan, heat milk and brown sugar together just until sugar is melted and is lukewarm.
    • With another small saucepan, heat molasses and corn syrup until lukewarm as well.
    • While both pans are cooling down a bit, cut cold butter into small pieces, add to flour mixture, and use pasty blender until mixture is fine crumbles.
    • Once both pans have cooled to luke warm, add milk mixture to flour mixture, stir until blended then add molasses mixture. Stir.
    • Add egg and whisk until well Incorporated.
    • Pour into prepared baking dish and bake for 45 minutes or until toothpick comes out clean.
    • Let cool completely in baking pan.
    • Once cooled, remove from pan and wrap in foil for one day so the top will get sticky.
    • Store in an airtight container.

    For the FrostingIn a medium mixing bowl, beat cream cheese and butter together until creamy.

    • Add vanilla and cinnamon, mix well.
    • Slowly add powdered sugar and beat until creamy.
    • Mix molasses into mixture and blend well.
    • Refrigerate frosting until chilled then frost cake once cake has sat overnight.

  • texas-pecan-cobbler

    texas-pecan-cobbler


    • 8 eggs
    • 2 cups local honey
    • 1/2 cup flour
    • 1/4 cup Texas Pecan Oil
    • 1/2 teaspoon salt
    • 1 pound brown sugar
    • 1 (9-inch) unbaked pie crust
    • 1 pound pecan pieces

    How to Make It

    • 1. Preheat oven to 350 degrees
    • 2. In a large bowl, beat eggs well. Add honey; mix. In a separate bowl, combine flour and pecan oil. Add flour mixture to eggs. Stir in salt and brown sugar and beat by hand until well-mixed.
    • 3. Place crust in the bottom of a large, deep casserole or pie plate . Sprinkle the pecans evenly over the crust. Pour the filling mixture on top, being careful that the pecans stay evenly distributed.
    • 4. Bake for about 1 hour and 10 minutes (check after 50 minutes) or until a knife inserted in the center comes out clean. Serve warm or cold; top with vanilla ice cream if desired.

  • Sausage biscuit casserole

    Sausage biscuit casserole

    • 2 cans of biscuits
    • 1 lb pork sausage
    • 7 lg eggs
    • 1 cup of cheese (your choice )
    • (as needed) salt and pepper

    How to Make It

    • Pour egg mixture over biscuits and gentle combine until all biscuits are covered with egg mixture. Set aside for 20-30 minutes.
    • Cook sausage and crumble. While cooking sausage set oven to 400°
    • Mix sausage and cheese in biscuits mixture. Bake in 400° oven for 22 minutes.

  • meat-loaf-cupcakes-with-mashed-potatoes

    meat-loaf-cupcakes-with-mashed-potatoes

    • 1 pound extra lean ground beef
    • 1/2 pound bulk sweet Italian sausage
    • 1 cup Italian-seasoned breadcrumbs
    • 1 cup shredded carrots
    • 1 cup tomato pasta sauce
    • 1/2 cup water
    • 2 Eggs
    • 1/2 cup finely chopped onion
    • 1 teaspoon finely chopped fresh garlic
    • 1 teaspoon dried oregano leaves
    • 1/2 teaspoon salt
    • 1/2 teaspoon pepper
    • 6 (3/4-ounce) slices deli cheddar cheese

    Potato Topping:

    • 1 1/4 cups water
    • 6 (3/4-ounce) slices deli cheddar cheese, cut into quarters
    • 2 cups mashed potatoes whipped with butter and milk
    • 1/2 teaspoon salt and pepper to taste

    How to Make It

    • 1. Heat oven to 450°F. Spray 12 cup muffin pan with no-stick cooking spray. Place muffin pan onto 9 x 13 inch baking pan; set aside.
    • 2. Combine all meatloaf ingredients except cheese slices in large bowl; mix well. Stack 6 cheese slices. Cut into 4 even strips; then cut across into thirds to create 12 small square stacks of cheese.
    • 3. Shape about 1/3 cupfuls meatloaf mixture into 12 (2 1/2-inch) balls. Press 1 stack cheese into center of each ball, covering evenly with meat mixture so cheese is in center. Place stuffed meatloaf mixture into muffin cups. Bake 20-25 minutes or until internal temperature is at least 165°F and meat is no longer pink.
    • 4. Meanwhile, combine left over mashed potatoes and 6 cheese quarters and cook over medium-high heat until cheese is melted. Top each cupcake with about 3 tablespoons potato mixture over each meatloaf; sprinkle with paprika, if desired.