Category: college cooking

  • 7 Simple OneTrayDinner Ideas for Busy Weeknights

    7 Simple OneTrayDinner Ideas for Busy Weeknights

    OneTrayDinner nights basically saved my sanity the first time my schedule got packed with late meetings, laundry piles, and that classic question, “So what are we eating?” I used to overthink dinner like it had to be a whole production. Now I just want something warm, filling, and low effort with minimal cleanup. If you are also trying to feed yourself (and maybe a couple of other hungry humans) without living in the kitchen, you are in the right place. Below are my go to ideas that feel doable even on the busiest weeknights.
    7 Simple OneTrayDinner Ideas for Busy Weeknights

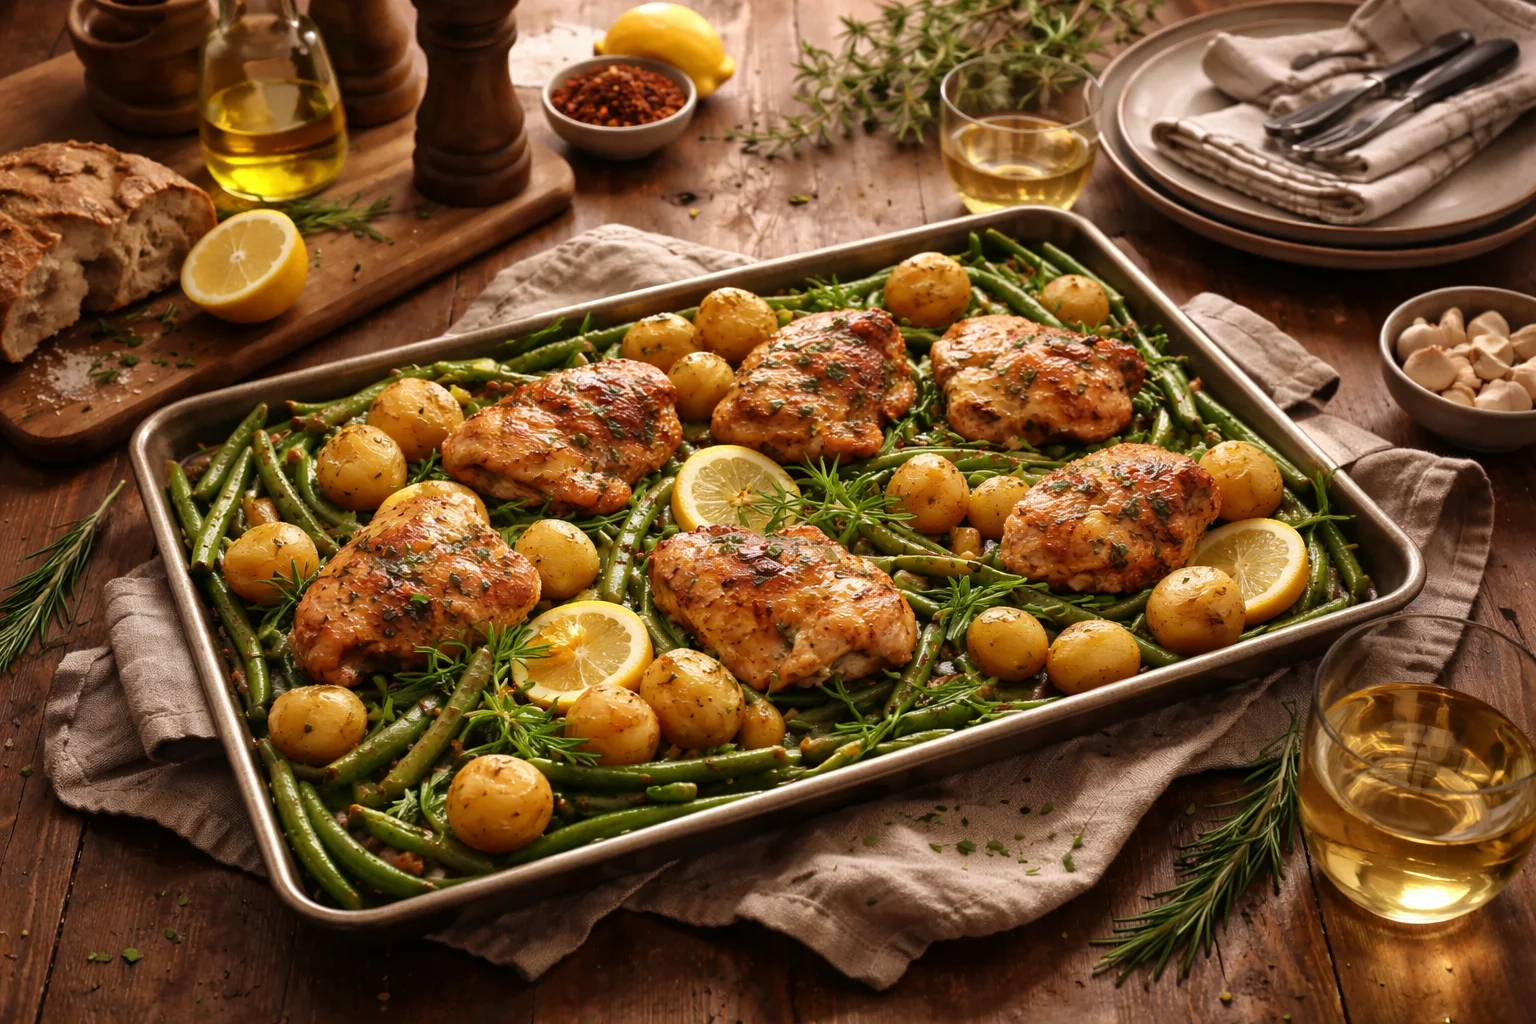
    What Makes a Great One-Tray Dinner Recipe?

    For me, a good OneTrayDinner has three things: it tastes like a real meal, it does not require fancy steps, and it comes out of the oven with zero stress. The magic is that everything cooks together, so flavors mingle and the tray does a lot of the work for you.

    Here is my little mental checklist when I am picking or building one:

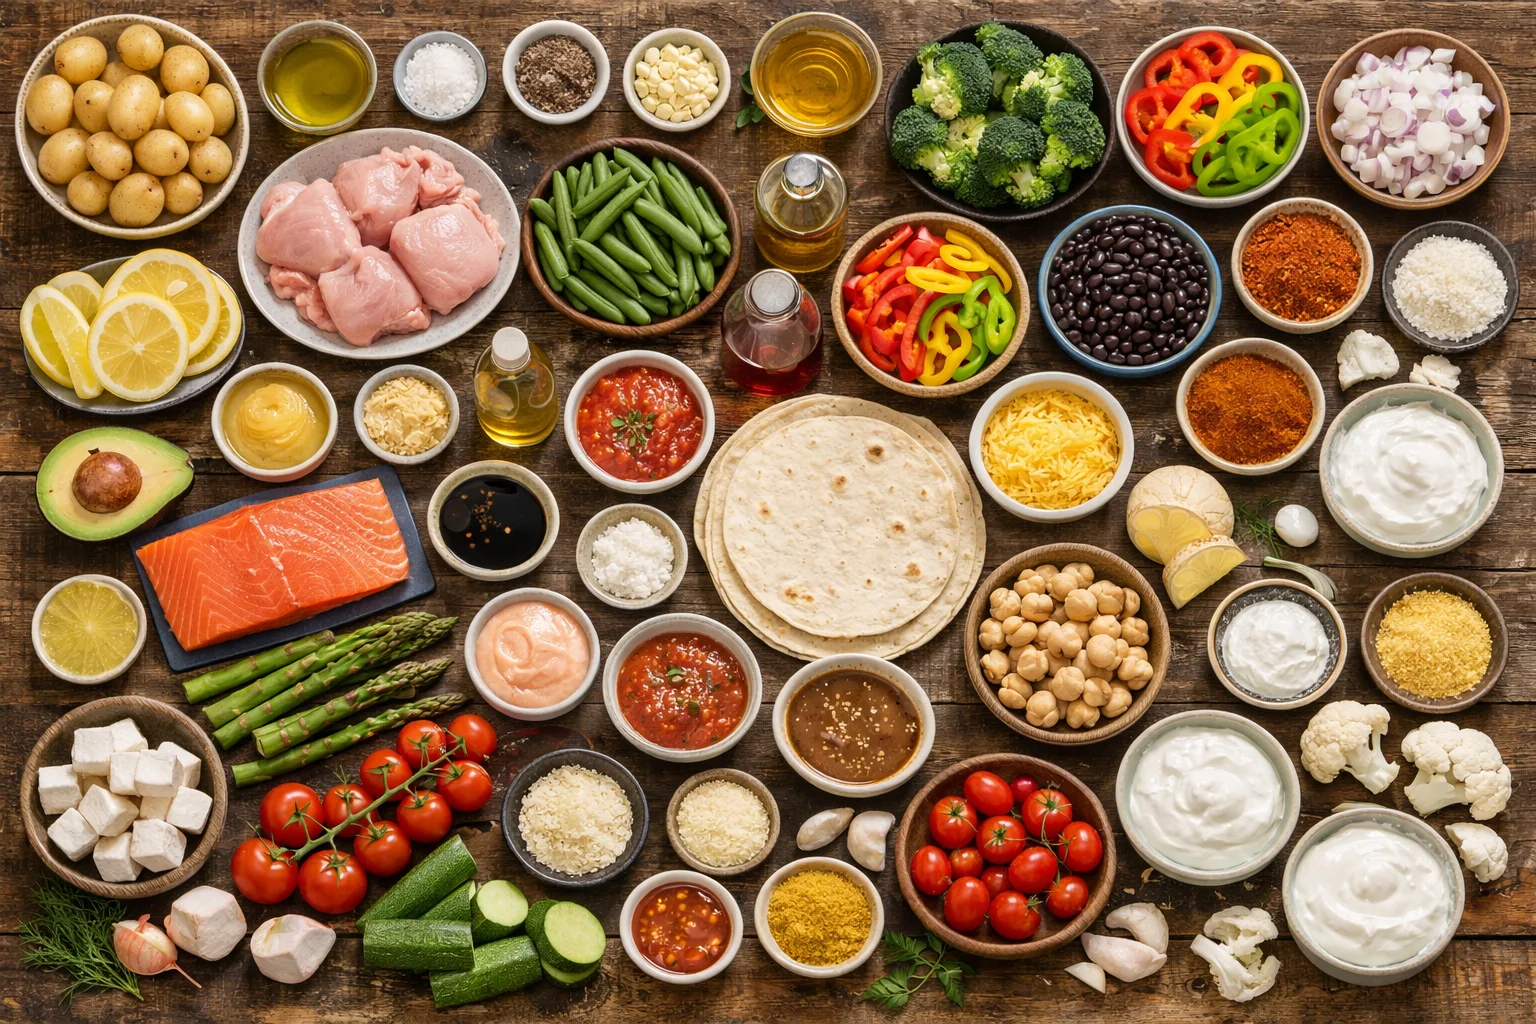
    • One protein (tofu, chicken, sausage, chickpeas, salmon)
    • Two to three vegetables (whatever is in the fridge)
    • One bold sauce or seasoning (pesto, taco seasoning, soy sauce mix, lemon and garlic)
    • One carb add on (bread, rice, tortillas, couscous, or just extra veggies)

    Now for the fun part. Here are my 7 simple tray ideas that I actually make on repeat:

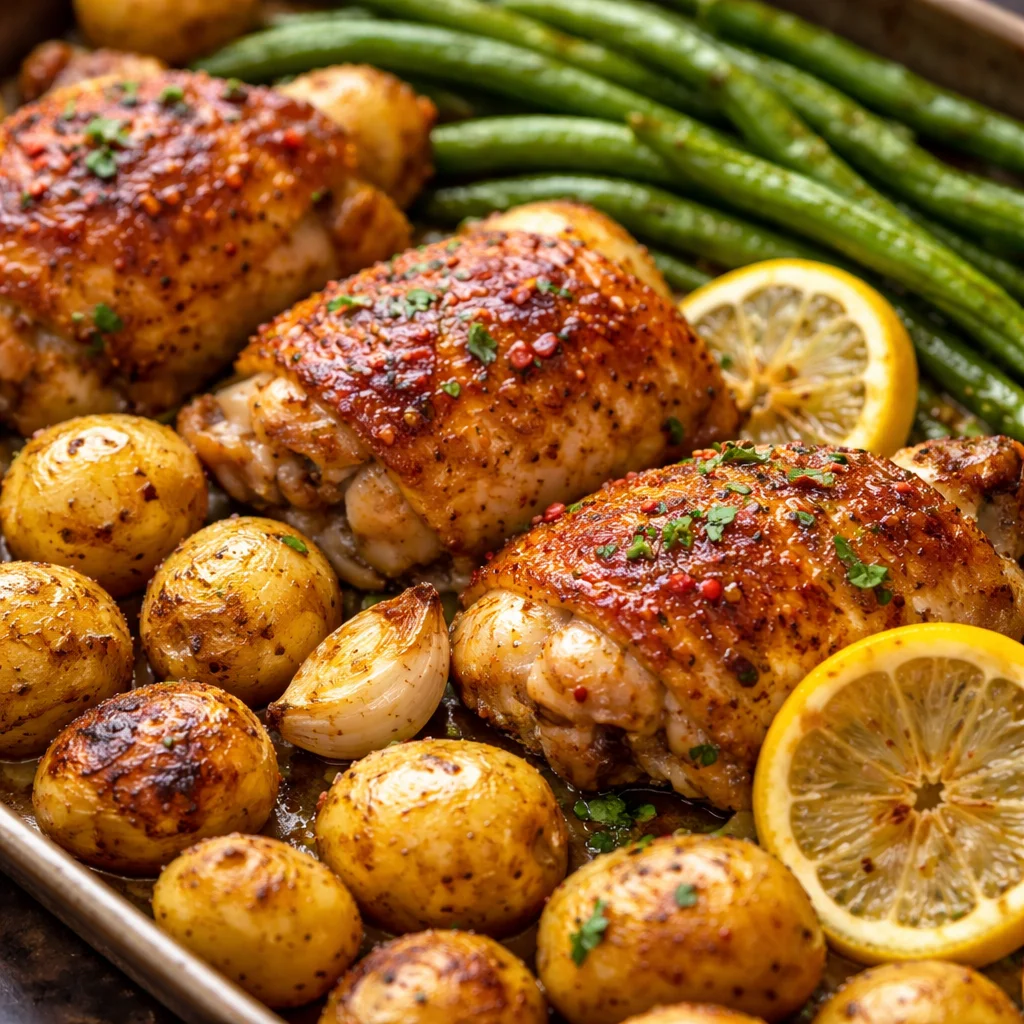
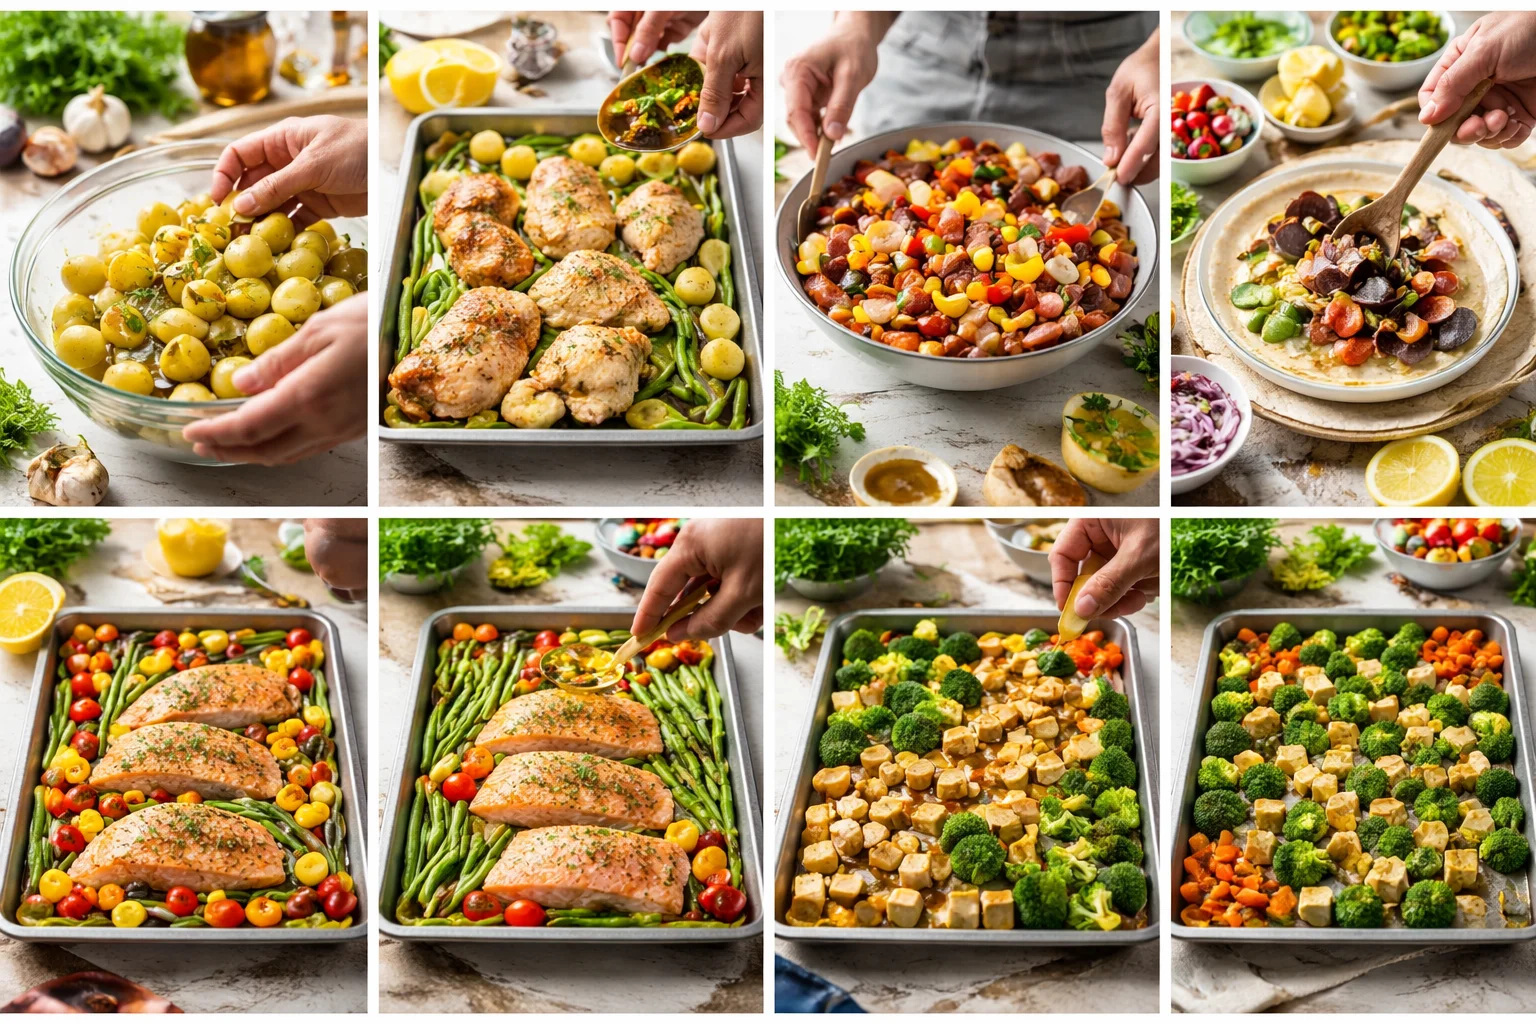
    1) Lemon garlic chicken with potatoes and green beans
    Toss chopped baby potatoes with olive oil, salt, pepper, and minced garlic. Roast 15 minutes, then add chicken thighs and green beans with lemon slices. It smells like you tried harder than you did.

    2) Honey mustard sausage and veggies
    Slice smoked sausage, toss with broccoli, bell peppers, and onions. Mix a quick sauce with honey, mustard, and a splash of vinegar. This one is sweet and tangy and disappears fast.

    3) Taco tray with peppers and black beans
    Toss sliced peppers, onions, and drained black beans with taco seasoning and oil. Roast, then stuff into tortillas. Add shredded cheese if you want, or keep it simple with salsa and avocado.

    4) Salmon with asparagus and cherry tomatoes
    Salmon goes in the middle, asparagus and tomatoes around it. I do olive oil, salt, pepper, and a quick squeeze of lemon. If you have dill, even better.

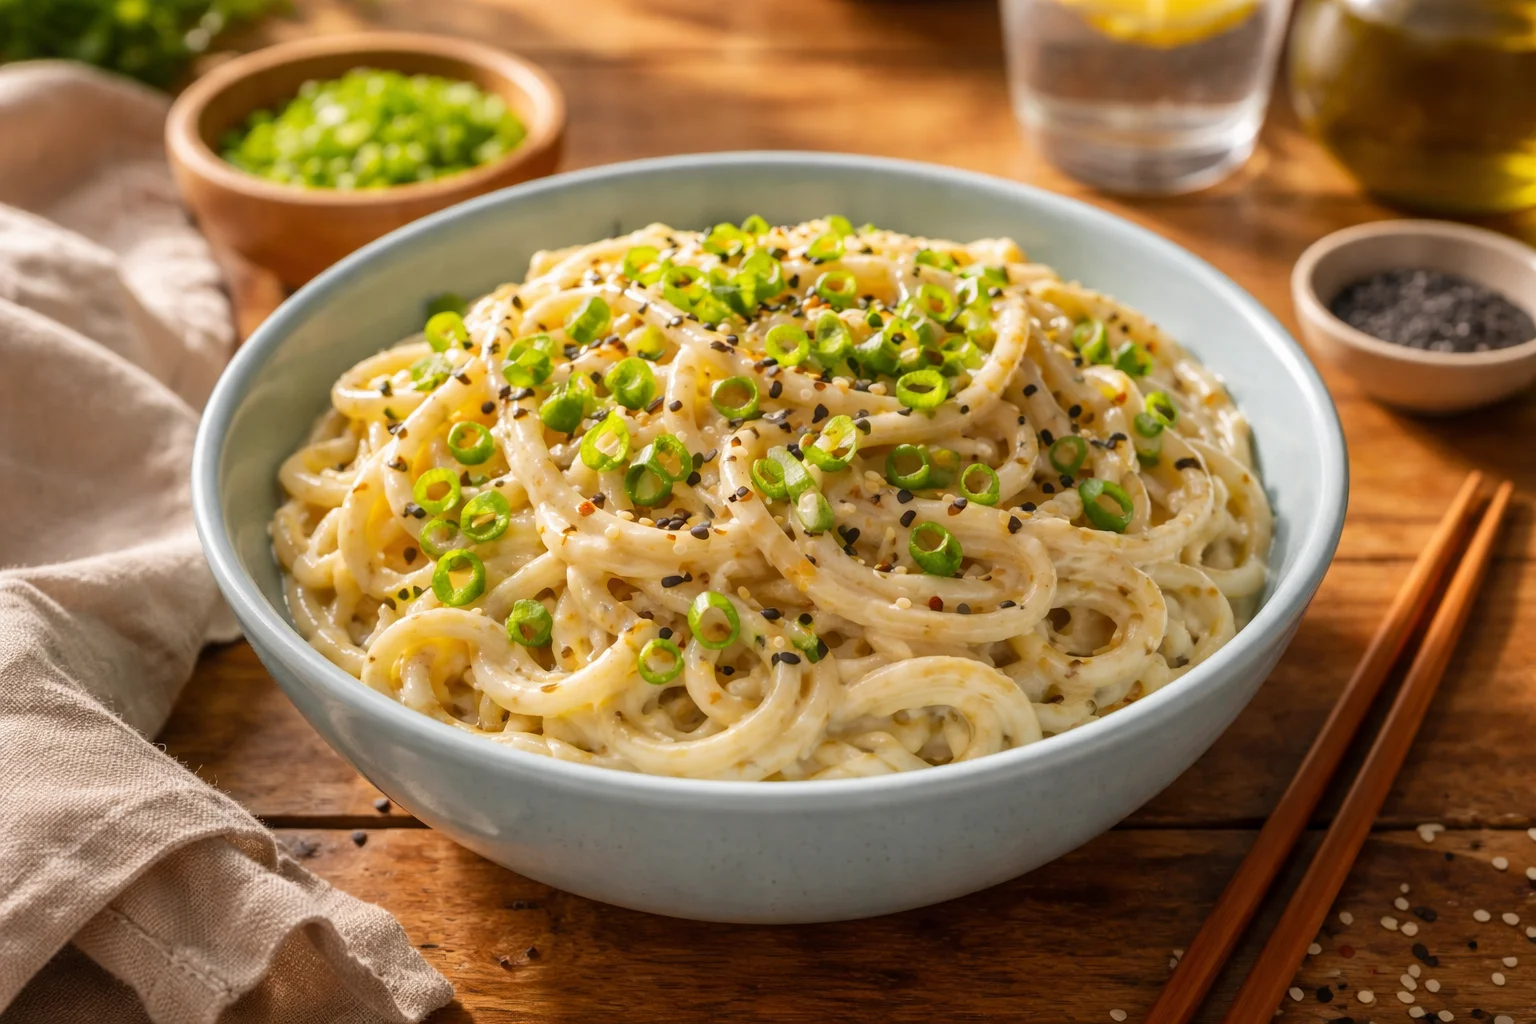
    5) Crispy tofu with broccoli and carrots
    This is my favorite when I want something lighter but still satisfying. Press tofu quickly with paper towels, cube it, and toss with soy sauce, a little oil, and cornstarch. Roast with broccoli and sliced carrots. Add a drizzle of spicy mayo or sesame sauce after.

    6) Sheet pan gnocchi with zucchini and tomatoes
    No boiling. Just toss shelf stable gnocchi with zucchini chunks, cherry tomatoes, olive oil, garlic powder, and parmesan. Roast until gnocchi gets chewy and a little crisp. It is dangerously snackable.

    7) Chickpea curry tray (yes, really)
    This is more of a roasted spiced chickpea and veggie situation that you serve over rice. Toss chickpeas, cauliflower, and onions with curry powder, oil, and salt. Roast, then finish with a spoon of yogurt or coconut yogurt and a squeeze of lime.

    Also, if you like having a few reliable sides ready to go, I keep a simple guide bookmarked for weeknight staples. Here is one I reference when I need ideas: quick weeknight side ideas.

    7 Simple OneTrayDinner Ideas for Busy Weeknights

    Benefits of Cooking with Tofu

    I know tofu can be a “maybe” food for some people, but hear me out. Once you find your method, it becomes one of the easiest proteins for a OneTrayDinner because it is hands off and it soaks up flavor like a sponge.

    Here is why I keep it in my fridge:

    It is fast. You do not need to marinate it for hours. Even a quick toss in soy sauce and garlic helps a lot.

    It is budget friendly. One block can feed a couple people when paired with veggies and rice.

    It plays well with big flavors. Think teriyaki, peanut sauce, barbecue, or even simple lemon pepper.

    If you are new to it, my best tip is this: dry it off really well and do not crowd the tray. Space equals crisp edges.

    “I tried your crispy tofu tray idea and my partner, who swore they hated tofu, went back for seconds. It was the first time tofu didn’t taste bland to us.”

    And if you want another tofu based dinner idea to rotate in, I keep one of my favorites here: easy tofu dinner recipe.

    OneTrayDinner,

    Best Vegetables for One-Tray Meals

    The best vegetables are the ones that roast nicely and do not turn sad and soggy. I usually aim for a mix of something hearty plus something quick cooking.

    These are my personal MVPs:

    Hearty veggies (great for longer roasting): potatoes, sweet potatoes, carrots, cauliflower, broccoli, Brussels sprouts, butternut squash.

    Quick veggies (add later or cut bigger): zucchini, bell peppers, asparagus, green beans, cherry tomatoes, mushrooms, onions.

    Two quick tricks that make a big difference:

    1) Cut things to similar sizes so dinner finishes together.

    2) If you are mixing potatoes with something delicate like asparagus, give the potatoes a head start, then add the asparagus later. It is not fussy, it is just smart.

    And please do not forget seasoning. Even just olive oil, salt, pepper, and garlic turns basic vegetables into something you actually look forward to.

    Tips for Meal Prep and Cooking Efficiently

    Busy weeknights do not need gourmet plans. They need a system you can repeat when you are tired. Here is what works in my kitchen without making me feel like I live in a meal prep factory.

    My weeknight tray system

    I keep it simple:

    Pick one sauce for the week (like pesto, teriyaki, or honey mustard) and use it in two different meals.

    Chop once, use twice. If I chop onions or bell peppers, I chop extra and store them in a container.

    Line the pan. Parchment paper or foil makes cleanup almost too easy.

    Use the oven time. While it roasts, I clean for 5 minutes or set the table. Future me is always grateful.

    If your family likes different spice levels, keep the tray mild and add heat at the end with hot sauce, chili crisp, or jalapenos.

    Creative Variations on One-Tray Dinner Recipes

    This is where OneTrayDinner cooking stays fun. Once you get the basic formula, you can swap flavors based on what you crave or what is on sale.

    Flavor ideas that change everything

    Try one of these quick combos:

    Mediterranean: chicken or chickpeas, zucchini, tomatoes, red onion, lemon, oregano, feta on top after roasting.

    BBQ: tofu or chicken, sweet potatoes, corn, red onion, barbecue sauce brushed on near the end.

    Asian inspired: broccoli, carrots, tofu, a simple sauce with soy sauce, sesame oil, and a little honey or brown sugar.

    Italian: sausage, peppers, onions, cherry tomatoes, plus a sprinkle of parmesan.

    Breakfast for dinner: chopped potatoes, onions, peppers, and sausage. Roast, then make little spaces and crack eggs in for the last few minutes.

    The biggest win is that you can keep the method the same and just change the vibe. Same tray, totally different dinner.

    Common Questions

    Can I make these OneTrayDinner ideas without meat?

    Absolutely. Tofu, chickpeas, and veggie sausages all work really well. Just make sure you season boldly and do not overcrowd the pan.

    What temperature should I roast most one tray meals at?

    I usually do 425°F. It helps vegetables caramelize and it gives tofu and gnocchi better texture.

    How do I stop everything from getting soggy?

    Use a big enough sheet pan so ingredients are in a single layer. Too much piled together makes steam, not roast.

    Can I prep a tray dinner earlier in the day?

    Yes. Chop veggies and mix your sauce ahead. Keep wetter items separate until you are ready to cook, then toss and bake.

    What is the best way to store leftovers?

    Cool them down, then store in airtight containers. Most leftovers keep well for 3 to 4 days, and they reheat nicely in the oven or air fryer.

    A Cozy Wrap Up for Your Next Weeknight

    If you take anything from this post, let it be this: OneTrayDinner cooking is not about perfection, it is about getting a real meal on the table with less stress and fewer dishes. Pick one protein, a couple veggies, and a sauce you love, then let the oven do the heavy lifting. If you want more inspiration, I genuinely like this One Tray Dinner Bake – Vegan Recipe – VegKit.com for a plant based option, and this round up of Useful one-tray dinner ideas – by Heather Taylor – The Frazzled Cook is packed with practical weeknight prompts. Now pick one tray idea for tomorrow night, put parchment on that pan, and make future you very, very happy.

  • 5 Irresistible Ways to Enjoy Kimchi Butter Pasta at Home

    5 Irresistible Ways to Enjoy Kimchi Butter Pasta at Home

    Kimchi Butter Pasta is my go to dinner for those nights when I want something cozy, spicy, and a little bit indulgent without doing a whole sink full of dishes. You know the vibe: you are tired, you are hungry, and you still want food that feels exciting. This is the kind of bowl that smells amazing the second the kimchi hits the pan. It is fast enough for a weeknight, but it tastes like you actually planned your life. And once you learn a few small tricks, you can make it your own in a bunch of ways.

    5 Irresistible Ways to Enjoy Kimchi Butter Pasta at Home

    Understanding the Flavor Profile of Buttery Kimchi Noodles

    The reason Kimchi Butter Pasta works so well is that it hits all the big cravings at once. You get buttery richness, tangy funk from kimchi, and a gentle heat that wakes everything up. It is bold, but it is not complicated.

    Here is what I taste in every good bowl:

    • Butter: round and comforting, it smooths out the sharp edges of the kimchi.
    • Kimchi: sour, salty, and a little fermented in the best way.
    • Kimchi brine: this is the secret sauce. A spoon or two makes everything taste more “together.”
    • Garlic: not optional in my kitchen. It makes the whole thing smell like dinner is happening.
    • A touch of sugar or honey: tiny amount, big payoff. It helps the kimchi taste more rounded.

    One personal note: if you are new to kimchi, start with a smaller amount and build from there. Some brands are punchier than others. I learned that the hard way after buying a super funky jar and using it like it was mild salsa. Still ate it, just needed extra butter and a fried egg to calm it down.

    If you love the cozy pasta vibe in general, you might also like this garlic shrimp pasta for another quick dinner that feels restaurant worthy at home.

    Kimchi Butter Pasta

    Cooking Methods for Preparing Noodles

    Let us talk noodles, because the way you cook them changes everything. You do not need fancy techniques, but you do need one habit: save some noodle water. That starchy water helps the butter and kimchi turn into an actual sauce instead of an oily puddle.

    Here are my favorite methods depending on what I have in the pantry:

    Method 1: Classic pasta, fast and familiar

    Spaghetti, linguine, or even short shapes like penne all work. Boil in salted water, pull it about 1 minute before you think it is done, then finish it in the pan with butter, kimchi, and a splash of that noodle water. This is where it becomes glossy and clingy in the best way.

    Method 2: Udon for chewy comfort

    If you have vacuum packed udon, this turns into buttery kimchi noodles that feel extra cozy. Udon is thicker and chewier, so it holds onto the sauce really well. I rinse it quickly after heating (just to remove extra starch), then toss in the pan like pasta.

    Method 3: One pan shortcut when you are tired

    If you hate washing pots, cook the kimchi and butter first, then add water or broth and simmer the noodles right in the same pan. You have to stir more, but it is worth it when you want minimal cleanup. Keep the heat gentle so the noodles cook evenly.

    My small rule: do not overcook the noodles. This dish is saucy and rich, so mushy noodles make it feel heavy fast.

    Kimchi Butter Pasta

    Best Pantry Ingredients for Kimchi Dishes

    This is the outline where I get really practical, because Kimchi Butter Pasta is basically built for pantry cooking. You can make it feel “special” without running to the store, as long as you keep a few helpful ingredients around.

    What I like to stock for easy kimchi meals:

    • Kimchi: obviously. Look for a jar that tastes good on its own. If you would not snack on it, you will not love it in pasta.
    • Butter: salted or unsalted both work. If salted, taste before adding extra soy sauce.
    • Garlic: fresh is best, but garlic paste works in a pinch.
    • Soy sauce: for savory depth. Start small.
    • Gochujang (optional): adds a deeper, slightly sweet heat.
    • Sesame oil: just a few drops at the end makes it smell amazing.
    • Eggs: fried egg on top makes it feel like a full meal.
    • Cheese (optional): parmesan for salty bite, or mozzarella for melt. Yes, it sounds odd. Yes, it works.

    Also, if you are the kind of person who likes a little treat after spicy dinner, I have to point you to these peanut butter cheesecake truffles. I make them when I want something sweet without baking.

    “I tried your Kimchi Butter Pasta idea with udon and a fried egg, and it was honestly better than takeout. The brine tip was everything.”

    Tips for Balancing Spices

    This is where a lot of people get nervous, but it is actually easy. The goal is not to make it unbearably hot. The goal is to make it flavorful and balanced so you want another bite.

    My go to balancing moves:

    Too spicy? Add more butter, a splash of cream, or even a little cream cheese. A fried egg also calms heat.

    Too sour? Add a tiny pinch of sugar or a drizzle of honey. You can also cook the kimchi a bit longer to mellow it out.

    Too salty? Skip soy sauce and use unsalted butter next time. Add more noodles and a splash of plain noodle water to spread the seasoning out.

    Tastes flat? Add garlic, a little more kimchi brine, or a small squeeze of lime. A sprinkle of sesame seeds helps too.

    One extra tip: cook the kimchi in butter for a couple of minutes before adding noodles. That quick saute takes the raw edge off and brings out a slightly sweet, almost caramel vibe.

    Variations and Customizations for Buttery Kimchi Noodles

    This is the fun part. Once you have the basic idea down, you can remix it in ways that fit your mood and what is in your fridge. I make some version of Kimchi Butter Pasta all the time, and I rarely do it exactly the same way twice.

    Variation 1: The creamy comfort bowl

    Add a splash of cream or a spoon of cream cheese. It turns the sauce silky and a little less sharp. This is my choice when I want something extra cozy.

    Variation 2: The seafood upgrade

    Top with shrimp, scallops, or even canned tuna in a pinch. If you want a guide for shrimp timing and flavor, this garlic shrimp pasta is a handy reference and the method transfers well.

    Variation 3: The crispy topping version

    Toast panko in butter until golden, then sprinkle it over the noodles. It adds crunch and makes the bowl feel fancy with almost no effort.

    Variation 4: The veggie loaded pantry dinner

    Add spinach, frozen peas, mushrooms, or shredded cabbage. Mushrooms are especially good because they soak up the buttery kimchi sauce.

    Variation 5: The late night egg situation

    Fried egg, soft scrambled egg, or even a jammy boiled egg. The yolk mixes into the sauce and it is just ridiculously good.

    However you do it, remember the core: buttery base, kimchi for punch, and just enough noodle water to pull it all together. That is the heartbeat of buttery kimchi noodles at home.

    Common Questions

    1) What type of kimchi is best for Kimchi Butter Pasta?
    I like napa cabbage kimchi that is medium spicy and not overly fishy. If the jar tastes good straight from the fridge, it will taste good in the pan.

    2) Can I make it without gochujang?
    Yes. Kimchi plus butter already brings plenty of flavor. If you want more depth, use a tiny bit of soy sauce or a pinch of sugar instead.

    3) How do I keep the sauce from getting greasy?
    Use reserved noodle water and add it a little at a time while tossing. That starchy water helps the butter turn into a smooth sauce.

    4) Is Kimchi Butter Pasta good as leftovers?
    It is best fresh, but leftovers are still tasty. Reheat gently with a splash of water and a small knob of butter to bring the sauce back.

    5) Can I make it vegetarian?
    Absolutely, just check that your kimchi is vegetarian since some have fish sauce or shrimp paste. Then load up on mushrooms or tofu for protein.

    A cozy bowl you will want on repeat

    If you take one thing from this post, let it be this: Kimchi Butter Pasta is flexible, fast, and way more comforting than it has any right to be. Keep kimchi and butter on hand, save your noodle water, and you can build a dinner that tastes bold without being hard. If you want more inspiration, I loved reading Caramelized Kimchi Pasta – The World According to Tausch for that deeper cooked kimchi flavor idea, and this Bon Appetit piece, These Buttery Kimchi Noodles Are My Desert-Island Pantry Dinner, is such a good reminder that pantry meals can still feel exciting. Try it once, tweak it to your taste, and I swear you will start craving that buttery, spicy tang on random weekdays like I do.

  • Weeknight Baked Potatoes

    Weeknight Baked Potatoes

    why make this recipe

    This recipe gives you soft, caramelized potato halves in under an hour. It uses a little butter and oil and simple spices you likely have at home. It is fast, easy, and good for weeknights when you want a warm side with little work.

    introduction

    Weeknight Baked Potatoes cook fast and taste rich without much fuss. They crisp on the cut side and stay tender inside. If you want a similar easy side, try the baked garlic parmesan potato wedges recipe at baked garlic parmesan potato wedges for another simple idea.

    how to make Weeknight Baked Potatoes

    You prepare the potatoes, place them cut side down on butter pats, season, and bake at a high temperature. Halfway through baking, brush them with the melted butter in the pan. Bake until fork tender and caramelized on the cut side.

    Ingredients :

    • 3 Medium sized Russet Potatoes, cut in half lengthwise
    • 4 tablespoons of butter, cut into about 1/2 inch slices, you need two pats for each potato, 1 tablespoon of olive oil
    • 2 to 3 teaspoons of coarse salt *or to taste
    • 1 teaspoon of black pepper
    • 1/2 teaspoon of paprika
    • 1 teaspoon of garlic powder
    • 1 teaspoon onion powder
    • 1 teaspoon of lemon pepper *optional
    • 1 teaspoon of dried parsley
    • Weeknight Baked Potatoes

    Directions :

    1. Scrub your potatoes and dry them with paper towels, then cut them in half lengthwise.
    2. Prepare a baking sheet with foil or parchment paper, and place your butter pats together in groups of two, so that each potato half will rest on two pats of butter, like little butter legs.
    3. Season each butter pat with salt, pepper, garlic and onion powder, paprika, and lemon pepper.
    4. Rub the cut potatoes all over with the olive oil and place cut side down on the pats of butter. Each potato should have 2 pats under it.
    5. Salt and pepper the skin. You can use the other seasonings on here as well.
    6. Heat your oven to 425 degrees and bake the potatoes on the top rack for 25 to 35 minutes. Halfway through baking, I take them out and brush them all over with the melted butter from the pan. *every oven is different, cooking times will vary, the potatoes should be fork tender when done and caramelized on the cut side.
    7. Sprinkle with a little more salt and the dried parsley.

    how to serve Weeknight Baked Potatoes

    Serve hot, cut side up or down. Top with sour cream, shredded cheese, chopped chives, bacon bits, or steamed vegetables. They make a good side for chicken, steak, or a simple salad.

    how to store Weeknight Baked Potatoes

    Cool to room temperature, then store in an airtight container in the fridge for up to 3 days. Reheat in a 375°F oven for 10–15 minutes or until hot. You can also reheat in a skillet over medium heat to keep a crisp edge.

    tips to make Weeknight Baked Potatoes

    • Use similar-sized russets so they cook evenly.
    • Pat the potatoes dry so the cut side caramelizes.
    • Place the potatoes cut side down on the butter pats to get a rich, browned surface.
    • Brush with melted butter once during baking for extra flavor.
    • Check with a fork for doneness; times vary by oven.

    variation (if any)

    • Swap russets for Yukon gold for a creamier texture.
    • Add grated Parmesan on top before the last 5 minutes of baking for a cheesy crust.
    • Use smoked paprika or cayenne for more heat.
    • Make them vegetarian by omitting bacon-style toppings.

    FAQs

    Q: Can I make these ahead and reheat?
    A: Yes. Bake, cool, and store in the fridge. Reheat in the oven to keep the cut side caramelized.

    Q: Can I use foil instead of parchment?
    A: Yes. Foil works fine and helps catch melted butter for brushing.

    Q: What if my potatoes are not fork tender at 35 minutes?
    A: Bake longer in 5-minute increments until fork tender. Cover loosely with foil if the tops brown too much.

    Q: Can I cut potatoes smaller to speed cooking?
    A: Yes. Smaller pieces will cook faster. Reduce baking time and watch for fork tenderness.

    Conclusion

    For the original recipe and extra tips, visit Weeknight Baked Potatoes – The Tipsy Housewife.

  • peanut-butter-cheesecake-truffles

    peanut-butter-cheesecake-truffles


      • 1 8oz of philly cream cheese
      • 1 regular size jar of your favorite Peanut Butter
      • 1 Bag of melting Chocolate/chocolate bark
      • 1/2 Cup of Graham Cracker Crumbs
      • 1/4 cup of powdered sugar
      • Nuts (optional)


    How to Make It

    • Take your cream cheese, powdered sugar and peanut butter in your mixer and whip together using your paddle attachment. (you can hand mix if you would prefer) until fully incorporated.
    • Once combined, use your hands to create little balls, about an inch/inch and a half each
    • Roll each ball in the Graham Cracker Crumbs, then press them into each ball with your fingers (you dont want loose crumbs) .
    • Place each of the balls onto a baking sheet lined with parchment paper.
    • Freeze for 1-2 hours (or until solid, if you can wait that long).
    • Place the melting chocolate or bark in a bowl and microwave for 90 seconds. Stir and, if needed, heat an additional 15 seconds until it’s smooth and creamy. watch it closely, keep stopping to stir , it burns easily if you use this way! I recommend using a double boiler, easier and you always get perfect melting chocolate.
    • Using a fork, dip the balls into the melted chocolate. Tap your fork on the side of your bowl to remove the excess.
    • Place back on your parchment lined sheet
    • Refrigerate until it’s time to serve.

  • strawberry-cheesecake-chimichangas

    strawberry-cheesecake-chimichangas

    For chimichangas:

      • 6 (8-inch) soft flour tortillas
      • 8 oz cream cheese ( room temperature)
      • 2 Tablespoon sour cream
      • 1 Tablespoon sugar
      • 1 teaspoon vanilla extract
      • 3/4 cups sliced strawberries
      • Vegetable oil-for frying

    For coating:

      • 1 Tablespoon cinnamon
      • 1/3 cup sugar
      • For serving:
      • 1 cup sliced strawberries

    How to Make It

    • Beat cream cheese , sour cream, 1 tablespoon sugar and vanilla extract .
    • Fold in 3/4 cup of sliced fresh strawberries.
    • Divide the mixture evenly between 6 tortillas. Slather the filling in the lower third of each tortilla, fold the two sides of each tortilla toward the center and then roll the tortilla up like a burrito (secure it with a toothpicks!) .
    • Combine 1/3 cup sugar with 1 tablespoon cinnamon in a shallow bowl and set aside.
    • Line a large plate with paper towels.
    • In about 5 inch deep saucepan place about 2 -2 1/2 inch vegetable oil for frying and heat it over medium-high heat until it reaches 360ºF.
    • Fry the chimichangas until golden brown and crispy, about 2-3 minutes and flip them as needed (work in batches)
    • Transfer the chimichangas to the paper towel on a plate to drain for a minute, then roll them in the cinnamon and sugar mixture.

  • BAKED GARLIC PARMESAN POTATO WEDGES

    BAKED GARLIC PARMESAN POTATO WEDGES

      • 3-4 large russet potatoes, sliced into wedges
      • 4 tablespoons olive oil
      • 2 teaspoons salt
      • 2 teaspoons garlic powder
      • 2 teaspoons Italian seasoning
      • ½ cup shredded parmesan cheese
      • optional: fresh parsley (or cilantro), ranch or blue cheese dressing for dipping

    How to Make It

    • Preheat oven to 375. Lightly grease a large baking sheet and set aside.
    • Place potato wedges in a large bowl. Drizzle with olive oil and toss to coat. In a small bowl whisk together salt, garlic powder, and Italian seasoning. Sprinkle potato wedges with the shredded cheese, tossing to coat, then sprinkle with the seasoning mixture.
    • Place potato wedges on prepared baking sheet in a single layer with skin-sides-down. Bake for 25-35 minutes until potatoes are fork-tender and golden. Sprinkle with freshly chopped parsley and dressing for dipping.

  • gingerbread-cake-with-cinnamon-molasses-frosting

    gingerbread-cake-with-cinnamon-molasses-frosting


    • 1 1/2 cup all purpose flour
    • 1 tsp baking soda
    • 1 Tbs ground ginger
    • 1 tsp cinnamon
    • 1 tsp pumpkin pie spice
    • 1/2 cup butter cold and cut into small pieces
    • 1/2 cup molasses
    • 1/2 cup corn syrup
    • 1/2 cup packed brown sugar
    • 9 oz milk yes, 9 oz
    • 1 egg

    For the Frosting

    • 4 oz cream cheese
    • 1/4 cup butter softened
    • 1/2 tsp vanilla
    • 1 1/2 cup powdered sugar
    • 3 tsp molasses
    • 1/4 tsp cinnamon

    How to Make It

    • Preheat oven to 350° and butter a 9 x 5 baking pan. Line with parchment paper after buttering.
    • In a medium mixing bowl, whisk flour, baking soda, ginger, cinnamon, pumpkin pie spice together. Set aside.
    • In a small saucepan, heat milk and brown sugar together just until sugar is melted and is lukewarm.
    • With another small saucepan, heat molasses and corn syrup until lukewarm as well.
    • While both pans are cooling down a bit, cut cold butter into small pieces, add to flour mixture, and use pasty blender until mixture is fine crumbles.
    • Once both pans have cooled to luke warm, add milk mixture to flour mixture, stir until blended then add molasses mixture. Stir.
    • Add egg and whisk until well Incorporated.
    • Pour into prepared baking dish and bake for 45 minutes or until toothpick comes out clean.
    • Let cool completely in baking pan.
    • Once cooled, remove from pan and wrap in foil for one day so the top will get sticky.
    • Store in an airtight container.

    For the FrostingIn a medium mixing bowl, beat cream cheese and butter together until creamy.

    • Add vanilla and cinnamon, mix well.
    • Slowly add powdered sugar and beat until creamy.
    • Mix molasses into mixture and blend well.
    • Refrigerate frosting until chilled then frost cake once cake has sat overnight.

  • texas-pecan-cobbler

    texas-pecan-cobbler


    • 8 eggs
    • 2 cups local honey
    • 1/2 cup flour
    • 1/4 cup Texas Pecan Oil
    • 1/2 teaspoon salt
    • 1 pound brown sugar
    • 1 (9-inch) unbaked pie crust
    • 1 pound pecan pieces

    How to Make It

    • 1. Preheat oven to 350 degrees
    • 2. In a large bowl, beat eggs well. Add honey; mix. In a separate bowl, combine flour and pecan oil. Add flour mixture to eggs. Stir in salt and brown sugar and beat by hand until well-mixed.
    • 3. Place crust in the bottom of a large, deep casserole or pie plate . Sprinkle the pecans evenly over the crust. Pour the filling mixture on top, being careful that the pecans stay evenly distributed.
    • 4. Bake for about 1 hour and 10 minutes (check after 50 minutes) or until a knife inserted in the center comes out clean. Serve warm or cold; top with vanilla ice cream if desired.

  • Sausage biscuit casserole

    Sausage biscuit casserole

    • 2 cans of biscuits
    • 1 lb pork sausage
    • 7 lg eggs
    • 1 cup of cheese (your choice )
    • (as needed) salt and pepper

    How to Make It

    • Pour egg mixture over biscuits and gentle combine until all biscuits are covered with egg mixture. Set aside for 20-30 minutes.
    • Cook sausage and crumble. While cooking sausage set oven to 400°
    • Mix sausage and cheese in biscuits mixture. Bake in 400° oven for 22 minutes.

  • meat-loaf-cupcakes-with-mashed-potatoes

    meat-loaf-cupcakes-with-mashed-potatoes

    • 1 pound extra lean ground beef
    • 1/2 pound bulk sweet Italian sausage
    • 1 cup Italian-seasoned breadcrumbs
    • 1 cup shredded carrots
    • 1 cup tomato pasta sauce
    • 1/2 cup water
    • 2 Eggs
    • 1/2 cup finely chopped onion
    • 1 teaspoon finely chopped fresh garlic
    • 1 teaspoon dried oregano leaves
    • 1/2 teaspoon salt
    • 1/2 teaspoon pepper
    • 6 (3/4-ounce) slices deli cheddar cheese

    Potato Topping:

    • 1 1/4 cups water
    • 6 (3/4-ounce) slices deli cheddar cheese, cut into quarters
    • 2 cups mashed potatoes whipped with butter and milk
    • 1/2 teaspoon salt and pepper to taste

    How to Make It

    • 1. Heat oven to 450°F. Spray 12 cup muffin pan with no-stick cooking spray. Place muffin pan onto 9 x 13 inch baking pan; set aside.
    • 2. Combine all meatloaf ingredients except cheese slices in large bowl; mix well. Stack 6 cheese slices. Cut into 4 even strips; then cut across into thirds to create 12 small square stacks of cheese.
    • 3. Shape about 1/3 cupfuls meatloaf mixture into 12 (2 1/2-inch) balls. Press 1 stack cheese into center of each ball, covering evenly with meat mixture so cheese is in center. Place stuffed meatloaf mixture into muffin cups. Bake 20-25 minutes or until internal temperature is at least 165°F and meat is no longer pink.
    • 4. Meanwhile, combine left over mashed potatoes and 6 cheese quarters and cook over medium-high heat until cheese is melted. Top each cupcake with about 3 tablespoons potato mixture over each meatloaf; sprinkle with paprika, if desired.