Category: Uncategorized

  • Savory One-Pan Dumpling Bake That’s Too Good to Share!

    Savory One-Pan Dumpling Bake That’s Too Good to Share!

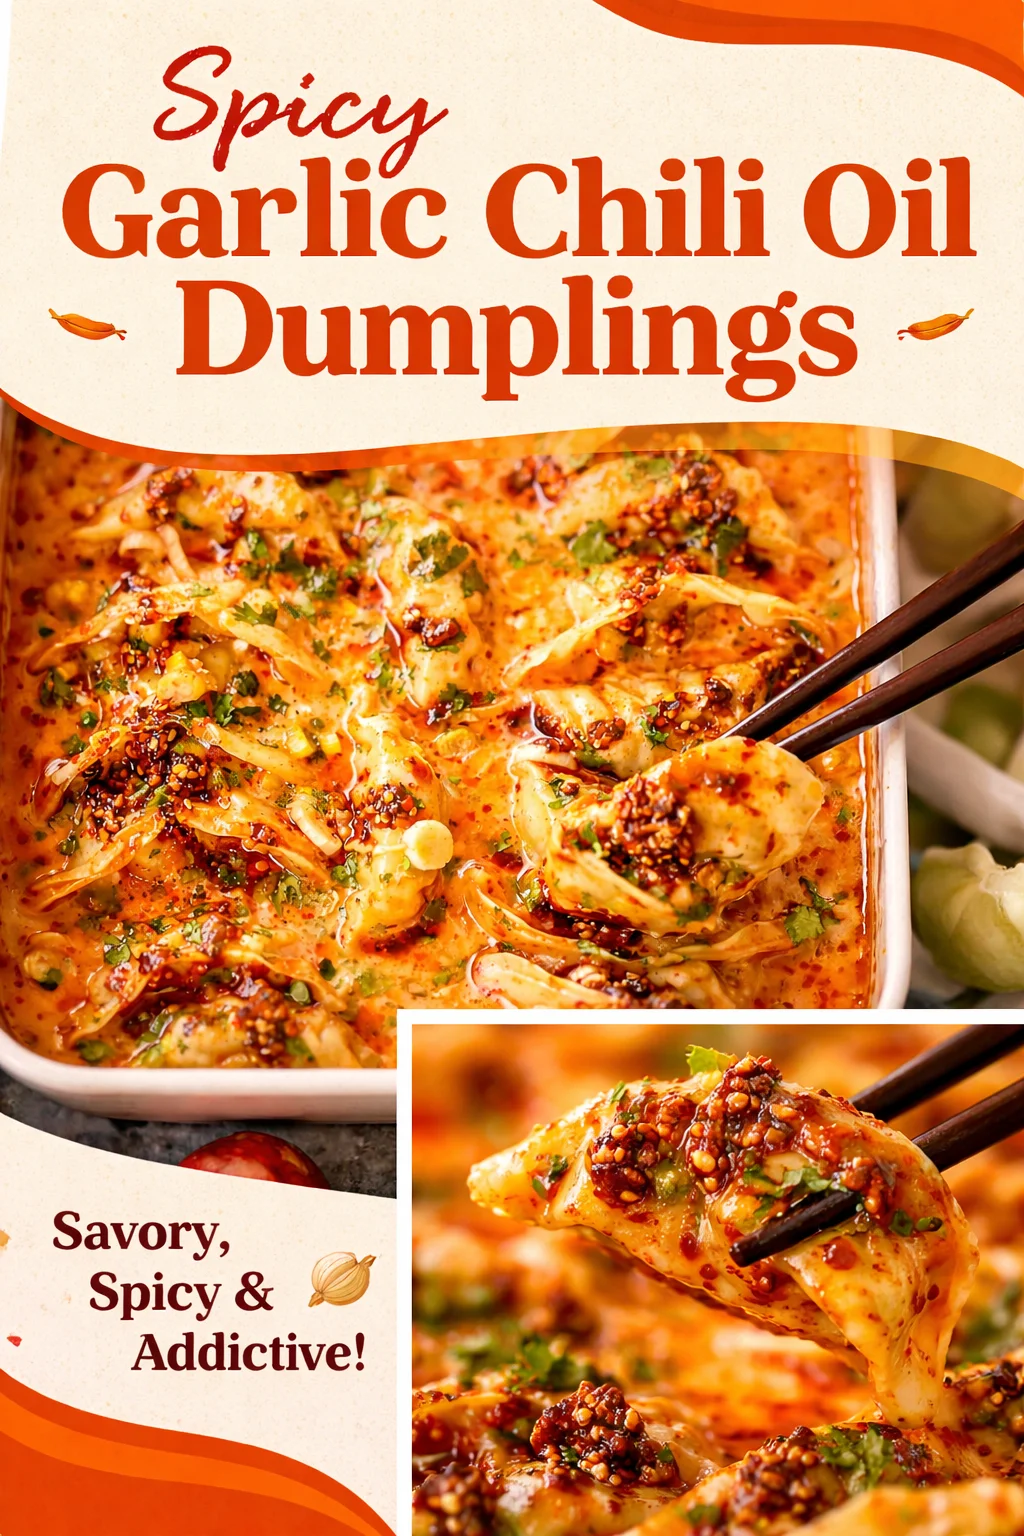
    Dumpling Bake nights happen when I want something cozy and impressive but I also do not want a pile of dishes staring at me after dinner. You know that feeling when everyone is hungry, the kitchen is messy, and you just need a win? This is that win. It is saucy, crispy around the edges, and somehow tastes like you tried way harder than you did. Plus, it works with freezer dumplings, which feels like cheating in the best way. Let me walk you through my favorite one-pan version that is honestly too good to share.
    Savory One-Pan Dumpling Bake That's Too Good to Share!

    Why Youll Love This Recipe

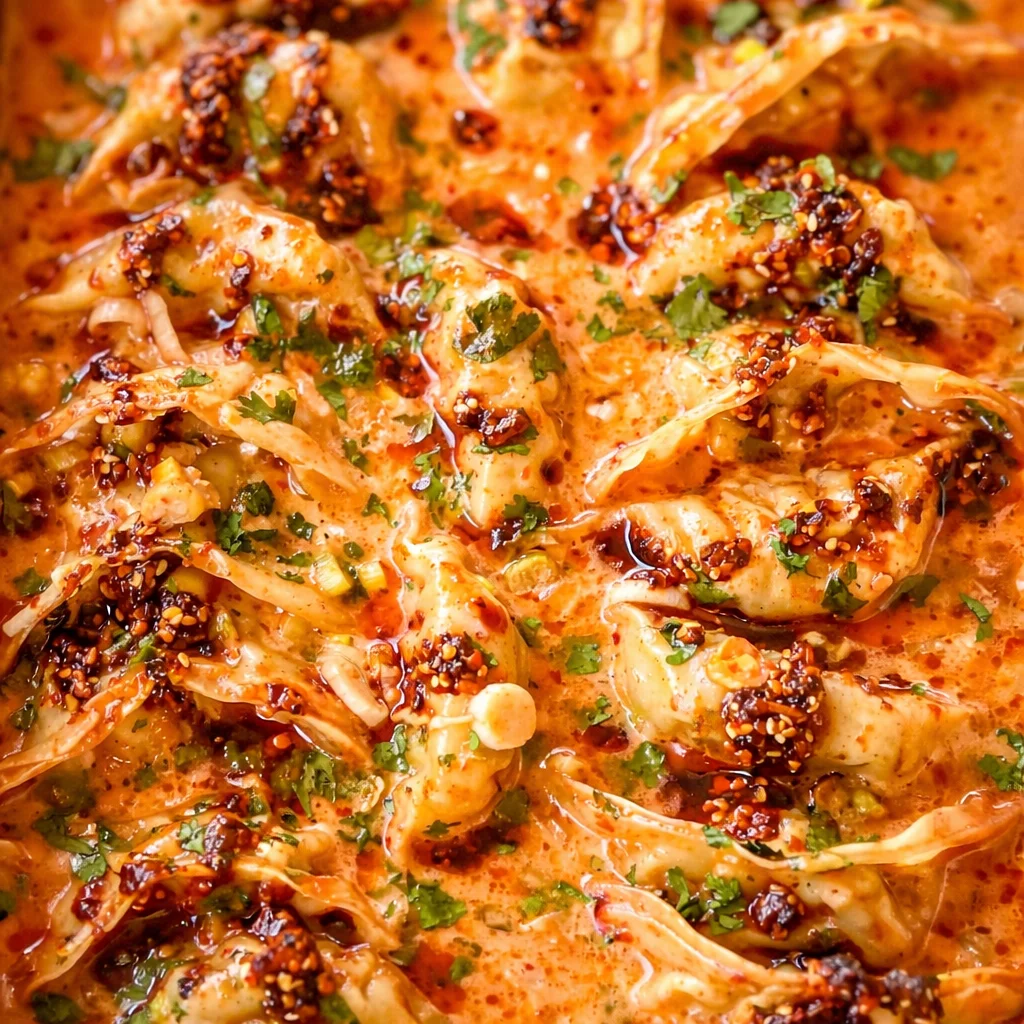
    This is the kind of dinner that makes people hover around the stove waiting for you to scoop them “just a taste.” It is warm, savory, and a little sticky in the way good baked sauces are. And because everything bakes together, the dumplings soak up flavor while the top gets those golden spots that make you want to eat straight from the pan.

    Here is why it is on repeat at my house:

    • One pan, so cleanup is easy and you do not need special gear.
    • Freezer dumpling friendly, which means weeknight realistic.
    • Big flavor from a simple sauce that tastes like takeout vibes.
    • Flexible, you can swap protein, veggies, and spice level.
    • Feeds a crowd, or feeds you for days if you “forget” to share.

    I have made this when friends dropped by last minute, and it made me look like I had a plan. The best part is that the Dumpling Bake is forgiving. If you add a little extra sauce or more veggies, it still comes out delicious.

    Savory One-Pan Dumpling Bake That's Too Good to Share!

    How to Make These Viral One-Pan Baked Dumplings

    Okay, let us get into the fun part. This method is simple: sauce first, dumplings in, bake, then finish with a few fresh toppings. The oven does most of the work.

    What you will need

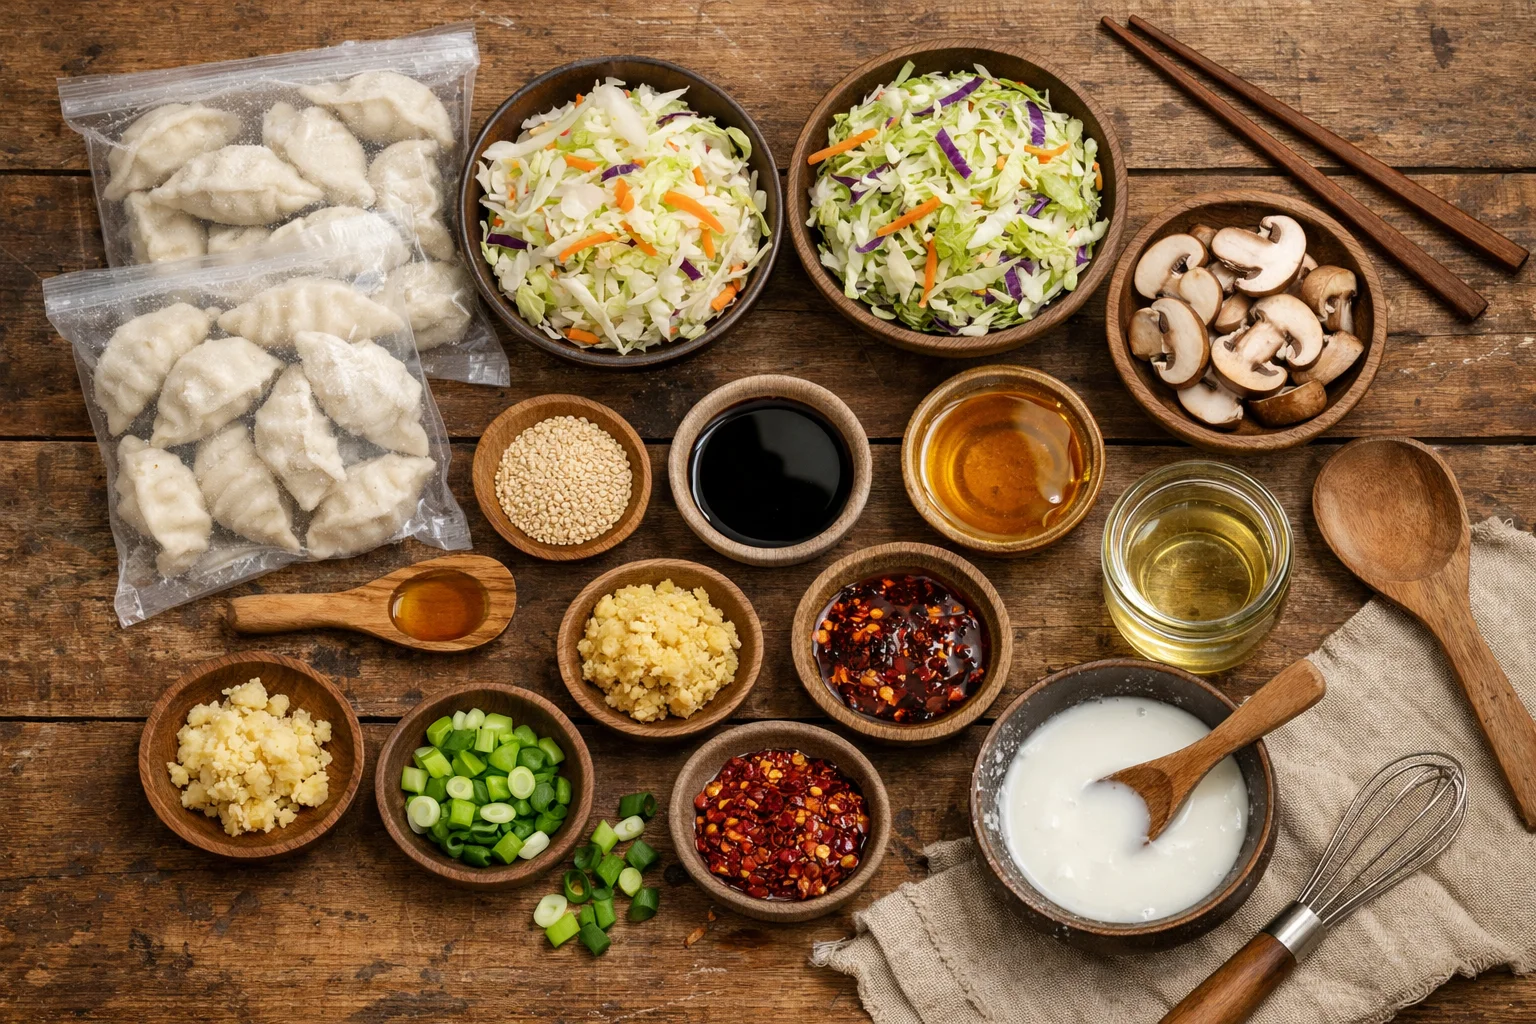
    Keep it simple. You can absolutely adjust based on what is in your fridge.

    • 1 to 2 bags of frozen dumplings (potstickers or gyoza work great)
    • 2 cups shredded cabbage or coleslaw mix
    • 1 cup sliced mushrooms (optional but so good)
    • 3 to 4 green onions, sliced
    • 1 tablespoon sesame oil
    • Sesame seeds for topping (optional)

    For the sauce:

    • 1 third cup soy sauce (or tamari)
    • 2 tablespoons honey or brown sugar
    • 2 tablespoons rice vinegar
    • 3 cloves garlic, minced
    • 1 tablespoon grated ginger (or 1 teaspoon ground ginger in a pinch)
    • 1 to 2 teaspoons chili crisp or sriracha (optional)
    • 1 tablespoon cornstarch mixed with 2 tablespoons water (for a thicker sauce)

    Step by step directions

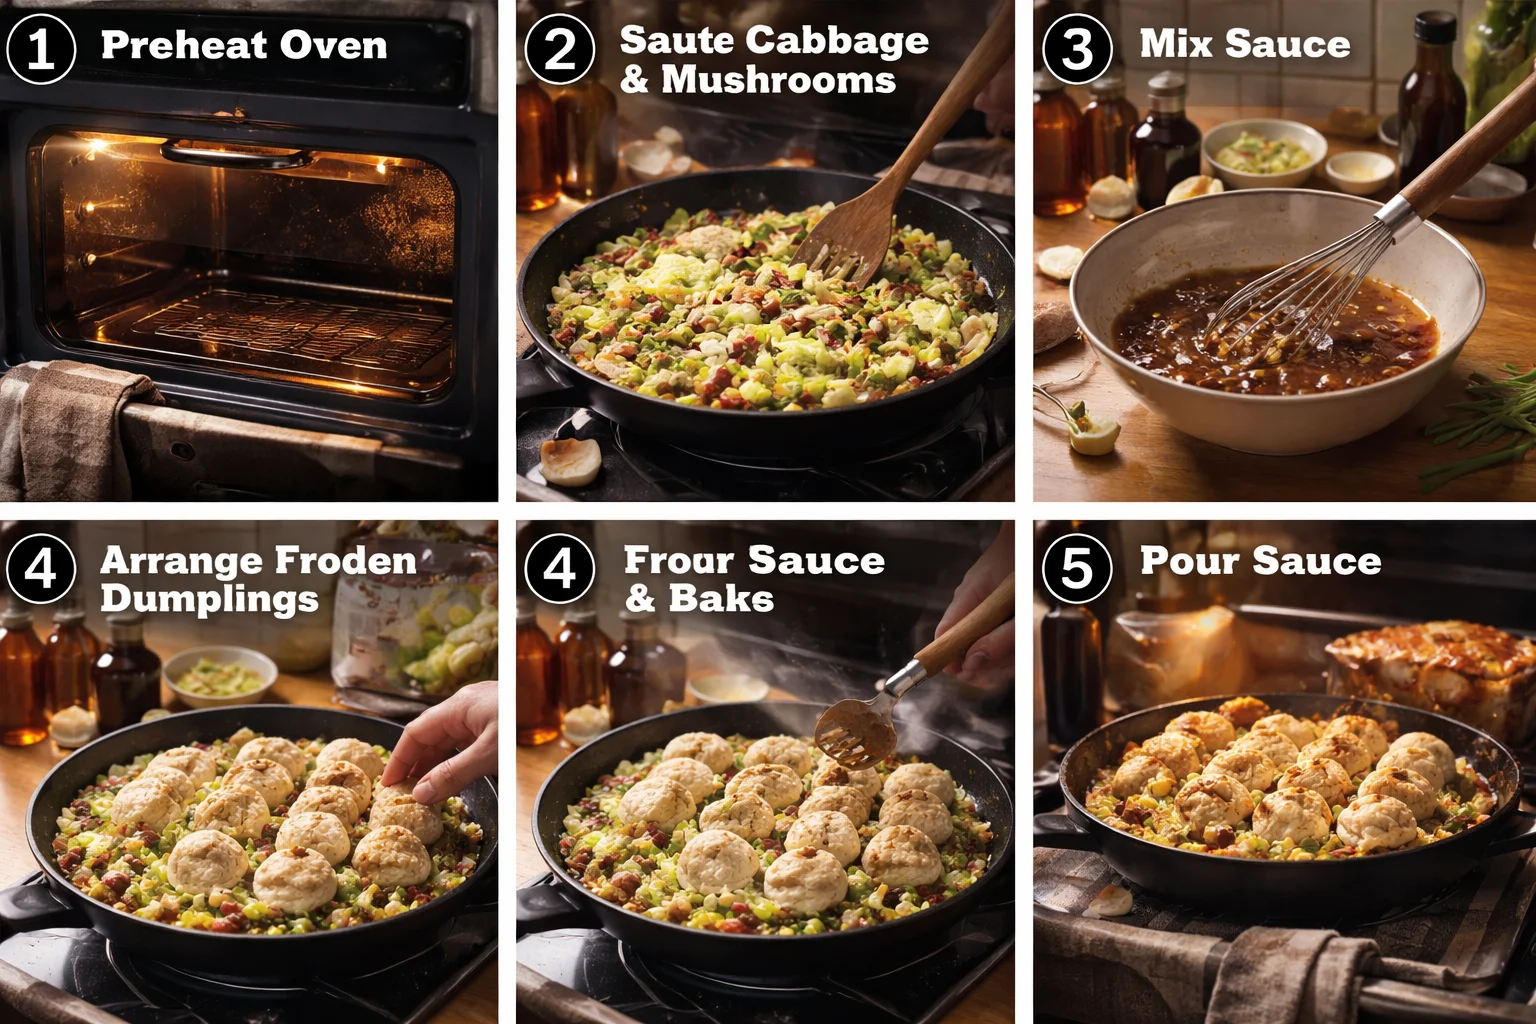
    1) Heat your oven to 400 F. Grab a 9×13 baking dish or a large oven-safe skillet.

    2) Toss cabbage and mushrooms in the pan with sesame oil. Spread them out so they make a little bed for the dumplings.

    3) Mix the sauce in a bowl. Add the cornstarch slurry at the end if you want it thicker and a bit glossy.

    4) Nestle frozen dumplings right on top of the veggies. Do not thaw them. Pour sauce over everything, making sure some sauce runs down into the veggies.

    5) Cover with foil and bake for 20 minutes. Then remove foil and bake another 10 to 15 minutes, until the Dumpling Bake looks bubbly and the tops have some golden spots.

    6) Finish with green onions and sesame seeds. If you like heat, add a little more chili crisp on top.

    If you want another cozy, quick dinner for busy nights, I usually rotate this with my other easy weeknight favorites too. I would link you to one here, but the internal link list I was given is empty, so I cannot add a proper internal link without making one up.

    “I made this once and now my family requests it every week. The dumplings on top get crispy and the sauce tastes like a restaurant dish.”

    Savory One-Pan Dumpling Bake That's Too Good to Share!

    Tips and Variations

    This is where you can make it feel like your own. The base method stays the same, but the vibe changes depending on what you toss in.

    Make it extra craveable

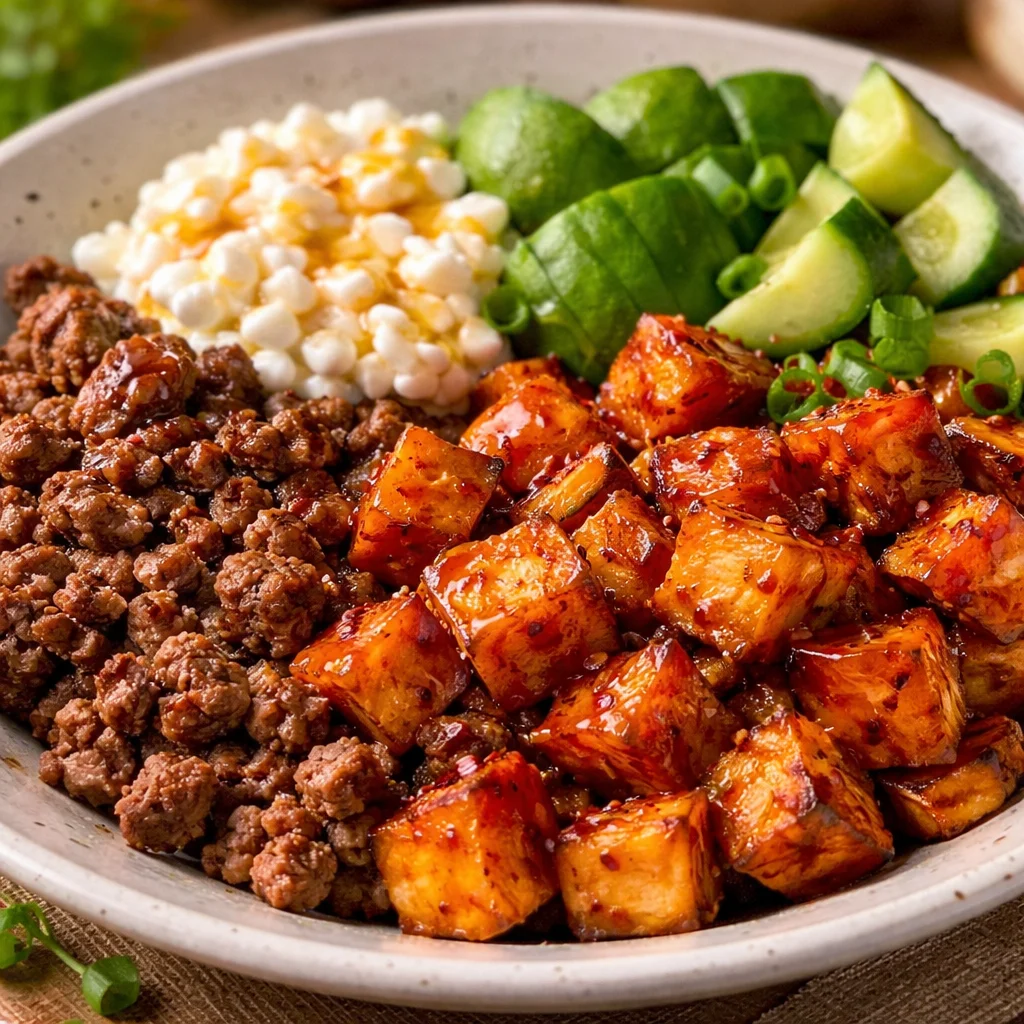
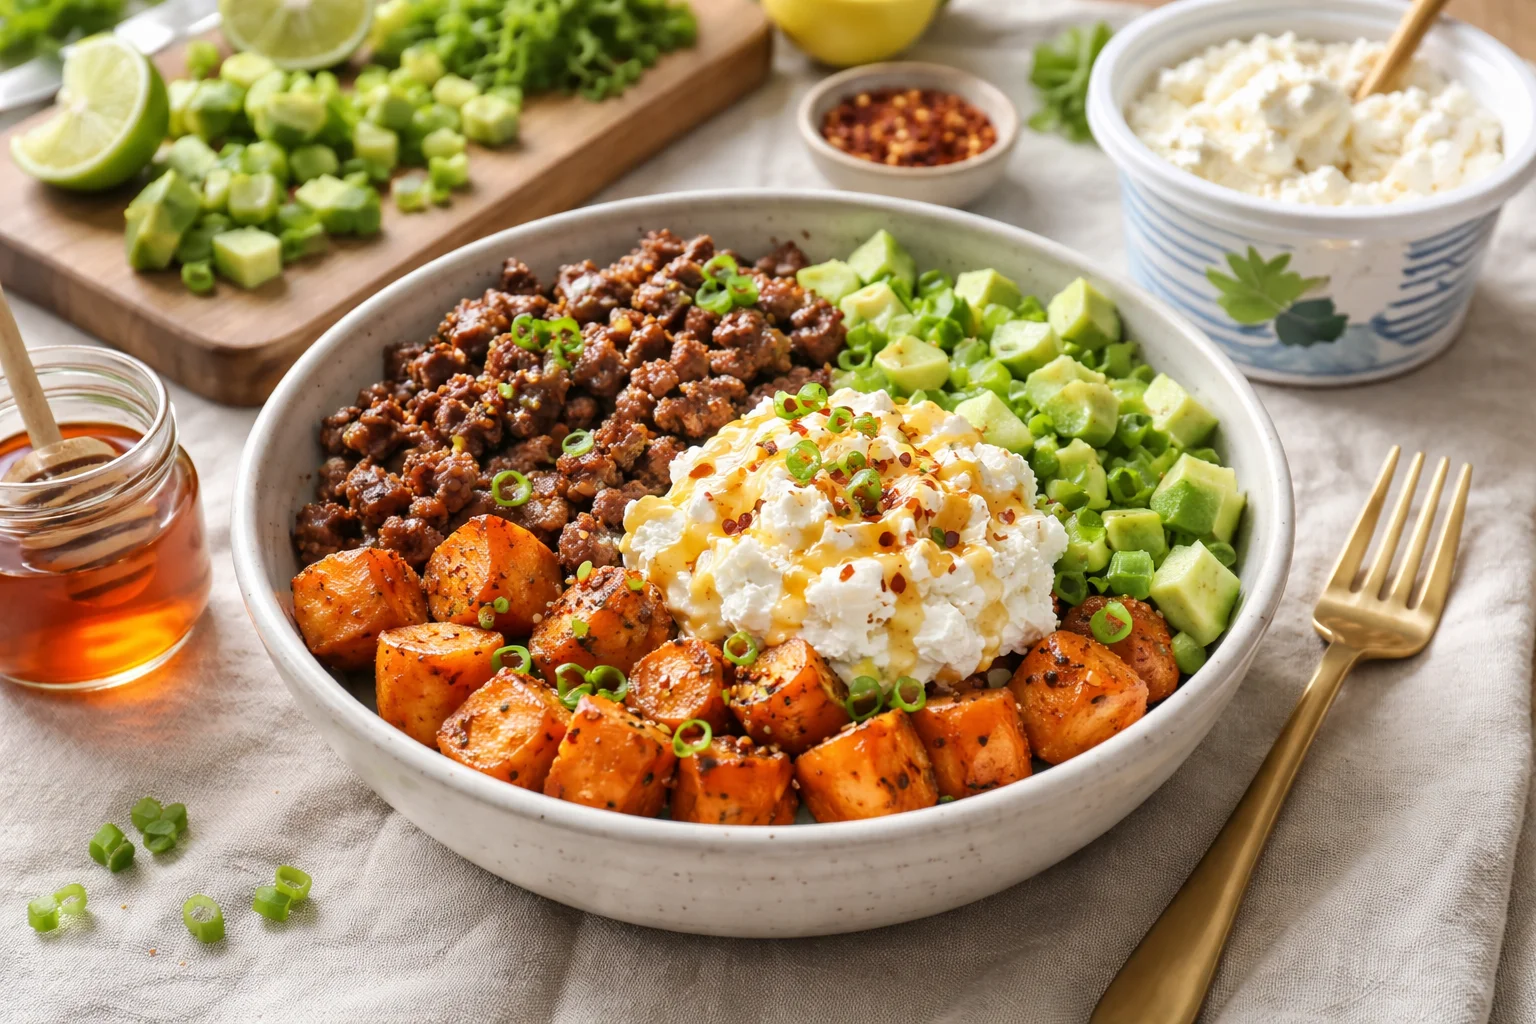
    • Go heavier on veggies: bell peppers, snap peas, broccoli florets, or spinach all work.
    • Add protein: shredded rotisserie chicken, cooked ground turkey, or crumbled tofu can go under the dumplings with the veggies.
    • Turn up the crisp: broil for 1 to 2 minutes at the end, but stay nearby. Things can go from golden to too dark fast.
    • Make it spicy: chili crisp, gochujang, or even red pepper flakes.

    If you are serving picky eaters, keep the spice out of the main pan and set out hot sauce on the table. That way everyone wins and you do not have to cook two dinners.

    Also, do not stress if your sauce looks like a lot at first. The dumplings drink it up, and the veggies release a little water, so everything evens out into this delicious baked coating. This is why I keep coming back to this Dumpling Bake when I want maximum comfort with minimum effort.

    Need an ingredient substitution?

    I am a big fan of “use what you have” cooking, especially on weeknights. Here are the swaps I have tried that actually work.

    Soy sauce: Tamari is great, and coconut aminos work if you want a slightly sweeter vibe.

    Honey: Brown sugar, maple syrup, or even a spoon of apricot jam can work in a pinch.

    Rice vinegar: Apple cider vinegar works, just use a touch less because it can be sharper.

    Fresh ginger and garlic: Powdered versions are fine. Not identical, but still tasty.

    Cabbage: Use coleslaw mix, shredded brussels sprouts, or thin sliced onions. Even bagged stir fry veggies are totally fair game.

    Dumplings: Any frozen potstickers, gyoza, or even mini wontons can bake up nicely. Just watch the cooking time if they are smaller.

    The one thing I would not skip is some kind of acid like vinegar. It keeps the sauce from tasting flat and makes the whole Dumpling Bake feel brighter, even though it is rich and cozy.

    Storing Viral One-Pan Baked Dumplings

    If you are lucky enough to have leftovers, they store better than you would think. The dumplings soften a bit in the fridge, but the flavor gets even better.

    Fridge: Store in an airtight container for up to 3 days.

    Reheat: Oven or air fryer is best if you want some crisp back. About 350 F until hot. Microwave works too, just expect softer dumplings.

    Freezing leftovers: You can freeze it, but the texture will be softer after thawing. If you do freeze, thaw overnight in the fridge and reheat in the oven.

    Little tip: if you know you want leftovers, bake the Dumpling Bake until just cooked through, then crisp individual portions later in the air fryer. It feels like a treat on day two.

    Common Questions

    Can I make this ahead of time?

    Yes. Mix the sauce and prep the veggies ahead. When you are ready, assemble with frozen dumplings and bake. I would not fully assemble hours early because the veggies can get watery.

    Do I have to cover it with foil?

    Covering helps the dumplings cook through and keeps the sauce from reducing too fast. If you skip it, keep an eye on the top and add a splash of water or broth if it looks dry.

    What kind of dumplings work best?

    Potstickers and gyoza are my go-to. Pork, chicken, shrimp, or veggie all work. Just use frozen, not fresh, so timing stays easy.

    How do I stop the dumplings from sticking?

    Make sure there is sauce under and around them. Also, a quick spray of oil on the pan helps if you are nervous about sticking.

    Can I make it gluten free?

    Yes, use gluten free dumplings if you can find them and swap soy sauce for tamari. Double check your chili crisp too, since brands vary.

    Alright, go bake it

    If you want a cozy dinner that feels a little viral but still totally doable, this Dumpling Bake is the move. You get crispy tops, saucy bottoms, and a pan of comfort that disappears fast. Keep it simple the first time, then play with the spice and veggies once you trust the method. And if you are in the mood to browse another baked version for inspiration, this Baked Dumplings – Modern Honey post is a fun read too. Now go grab those freezer dumplings and make your kitchen smell amazing tonight.
    Dumpling Bake

  • 5 Delicious Ways to Enjoy a Hot Honey Sweet Potato Beef Bowl

    5 Delicious Ways to Enjoy a Hot Honey Sweet Potato Beef Bowl

    Hot Honey Sweet Potato Beef Bowl is my answer for those nights when I want something cozy and exciting, but I do not want a pile of dishes or a long recipe. You know the feeling, you are hungry, you want real food, and you also want it to taste like you tried. This bowl hits that sweet spot with spicy sweet hot honey, creamy cottage cheese, and hearty beef all tucked into tender sweet potatoes. It is the kind of meal that makes you pause after the first bite like, okay yeah, this is happening. And the best part is you can tweak it a bunch of ways depending on your mood and what is in your fridge.
    Hot Honey Sweet Potato Beef Bowl

    What is the viral cottage cheese sweet potato beef bowl?

    If you have been scrolling lately, you have probably seen some version of this bowl blowing up. The viral idea is simple: roast or microwave sweet potatoes, add browned beef, spoon on cottage cheese, and finish with hot honey. It sounds a little random until you taste it, then it makes perfect sense.

    The sweet potato is soft and naturally sweet, the beef is savory, and the cottage cheese brings this cool creamy balance. Then hot honey ties it all together with a sticky heat that makes every bite more fun. It is not fancy, but it tastes like something you would order and immediately try to recreate at home.

    Also, it is a great “use what you have” meal. I have made this when I was low on groceries, and it still felt like a real dinner. If you like bowl meals in general, I usually build them the same way every time: base, protein, creamy thing, crunchy thing, sauce.

    And yes, I have tried it with different toppings, and it still works. I will share my five favorite ways to enjoy a Hot Honey Sweet Potato Beef Bowl a little later, because there are so many good directions you can take it.

    Quick note: since you gave me an empty internal link list, I cannot add a real internal link without making one up. If you share even one URL from your site, I will happily add a clickable internal link in the right spot.

    Hot Honey Sweet Potato Beef Bowl

    Why Youll Love This Recipe

    I keep coming back to this bowl for a few simple reasons. First, it tastes bold without being complicated. Second, it is filling in that “I am actually satisfied” way, not the “I need a snack in 20 minutes” way.

    It is big flavor with minimal effort

    You are basically cooking two things: sweet potatoes and beef. Everything else is just assembling. That is my kind of dinner. The hot honey makes it taste like you did something special, even if you were half watching a show while cooking.

    It fits a lot of eating styles

    You can make it higher protein, lighter, spicier, or more kid friendly. It can be gluten free without even trying. And if you are cooking for someone who is picky, you can serve the toppings on the side and let them build their own bowl.

    “I thought cottage cheese in a beef bowl would be weird, but it turned out so good. The hot honey is the magic. I made it twice in one week.”

    It is also a great way to get more sweet potatoes into your life without feeling like you are eating “healthy food.” It just tastes good, full stop. And if you are the kind of person who likes leftovers, the Hot Honey Sweet Potato Beef Bowl holds up really well.

    5 Delicious Ways to Enjoy a Hot Honey Sweet Potato Beef Bowl

    Key Ingredients

    You do not need much, but the right ingredients make a huge difference. Here is what I reach for most often. I will keep it simple and practical.

    • Sweet potatoes: medium sized ones cook more evenly. Roast for best flavor, microwave for speed.
    • Ground beef: I like 85 to 90 percent lean. Too lean can taste dry, too fatty can get greasy.
    • Cottage cheese: full fat is creamier, but use what you like. Small curd feels a bit smoother.
    • Hot honey: store bought is easy. If yours is very mild, add chili flakes.
    • Seasonings: salt, pepper, garlic powder, onion powder. Optional smoked paprika or cumin.
    • Something crunchy: sliced green onion, diced cucumber, chopped pickles, or toasted nuts.

    Now for the fun part. Here are my 5 delicious ways to enjoy a Hot Honey Sweet Potato Beef Bowl. I still follow the same base recipe, but I change the toppings or the vibe.

    1) The classic viral style
    Sweet potato, beef, cottage cheese, hot honey, and a pinch of flaky salt. Add cracked pepper and green onions if you have them. This is the version that made me fall in love with it.

    2) Taco night version
    Season the beef with cumin, chili powder, and a little oregano. Top with cottage cheese, hot honey, shredded lettuce, and salsa. If you have tortilla chips, crush a few on top for crunch.

    3) BBQ twist
    Mix a spoon of BBQ sauce into the beef while it is hot. Then do cottage cheese and a drizzle of hot honey. Add thin sliced red onion or pickles. Sweet, tangy, and honestly kind of addictive.

    4) Breakfast bowl energy
    Top the bowl with a fried or soft scrambled egg. The yolk plus hot honey is unreal. Add a few avocado slices if you are feeling fancy, but it is great without them too.

    5) Extra spicy and fresh
    Add chopped jalapenos or a little hot sauce on top of the cottage cheese. Finish with hot honey and a squeeze of lime. If you have cilantro, throw it on. It wakes the whole bowl up.

    Once you find your favorite version, you will probably make it on repeat. I do. And it is one of the few meals where I genuinely do not miss a “real” sauce because the hot honey and cottage cheese already do so much.

    Step-By-Step Instructions

    This is how I make it on a normal weeknight. Nothing complicated, just a solid plan.

    Cook the sweet potatoes

    If I have time, I roast them at 425 F until they are very soft, usually around 35 to 45 minutes depending on size. If I do not have time, I poke holes in them and microwave until tender, flipping once. Either way, you want them soft enough to mash slightly with a fork.

    Brown the beef

    Heat a skillet, add the beef, and break it up. Season with salt, pepper, garlic powder, and onion powder. Cook until it is browned and no longer pink. If there is a lot of grease, I carefully drain a bit, but I leave some for flavor.

    Build the bowl

    Split the sweet potato open and fluff it. Add the beef. Spoon cottage cheese on top. Drizzle hot honey over everything. Finish with your crunchy topping of choice.

    Tip from my own “oops” moments: do not add the cottage cheese while the beef is screaming hot if you do not want it to melt. Let the beef sit for a minute, then assemble. It stays creamier that way.

    Meal Prep Instructions

    This bowl is super meal prep friendly, and it is one of the few reheated meals I still look forward to.

    Here is what I do:

    Prep the components, not the whole bowl
    I cook 3 to 5 sweet potatoes and brown a big batch of beef. Then I keep cottage cheese and hot honey separate until I am ready to eat. This keeps the texture right.

    Storage
    Sweet potatoes and beef keep well in the fridge for about 3 to 4 days in sealed containers. Cottage cheese stays in its container. Hot honey stays at room temp unless the label says otherwise.

    Reheating
    Warm the sweet potato and beef first. Then add cottage cheese and hot honey after heating. If you add them before, the bowl can get a little watery.

    Make it feel new
    Change toppings through the week. One day do taco toppings, another day do pickles and BBQ vibes, another day go breakfast style. That is how a Hot Honey Sweet Potato Beef Bowl stays exciting instead of feeling like leftovers.

    Common Questions

    Can I use ground turkey or chicken instead of beef?
    Yes. Just season it a little more since turkey and chicken are milder. A pinch of smoked paprika helps.

    Is cottage cheese required?
    No, but it is part of the magic. If you really hate it, try plain Greek yogurt or even mashed avocado for creaminess.

    How do I make hot honey if I do not have it?
    Warm regular honey for a few seconds and stir in chili flakes or a tiny bit of your favorite hot sauce. Taste and adjust.

    What if my sweet potato is taking forever to cook?
    Cut it in half lengthwise before roasting, or microwave it first for a few minutes, then finish in the oven for better flavor.

    Is this bowl spicy?
    It can be mild or hot depending on your honey. Start with a small drizzle, then add more after you taste.

    A cozy bowl you will actually crave again

    If you are stuck in a dinner rut, this is an easy way out that still feels fun. You get sweet, savory, creamy, and spicy all in one bite, and it is easy to switch up with toppings so it never gets boring. I hope you try at least one of the five versions, and then make it your own from there. If you want to see the trend that inspired so many of us, check out this Tiktok Hot Honey Cottage Cheese Sweet Potato Beef Bowl and then come back and tell me how you topped yours.

    5 Delicious Ways to Enjoy a Hot Honey Sweet Potato Beef Bowl

  • 10 Chaos Cakes That Will Make You Smile and Crave More!

    10 Chaos Cakes That Will Make You Smile and Crave More!

    Chaos Cakes are for those days when you want something sweet, but life is loud and your kitchen plans are… let’s say flexible. Maybe your frosting is too soft, maybe your layers lean a little, maybe your sprinkles went rogue. Been there. I started making these kinds of cakes when I realized perfection wasn’t making anyone happier at my table. The funny part is that the messier they look, the faster they disappear.
    10 Chaos Cakes That Will Make You Smile and Crave More!

    When Frosting Met Wrapping

    I still remember the first time I tried to wrap a frosted cake because I needed fridge space. I thought, I’ll just cover it, no big deal. Ten minutes later I was peeling plastic wrap off buttercream like I was defusing a tiny, delicious bomb. That moment right there is basically the spirit of Chaos Cakes: frosting meets real life, and real life usually wins.

    Here are 10 Chaos Cakes That Will Make You Smile and Crave More, all born from happy accidents, rushed weeknights, and the kind of cravings that do not care about clean edges.

    1) The Crinkle Coat Chocolate Cake
    You frost it once, it looks rough, and instead of fixing it you drag a spoon around the sides and call it texture. Add chocolate shavings and suddenly it looks intentional.

    2) The Sprinkle Avalanche Funfetti
    Instead of carefully sprinkling, you basically dump sprinkles on top and press lightly. The extras fall everywhere. Your counter looks like a birthday party exploded. Worth it.

    3) The “Oops, It’s a Naked Cake” Vanilla Layer
    If you run out of frosting or patience, scrape it thin and let the cake show through. Add berries on top and people will think you planned a rustic vibe.

    4) The Melted Ganache Drip That Would Not Behave
    Pour ganache and let it slide where it wants. Some drips will race, others barely move. It looks wild in a good way, like abstract art you can eat.

    5) The Swirled Two Frostings Cake
    Can’t decide between chocolate and vanilla? Don’t. Put both in the piping bag at the same time. You get messy swirls and no one complains.

    6) The Cookie Press-In Cake
    Broken cookies? Press them into the sides. Whole cookies? Press those too. It’s crunchy, chaotic, and very satisfying.

    7) The Jam Smudge Cake
    You spread jam between layers and it leaks a little out the sides. Instead of wiping it, you smear it around with a spatula so it looks like a watercolor cake.

    8) The Lopsided Stack Cake
    If the layers slide a bit, stop fighting it. Add extra frosting on the low side and pile toppings on top. It ends up looking playful, not wrong.

    9) The Confetti Crumb Coat Cake
    Crumbs everywhere? Do a crumb coat and intentionally leave it speckled. It’s like your cake is wearing freckles.

    10) The Microwave Mug Cake Turned Layer Cake
    Bake two or three quick sponge rounds in a pinch (even in a microwave if you’re desperate), stack them, and go heavy on toppings. It’s not fancy, but it scratches the itch.

    One quick note: you asked for an internal link from a provided list, but the list is empty. I can’t add a valid internal link without at least one URL. If you share one link from your site (even just your cake basics page), I’ll place it naturally in the right section.

    Chaos Cakes

    Plans Gone Awry? Just Add Heat!

    If there’s one thing I trust when a cake goes sideways, it’s heat. A little warmth can save frosting, smooth out a weird texture, and help toppings stick like they mean it. Not “blast it and pray” heat. Just small, controlled moves that make a big difference.

    Here are my go to heat tricks for Chaos Cakes when things start looking messy in the not cute way:

    • Warm spoon trick: Dip a spoon in hot water, dry it, then smooth frosting in slow swipes. It instantly calms down sharp edges.
    • Hair dryer at a distance: A few seconds on low can soften buttercream enough to re-smooth it. Do not get close or you’ll melt it into soup.
    • Ganache rescue: If ganache is too thick, microwave it in short bursts, stir, and let it cool for a minute so it drips instead of floods.
    • Stuck cake layers: If a layer is cold and grabbing your knife, let it sit at room temp 10 minutes before trimming.

    And because Chaos Cakes are half vibe and half survival strategy, here’s something I do when I’m really running late: I intentionally make the top look dramatic. Big swooshes of frosting, a fast drizzle, a handful of chopped candy. People remember that more than a perfectly level edge anyway.

    “I tried your chaotic drizzle idea for my daughter’s birthday cake and it looked so fun. Everyone thought it was a bakery style design, and I didn’t even stress once.”

    Chaos Cakes

    Silver Linings and Lessons Learned

    I’ve learned a lot from cakes that didn’t go according to plan. Like how a cracked top can become a perfect place to hide a mound of whipped cream. Or how a frosting seam on the side disappears when you press toasted coconut over it. Chaos Cakes taught me to stop treating baking like a test and start treating it like a treat.

    Here are a few lessons I keep coming back to:

    Mess can be a design choice. Smudges, drips, and swoops read as playful when you commit to them.
    Flavor forgives everything. If your cake tastes amazing, nobody cares about the lean.
    Texture is your friend. Nuts, cookies, sprinkles, and chocolate curls cover a lot of little issues.
    Cold is powerful. If frosting is sliding, chill the cake 15 to 20 minutes and try again.

    Also, if you’re making Chaos Cakes for other people, tell them the theme. I’m serious. The moment you say, “It’s a chaos cake,” everyone relaxes and starts smiling before they even take a bite.

    Tips for Successful Cake Decorating

    Even though Chaos Cakes are relaxed, a few simple habits will make your decorating experience so much easier. Think of these as the seatbelt. You can still drive with the windows down, but you’re safer.

    My best practical tips:

    Chill your layers before frosting. Cold cake is sturdier and crumbs behave better.
    Do a quick crumb coat. A thin first layer of frosting locks in crumbs so the final coat looks cleaner, even if you keep it messy on purpose.
    Pick one “chaos element.” Like a wild drip, or a sprinkle avalanche, or a cookie wall. One main chaotic feature looks fun, not confused.
    Use what you already have. Leftover Halloween candy, a half bag of chocolate chips, the last spoon of jam. Chaos Cakes love leftovers.

    Since we’re talking decorating, this is where I normally point readers to a related guide on my own site, like a frosting basics or crumb coat tutorial. But again, your internal link list is empty, so I can’t place a clickable internal link yet. Send me one URL and I’ll tuck it into this section naturally.

    Common Mistakes in Cake Baking

    Let’s be real, some chaos is cute, but some chaos is just a cake that’s falling apart. If you want Chaos Cakes that still slice nicely and taste great, watch out for these common mistakes. I’ve done every single one, by the way.

    Overbaking the layers: Dry cake is hard to save. Set a timer and start checking early. If a toothpick comes out with a few moist crumbs, you’re usually good.
    Frosting a warm cake: This is the classic meltdown moment. If the cake is even slightly warm, wait. Or pop it in the fridge for a bit.
    Not leveling at all: You do not need perfect leveling, but if one layer has a big dome, trim just a little so it doesn’t slide.
    Too much filling: Jam and cream are amazing, but if you overload the middle, it will squeeze out and push layers around.
    Skipping chill time: Ten minutes in the fridge can turn a stressful mess into a cake you can actually handle.

    If you’re aiming for Chaos Cakes specifically, I like to keep the cake structure simple and let the outside go wild. Solid base, playful finish. That’s the sweet spot.

    Common Questions

    Are Chaos Cakes just “ugly cakes”?

    Not really. Chaos Cakes are more like carefree cakes. They’re intentionally relaxed looking, but still tasty and totally lovable.

    What frosting works best for Chaos Cakes?

    Buttercream is easiest because it’s forgiving. Cream cheese frosting is delicious too, just keep it chilled since it softens faster.

    How do I keep a messy cake from collapsing?

    Chill your layers, don’t overfill the middle, and if it starts sliding, stop and refrigerate it for 15 minutes before continuing.

    Can I make Chaos Cakes ahead of time?

    Yes. Bake the layers a day ahead, wrap and chill them. Decorate the next day when you have more time and less stress.

    What are quick toppings that hide mistakes?

    Crushed cookies, toasted coconut, chopped nuts, sprinkles, chocolate curls, and fresh berries all cover weird spots fast.

    A Sweet Mess Worth Making

    If there’s one thing I hope you take from this, it’s that Chaos Cakes can be a little messy and still feel like a big win. Keep your flavors strong, use a few simple tricks like chilling and quick smoothing, and let the outside be playful. When you need extra perspective and a good read with your baking inspiration, I loved Corn Cakes and Chaos – by John Whaite because it reminds you that life and baking both get weird sometimes. Now pick one chaotic idea, grab your sprinkles or cookies, and make a cake that makes you smile.

    Chaos Cakes

  • 5 Reasons the Dubai Paratha Burger Will Change Your Life

    5 Reasons the Dubai Paratha Burger Will Change Your Life

    Dubai Paratha Burger is the kind of food that shows up when you are tired of boring dinners, but you still want something that feels like a treat. You know that moment when you are staring into the fridge like it owes you answers? Yeah, this is what I make when that happens. It is crispy, juicy, a little messy, and honestly it makes regular burgers feel a bit plain after. I first tried a version of it after a long day, and it instantly became my comfort meal. If you love quick recipes with big flavor, you are about to be very happy.
    5 Reasons the Dubai Paratha Burger Will Change Your Life

    Paratha Smash Burger: a recipe

    Let me give you the real life version first: this is a smash burger, but instead of a bun, you use paratha. So you still get that juicy beefy bite, but with a flaky, buttery, layered wrap situation that hits differently. It is the kind of meal you make once, then you start thinking about it the next day at work.

    Here is the simple way I do my Dubai Paratha Burger at home. Nothing fancy, just solid steps that actually work.

    My weeknight method (no stress)

    • Warm the paratha in a pan until it is golden and flexible, then set aside.
    • Roll beef into loose balls, about the size of a golf ball. Do not overpack them.
    • Heat a pan until it is hot. Put the beef ball down and smash it hard with a spatula.
    • Season with salt and pepper. Let it crisp for about 60 to 90 seconds.
    • Flip, add cheese if you want, and cook another 30 to 60 seconds.
    • Build it on paratha with sauce, onions, pickles, whatever makes you happy.
    • Fold like a wrap or stack like a burger. Eat immediately while it is still loud and crispy.

    Reason number one this changes your life: it is fast, but it tastes like you put in way more effort than you did. The crispy edges plus the soft paratha layers are just unfair in the best way.

    Dubai Paratha Burger

    Key Ingredients for Paratha Smash Burger

    Ok, ingredient talk, but keep it casual. The magic here is not a long shopping list. It is a few basics that work together really well. And once you find your favorite combo, it becomes your personal signature.

    These are my must haves for a Dubai Paratha Burger that actually tastes like the real deal.

    • Paratha: store bought frozen paratha works great. Flaky is the goal.
    • Ground beef: I like 80 20 because the fat makes the edges crisp and keeps it juicy.
    • Salt and pepper: simple seasoning is the whole smash burger vibe.
    • Cheese: optional, but melty slices make it extra comforting.
    • Sauce: mayo plus ketchup plus a little hot sauce is my easy go to.
    • Crunch: thin onions, shredded lettuce, or pickles for that snap.

    Reason number two it changes your life: it is flexible. You can keep it basic or go fully loaded depending on your mood and what is in your fridge.

    Also quick side note, if you like experimenting with comfort food mashups, I usually keep a little list of ideas on my site, but I was supposed to add an internal link here and the list I was given is empty, so I cannot link anything without making it up. If you send me one URL, I will happily plug it in naturally.

    “I tried this after seeing it all over my feed, and I get the hype now. The paratha makes it feel like street food at home. My family asked for it again two days later.”

    5 Reasons the Dubai Paratha Burger Will Change Your Life

    Cooking Techniques for Perfect Smash Burgers

    This is where the Dubai Paratha Burger goes from good to wow. Smash burgers are simple, but a couple small details really matter. I learned this the hard way after making a few thick, sad patties early on. The good news is it is easy to fix.

    Little tricks that make a big difference

    Get your pan hot. Like properly hot. If the beef does not sizzle the second it touches the pan, wait longer.

    Do not overwork the meat. Form loose balls, not tight ones. The smash does the shaping.

    Smash once, then leave it alone. The crisp edges happen when the meat has contact with the pan and you do not keep moving it around.

    Use a thin spatula. If it is too chunky, it is harder to scrape those crispy bits up.

    Toast the paratha separately. You want it flaky and warm, not steamed and soggy.

    Reason number three it changes your life: it teaches you how to make a seriously good burger without needing a grill, without needing fancy gear, and without needing a long cooking time.

    Tips for Serving and Pairing

    Now let us talk about the part that makes it feel like a full experience, not just a burger you ate standing near the stove. The Dubai Paratha Burger is rich and savory, so pairing is all about balance. You want something cool, something crunchy, and maybe something spicy if you are that person. I am that person.

    ;

    Reason number four it changes your life: it becomes your new go to for feeding people. It feels special, but it is not complicated. Also, it travels surprisingly well if you wrap it in foil and let it rest a minute.

    My favorite serving ideas:

    • Cold drink: iced lemon mint or even a simple soda to cut the richness
    • Side crunch: fries, chips, or a quick cucumber salad with lemon and salt
    • Extra sauce: serve a little dipping cup on the side, it makes it feel like a takeout treat

    If you are serving kids or spice sensitive friends, keep the heat in the sauce on the side. Everyone wins.

    Variations of the Paratha Smash Burger

    This is the fun part. Once you nail the basic Dubai Paratha Burger, you can twist it in a bunch of ways without making it complicated. I do this depending on what I have in the fridge or what I am craving.

    Easy variation ideas (still beginner friendly)

    Spicy version: add jalapenos, extra hot sauce, or a spicy mayo. Even a pinch of chili flakes works.

    Chicken version: use ground chicken, but add a little oil to the pan since it is leaner.

    Double patty: because sometimes you want that diner style bite.

    Breakfast style: add a fried egg and a little cheese, and suddenly it is a morning thing.

    Veg option: try a smashed potato patty or a crispy veggie patty and treat it the same way with the paratha.

    Reason number five it changes your life: it keeps you out of food boredom. You can make it weekly and it will not feel like the same meal every time.

    Common Questions

    Can I make the Dubai Paratha Burger with frozen paratha?

    Yes, and honestly it is what I use most of the time. Just cook it until golden on both sides so it stays flaky.

    What if I do not have a burger press?

    No problem. Use a sturdy spatula and press down hard. You can also use the bottom of a small pan, just be careful with heat.

    How do I keep the paratha from getting soggy?

    Toast it well and do not overload it with wet sauce. I spread sauce thin, then add lettuce or onions as a barrier.

    Can I prep anything ahead?

    You can mix your sauce, slice onions, and portion the meat into balls earlier in the day. Cook everything fresh for the best crisp.

    What cheese works best?

    American style slices melt easiest, but cheddar or mozzarella also work if that is what you have.

    Alright, go make it tonight

    If you have been stuck in a dinner rut, Dubai Paratha Burger is the kind of recipe that wakes up your appetite and your mood. It is quick, it is satisfying, and it feels like something you would pay for outside, but you can pull it off at home. Try it once with the basic version, then start playing with sauces and toppings until it feels like yours. Also if you want a funny and oddly emotional read about how intense this burger craze can get, check out The stupid Dubai paratha burger made me cry. Now go get that pan hot and let your kitchen smell amazing.
    Dubai Paratha Burger

  • 7 Deliciously Easy Egg-Free Baking Recipes to Try Today

    7 Deliciously Easy Egg-Free Baking Recipes to Try Today

    Egg-Free Baking has saved me more times than I can count, especially on those days when I’m halfway into a recipe and realize the egg carton is empty. Or maybe you’re baking for an allergy, a vegan friend, or you just don’t love the idea of eggs in your sweets. Whatever brought you here, you’re in the right place. Egg-Free Baking can be simple, comforting, and honestly just as delicious as the classic versions. Today I’m sharing seven recipes I actually make on regular weekdays, not just for show. Grab a bowl, a spoon, and let’s bake something good.
    Egg-Free Baking

    Egg-Free Desserts

    This is where Egg-Free Baking really shines, because desserts are usually what people panic about first. The trick is knowing what replaces the “job” of an egg. Sometimes you need binding, sometimes moisture, sometimes lift. These three dessert recipes cover all of that, and they’re the ones I reach for when I want a sure thing.

    1) Fudgy egg-free brownies (one bowl)

    These are my “I need chocolate now” brownies. They come out with glossy tops and chewy edges, and nobody ever asks where the eggs are.

    What you’ll need:

    • 1/2 cup melted butter or neutral oil
    • 1 cup sugar
    • 1/2 cup cocoa powder
    • 1/2 cup plain yogurt or sour cream (this is the magic)
    • 1 tsp vanilla
    • 3/4 cup flour
    • 1/2 tsp baking powder
    • 1/4 tsp salt
    • Optional: chocolate chips or chopped nuts

    How I do it: Mix butter, sugar, cocoa, yogurt, and vanilla. Stir in flour, baking powder, and salt. Fold in chips if you want. Bake at 350 F for about 22 to 28 minutes. Let them cool before slicing, even though it’s hard. If you slice too early, they’ll be a little messy, but still delicious.

    2) Soft egg-free vanilla cupcakes

    These are light, sweet, and super “birthday party” vibes. For Egg-Free Baking, I lean on vinegar plus baking soda for lift, and it works like a charm.

    My quick method: Mix your dry ingredients in one bowl and wet ingredients in another, then combine. I add 1 tablespoon vinegar to the wet mix and 1 teaspoon baking soda to the dry, and once they meet, don’t overmix. Bake until a toothpick comes out clean. Frost with buttercream, or keep it simple with powdered sugar.

    3) No egg chocolate chip cookies (chewy style)

    My biggest tip here is not to try to make them “healthy” on the first go. Give yourself the classic cookie experience first, then experiment later.

    Egg swap I love: 3 tablespoons applesauce or mashed banana for every egg. Applesauce keeps it more neutral in flavor. Chill the dough for 30 minutes if you can. It helps the cookies bake up thicker instead of spreading like pancakes.

    “I made the egg-free cupcakes for my kid’s school party and nobody noticed they were egg-free. Two parents asked for the recipe, which basically never happens.”

    Egg-Free Baking

    Egg-Free Breads

    Breads are sneaky because some of them don’t need eggs at all, but recipes still add them for richness or color. For Egg-Free Baking at home, I like breads that are forgiving and still taste amazing the next day. These two are reliable, cozy, and great with coffee.

    4) Banana bread without eggs

    This one is practically made for Egg-Free Baking because bananas already act like a binder. The key is using bananas that are truly ripe. Like, brown spots, strong banana smell, the whole deal.

    My tips: Use 3 medium ripe bananas, mashed well. If your batter looks too thick, add a splash of milk. If you like walnuts or chocolate chips, stir them in at the end. Bake it until the center is set and the top looks deep golden. Let it sit for at least 20 minutes before slicing so it doesn’t crumble.

    5) Quick egg-free cinnamon muffins

    These are the “I forgot I volunteered to bring something” muffins. I do a simple batter, then swirl in cinnamon sugar. If you want them extra cozy, add a tiny pinch of nutmeg.

    Simple cinnamon sugar: 2 tablespoons sugar plus 1 teaspoon cinnamon. Swirl it through the batter with a butter knife. Don’t overthink it. The messy swirls are the best part.

    7 Deliciously Easy Egg-Free Baking Recipes to Try Today

    Egg-Free Breakfast Recipes

    Breakfast is where Egg-Free Baking can feel a little emotional, because pancakes and waffles are such comfort food. I’ve had mornings where I just wanted that warm, fluffy stack without doing a grocery run. These two recipes get you there.

    6) Fluffy egg-free pancakes

    I’ve tested a bunch of versions, and the biggest win is using a little baking powder plus an acid. Think buttermilk, yogurt, or a milk plus vinegar combo. It gives you lift and tenderness.

    What I do: For one batch, mix flour, baking powder, sugar, and salt. Then add milk (or plant milk), a little oil, and a splash of vinegar. Let the batter sit for 5 minutes before cooking. That tiny rest makes a difference. Cook on medium heat and flip when you see bubbles that stay open on top.

    7) Easy egg-free waffles (crispy edges)

    Waffles without eggs can still get crispy, you just need two things: a bit of cornstarch and a hot waffle iron. Cornstarch helps with that light crunch.

    Quick tip: Don’t stack waffles right away. Let them cool on a wire rack for a minute so steam doesn’t soften them. Top with butter, syrup, fruit, or even peanut butter if you’re hungry hungry.

    If you’re new to Egg-Free Baking, it helps to think in categories so you can swap recipes based on what you’re craving. Here are the types I keep in my back pocket, especially when I’m baking for guests and want something that feels familiar.

    My go to categories:

    Cookies and bars: Usually easy to replace eggs with applesauce, yogurt, or flax.

    Cakes and cupcakes: Look for recipes using vinegar plus baking soda, or yogurt for moisture.

    Quick breads and muffins: Often naturally egg-free, especially fruit based ones.

    Breakfast bakes: Pancakes, waffles, and even baked oatmeal can be egg-free with the right balance.

    And if you ever want a simple pantry-friendly guide, I keep a little roundup style page on my site that I update when I find something new. Here’s a handy related read: egg-free baking substitutes that actually work.

    Latest Recipes

    I’m always messing around with new ideas because, honestly, Egg-Free Baking keeps me creative. When you’re not leaning on eggs, you start paying attention to texture, moisture, and flavor in a different way. Here are the newest things I’ve been baking lately, and what I’d suggest if you want to keep experimenting after you try the seven recipes above.

    What I’m making right now:

    Egg-free lemon loaf with a tangy glaze, using yogurt for softness.

    Egg-free peanut butter cookies with a slightly chewy center, using applesauce.

    Egg-free chocolate mug cake for late-night cravings, heavy on cocoa and vanilla.

    Quick reality check: when you test new recipes, write down what you change. I used to swear I’d remember, and I never did. A two line note in your phone saves future you.

    Common Questions

    Q: What’s the easiest egg substitute for most baking?
    A: Plain yogurt or applesauce is easiest for cakes, muffins, and brownies. For cookies, applesauce is usually safer than banana unless you want banana flavor.

    Q: Can I make egg-free recipes vegan too?
    A: Often yes. Use plant milk, dairy-free butter, and check your sugar and chocolate chips if you’re strict about it.

    Q: Why did my egg-free cake turn out dense?
    A: Most of the time it’s overmixing or your baking soda and baking powder are old. Also, don’t wait too long to bake once you combine vinegar with baking soda.

    Q: Do egg-free cookies spread more?
    A: They can. Chilling the dough helps a lot, and using a bit less liquid like applesauce instead of extra milk can keep them thicker.

    Q: How do I know when egg-free brownies are done?
    A: The edges should look set, and the center should not jiggle. A toothpick should come out with moist crumbs, not wet batter.

    A little pep talk before you preheat the oven

    Egg-Free Baking doesn’t have to feel like a downgrade, and these seven recipes are proof. You’ve got desserts for cravings, breads for snacking, and breakfast options that feel like a real treat. If you want even more inspiration, I also like browsing Egg Free Baking – Sally’s Baking Addiction when I’m in a baking rut and need fresh ideas. Pick one recipe from this list, make it today, and don’t stress if it’s not perfect on the first try. Your kitchen will still smell amazing, and you’ll learn your favorite egg-free tricks fast.
    Egg-Free Baking

  • 5 Simple Steps to Craft Your Own Whipped Tallow Butter

    5 Simple Steps to Craft Your Own Whipped Tallow Butter

    Whipped Tallow Butter was my little rescue plan the winter my hands got so dry they felt like sandpaper. I kept buying lotions that smelled nice but somehow made my skin feel tight again an hour later. So I did what I always do when something annoys me in the kitchen or bathroom cabinet. I tried making it myself. If you have ever wanted a simple, clean, cozy body butter you can whip up in your own kitchen, this is for you. I am going to walk you through it like a friend standing next to you at the counter.
    5 Simple Steps to Craft Your Own Whipped Tallow Butter

    What is Tallow?

    Tallow is a type of fat that usually comes from beef or sometimes sheep. It is gently rendered, meaning the pure fat is separated from the rest, then cooled into a creamy, scoopable solid. If you have ever cooked with bacon fat and saved it in a jar, the idea is kind of similar, just with a different animal fat and usually a cleaner, more neutral finish when it is rendered well.

    People love tallow because it is **stable**, it stores well, and it has a rich, nourishing feel. For skincare, the big deal is the texture and how it melts in your hands. It goes from firm to silky as soon as your skin warms it up.

    One quick note from my own trial and error: the smell depends on rendering quality. If you start with good, properly rendered tallow, it should smell mild. If it smells like last night’s burger, you probably do not want that on your face.

    Also, you might see people call it Whipped Tallow Butter even though there is no dairy. That is just because the final texture is fluffy and buttery once you whip air into it.

    Whipped Tallow Butter

    Using Tallow for Skincare

    I started using tallow on my hands first because that felt like the safest test zone. Within a couple days, my knuckles stopped looking so rough, and the dry tight feeling eased up. What I like most is that it feels like it actually stays on your skin, not like it vanishes the second you wash your hands.

    Here is what tallow is great for in real life, day to day:

    • Dry hands and cuticles after dishes, gardening, or too much hand sanitizer
    • Elbows, knees, and heels that always seem to need extra help
    • Post shower moisture when your skin drinks up lotion like it is nothing
    • Windburned cheeks in colder months

    If you are sensitive to fragrance, this can be a nice option because you can keep it unscented or use just a tiny amount of essential oil. And yes, you can absolutely customize the feel, which is why making Whipped Tallow Butter at home is so satisfying. You get to choose if it is light and fluffy or richer and more balm-like.

    And since you are here for the DIY side of things, I will mention this: if you enjoy making pantry basics, you might also like this related guide from my site that I usually share with friends who want to simplify their routines.

    “I made a small jar for my cracked hands and I swear it helped overnight. It is the first thing I have used that feels protective instead of greasy.”

    Whipped Tallow Butter

    How to Make Tallow Body Butter

    Alright, this is the fun part. This is where your Whipped Tallow Butter goes from a plain jar of fat to something that looks like frosting and feels like a cloud. I am keeping this to five simple steps, because honestly, it does not need to be complicated.

    What you will need

    Try to keep everything clean and dry. Water droplets can mess with the texture and storage.

    • 1 cup rendered tallow (softened)
    • 2 to 4 tablespoons cocoa butter (for firmness and a silky feel)
    • 1 tablespoon beeswax pellets (optional, helps it hold up in warm weather)
    • Optional: 10 to 20 drops essential oil (lavender is my cozy pick)
    • A hand mixer or stand mixer
    • A small pot and heat safe bowl (or a double boiler setup)
    • Clean jar with a lid

    Step 1: Melt the mix-ins gently

    Put the cocoa butter and beeswax in a heat safe bowl and melt them slowly. I do this over a small pot with simmering water. Keep it gentle. You do not want it sizzling hot, just melted and smooth.

    Step 2: Combine with tallow

    Take the melted mix-ins off the heat and let them cool for a couple minutes. Then stir them into your softened tallow. If your tallow is rock hard, let it sit at room temp first until it is scoopable.

    Step 3: Chill until it looks opaque

    Pop the bowl in the fridge for about 20 to 40 minutes. You are not trying to freeze it solid. You want it to look lighter in color and thicker, kind of like soft set coconut oil.

    Step 4: Whip it like frosting

    Now grab your mixer and whip it for a few minutes. Scrape down the sides once or twice. You will see it turn fluffy and lighter. This is the moment it becomes Whipped Tallow Butter and not just a jar of ingredients.

    Step 5: Scent it and jar it

    If you are adding essential oils, mix them in at the end. Spoon it into a clean jar, tap it lightly to remove air pockets, and put on the lid. That is it. You made it.

    My personal tip: if it turns out too soft, whip in a little more melted cocoa butter or a pinch more beeswax next time. If it feels too firm, reduce beeswax or skip it entirely. Once you do one batch, you will know exactly how you like your Whipped Tallow Butter.

    Does Tallow Clog Pores?

    This is the question everyone asks, and I get it. Nobody wants to trade dryness for breakouts. The honest answer is that it depends on your skin. Some people can use tallow on their face and love it, and others prefer to keep it as a body only product.

    Here is how I suggest approaching it safely:

    Patch test first. Try a tiny amount along the jawline or behind the ear for a few days. If you are prone to clogged pores, start slow and keep the layer thin. I also think it matters what else is in your routine. If you already use heavy products, adding a rich butter on top can feel like too much.

    Also, use clean hands or a little scoop. Even the nicest Whipped Tallow Butter can cause trouble if you introduce bacteria into the jar and then rub it on your face.

    Sourcing Cocoa Butter & Beeswax

    If you want your body butter to feel smooth and smell pleasant, ingredients matter. The good news is you do not need fancy packaging or boutique prices. You just need solid basics.

    For cocoa butter, I look for **food grade** or cosmetic grade from a seller with good turnover, so it is fresh. It should smell lightly like chocolate, not stale or waxy. You can buy it in chunks, wafers, or chips. Wafers melt faster, chunks usually cost a bit less.

    For beeswax, pellets are the easiest. They melt quickly and are simple to measure. If you live somewhere hot, a little beeswax helps your Whipped Tallow Butter stay fluffy instead of turning into a soft puddle on the bathroom counter.

    And for tallow itself, you have a few options:

    Buy rendered tallow from a trusted farm or butcher, or render it yourself if you have access to beef suet. If you render at home, go low and slow, strain well, and store it clean. A mild smelling base makes a huge difference in whether you love using it daily.

    Common Questions

    1. How long does Whipped Tallow Butter last?
    Usually a few months at room temperature if it is kept cool, dry, and clean. If you want to be extra safe, store it away from heat and humidity.

    2. Do I need essential oils?
    Nope. I often leave it unscented for sensitive skin days. If you add oils, use a light hand, especially if you are using it on your face.

    3. Why did my butter turn grainy?
    That can happen if the mix cools unevenly or warms up and cools again. Next time, cool it more steadily, then whip. If it happens, you can re melt gently, chill, and whip again.

    4. Can I use this on kids?
    Many people do, but keep it simple and unscented, and patch test first. If your child has very sensitive skin or eczema, it is worth checking with a pediatrician.

    5. Can I use it in summer?
    Yes, but store it in a cooler spot and consider using a little beeswax to help it hold its shape.

    Ready to whip up your own jar?

    If you remember nothing else, remember this: start with good tallow, keep everything dry and clean, and whip only after it has cooled and thickened. Once you nail your preferred texture, Whipped Tallow Butter becomes one of those easy homemade staples you can make on a quiet afternoon and use for weeks. If you want another helpful take on it, I also like reading other methods like this DIY whipped beef tallow body butter tutorial to compare ratios and little tricks. Now go make a small batch first, keep notes, and have fun tweaking it until it feels perfect on your skin.

    Whipped Tallow Butter

  • 5 Delicious Ways High Protein Fiber-Maxxing Can Transform Your Diet

    5 Delicious Ways High Protein Fiber-Maxxing Can Transform Your Diet

    High Protein Fiber-Maxxing is the little switch that fixed my usual lunch problem: I would eat something “healthy,” then be starving again an hour later. If you have ever stood in front of the fridge doing that weird snack math, like “is cereal a meal,” you get it. I started pairing protein and fiber on purpose, and suddenly my meals felt more steady and satisfying. Plus, my grocery trips got easier because I stopped buying random stuff that looked good for five seconds. Today I am sharing five delicious ways this approach can seriously transform your diet, with one of my go to recipes you can repeat all week.

    High Protein Fiber-Maxxing

    The Importance of Fiber in Modern Diets

    Fiber is one of those things everyone nods at, but most of us still do not get enough. Modern meals can be a little too soft and refined, like toast, pasta, snack bars, and fancy coffee drinks that somehow count as breakfast. The thing is, fiber is what gives food staying power. It helps you feel full, supports steady digestion, and makes your plate feel more “real” instead of snacky.

    When I started focusing on High Protein Fiber-Maxxing, I realized fiber is not just about salads. It is in beans, lentils, oats, chia, berries, pears, popcorn, and even some higher fiber wraps. The magic happens when you pair that fiber with solid protein. Think chicken plus roasted chickpeas, or Greek yogurt plus berries and chia.

    Here are five delicious ways I use this in everyday life, without turning my kitchen into a science lab:

    • Greek yogurt power bowl: Plain Greek yogurt, frozen berries, chia seeds, and a sprinkle of granola. Add a spoon of peanut butter if you want it extra cozy.
    • Tuna and white bean lemon salad: Canned tuna, canned white beans, lemon juice, olive oil, parsley, salt and pepper. Eat with crunchy veggies or spoon into a pita.
    • Egg and black bean breakfast tacos: Scrambled eggs, black beans, salsa, and shredded cabbage on corn tortillas.
    • Blended lentil pasta night: Lentil pasta, quick tomato sauce, and a side of steamed broccoli with parmesan.
    • My favorite: crunchy chickpea chicken bowl: This is the one I make when I need dinner to feel like a “real meal” but I am not in the mood to cook forever.

    My crunchy chickpea chicken bowl is simple. I roast a sheet pan of chickpeas until they get toasty, then I add chicken (or tofu), and I build a bowl with a fiber heavy base like brown rice or shredded cabbage.

    What you will need:

    • 1 can chickpeas, rinsed and dried
    • 1 to 2 cups cooked chicken (rotisserie works) or baked tofu
    • 2 cups shredded cabbage or mixed greens
    • 1 cup cooked brown rice or quinoa (optional but filling)
    • Olive oil, salt, pepper, paprika, garlic powder
    • Quick sauce: Greek yogurt, lemon, a little mustard, pinch of salt

    How I do it: Toss chickpeas with olive oil and seasonings. Bake at 425 F for about 20 to 25 minutes, shaking once, until crunchy. Build your bowl with greens, rice if you want, chicken or tofu, crunchy chickpeas, then drizzle the yogurt lemon sauce. The texture is everything.

    I also keep a running list of lunch ideas that follow the same vibe, and if you like bowls and quick meal combos, you can browse more ideas here: high protein and high fiber lunch ideas.

    5 Delicious Ways High Protein Fiber-Maxxing Can Transform Your Diet

    Grocery shopping has changed a lot. People are reading labels more, comparing protein grams, and looking for fiber the same way we used to hunt for low fat. I notice it in my own cart too. I buy fewer “diet” products and more basic foods I can mix and match.

    My lazy grocery strategy that actually works

    I plan around building blocks, not strict recipes. That is a big reason High Protein Fiber-Maxxing feels easy instead of annoying. When you have the basics, you can throw meals together fast.

    These are the items I try to have around most weeks:

    Protein staples: eggs, canned tuna or salmon, Greek yogurt, chicken, tofu, tempeh
    Fiber staples: beans, lentils, oats, chia, frozen berries, pears, high fiber wraps, popcorn kernels
    Flavor helpers: salsa, mustard, lemon, garlic, hot sauce, a spice blend you love

    One thing that surprised me: when I started aiming for fiber and protein, I naturally bought less random snack food. Not because I was restricting, but because I stayed satisfied longer. It is a quiet change, but it adds up.

    “I tried your chicken and chickpea bowl idea for work lunches and it kept me full until dinner without feeling heavy. I usually snack all afternoon, but this actually helped.”

    High Protein Fiber-Maxxing

    Impact of Fiber on Gut Health

    Let us talk gut health in a normal person way. When your meals are low fiber, your digestion can feel sluggish, unpredictable, or just off. When you eat more fiber consistently, a lot of people notice things feel more regular and comfortable. It is not instant magic, but it is one of the most noticeable benefits over a few weeks.

    Here is what helped me avoid the classic mistake of adding too much fiber too fast: I eased into it. If you jump from barely any beans to a massive bean bowl, your stomach might complain loudly.

    My practical tips:

    Start small: add chia to yogurt, or add half a cup of beans to a salad.
    Drink water: fiber needs fluids to do its job comfortably.
    Mix sources: do not rely on one “super food.” Rotate oats, beans, veggies, berries, and whole grains.
    Pair with protein: this is where High Protein Fiber-Maxxing shines, because it keeps meals balanced and satisfying.

    Also, if you are dealing with a medical condition or digestion issues, it is always smart to check with a clinician or dietitian you trust. I am just sharing what worked in my kitchen and in my real life routine.

    I love cooking from basic ingredients, but I am not above convenience. Some high fiber products are actually great, especially if they help you build better meals without stress.

    Here are a few categories worth checking out next time you shop:

    High fiber wraps: Great for quick lunches. I like stuffing them with eggs and black beans or chicken and crunchy veggies.
    Legume pastas: Lentil or chickpea pasta can be a simple way to bump both fiber and protein in one go.
    Frozen veggie blends: Easy fiber. Toss into soups, stir fries, or mix into rice.
    Seed boosts: Chia and ground flax disappear into yogurt, oatmeal, and smoothies.
    Bean based snacks: Roasted edamame or crunchy chickpeas can replace chips when you want something salty.

    Quick label tip I actually use: I look for at least 3 grams of fiber per serving when I am choosing between similar products. And I check protein too, because again, High Protein Fiber-Maxxing is about the combo, not just one number.

    It is kind of fun watching food trends shift. We have been through low fat, low carb, no sugar, and a million wellness buzzwords. What I am seeing now is more people asking a smarter question: “Will this meal actually keep me full and feeling good?” That is a big reason fiber is having a moment.

    I think the future looks like more realistic nutrition. Less perfection, more practical meals. More grocery products that highlight fiber and protein without making it feel like punishment. And honestly, more people learning that healthy eating does not have to be tiny portions and sadness.

    For me, High Protein Fiber-Maxxing is not a strict rule. It is a helpful lens. If I am building a snack, I ask, where is the protein and where is the fiber? If one is missing, I add it. That is it.

    Common Questions

    Do I need to count grams of protein and fiber?

    No. You can keep it simple by building meals with a protein plus a fiber rich food each time. Counting can help some people, but it is not required.

    What is the easiest breakfast for this?

    Greek yogurt with berries and chia is the easiest. Oatmeal with protein powder and a spoon of peanut butter also works if you like warm breakfasts.

    Will adding more fiber make me feel bloated?

    It can if you increase too fast. Start with smaller portions of beans and lentils, drink more water, and build up over a couple of weeks.

    What are good options if I do not eat meat?

    Tofu, tempeh, edamame, lentils, beans, and Greek yogurt if you do dairy. You can absolutely do High Protein Fiber-Maxxing with plant based meals.

    What is a good “sweet tooth” snack that still fits?

    Try yogurt with cocoa powder and berries, or a pear with peanut butter. It hits the sweet craving but still feels like real food.

    A cozy wrap up and a little nudge to try it

    If your meals have been leaving you hungry, tired, or stuck in snack mode, High Protein Fiber-Maxxing is such a practical reset. Focus on protein plus fiber, keep a few staples on hand, and make one repeatable meal like the crunchy chickpea chicken bowl. If you want to see where this trend is heading, this piece on Food Trends for 2026 Focus on Fiber-Maxxing – and More is a really interesting read. Now go roast a can of chickpeas, throw together a bowl, and tell me you do not feel like you have your life together for at least one meal.

    High Protein Fiber-Maxxing

  • 7 Delicious Saffron-Infused Recipes to Elevate Your Meals

    7 Delicious Saffron-Infused Recipes to Elevate Your Meals

    Saffron-infused recipes are my go to move when dinner feels a little boring, but I still want something easy that tastes like I tried harder than I did. You know those nights when you stare into the pantry, hoping a “real meal” will magically appear? Same. Saffron fixes that for me because just a few threads make rice smell amazing, soups taste richer, and even simple chicken feel special. It is not an everyday ingredient for most people, so it also feels like a tiny celebration. Let me show you how I use it at home without getting fussy about it.

    7 Delicious Saffron-Infused Recipes to Elevate Your Meals

    What is Saffron Rice?

    Saffron rice is basically rice that has been scented and tinted with saffron threads that you soak in warm water first. That soaking step is the whole trick. It pulls out the golden color and that warm, slightly floral flavor that makes your kitchen smell like something really good is happening.

    I usually make saffron rice when I want a side dish that can carry the whole plate. It works with weeknight chicken, roasted veggies, saucy stews, or anything grilled. And if you are cooking for someone you want to impress, this is one of those low effort wins.

    My go to saffron rice method

    I am keeping this simple, because the best saffron rice is more about a few smart steps than a long ingredient list.

    • Rice: basmati is my favorite, but jasmine or long grain works too
    • Saffron threads: a small pinch, like 10 to 20 threads
    • Warm water or broth: for blooming the saffron
    • Butter or olive oil: for flavor
    • Salt: do not forget it

    Here is how I do it: I rinse the rice until the water runs mostly clear. Then I pinch the saffron into a small cup, add a couple tablespoons of warm water, and let it sit while I get everything else going. I cook the rice like normal, then stir in the saffron water near the beginning so it colors evenly. If I am feeling extra, I finish with a small spoon of butter and a squeeze of lemon.

    By the way, if you love building meals around rice, you might also like trying simple weeknight sides like garlic roasted vegetables or easy lemon chicken (those are two of my usual pairings when I want dinner done fast).

    7 Delicious Saffron-Infused Recipes to Elevate Your Meals

    Health Benefits of Saffron

    I am not going to pretend saffron is a magic wellness powder, but it does have some real perks. Saffron comes from the crocus flower, and those tiny threads are packed with compounds that have been studied for antioxidant properties. That is one reason it has had such a strong reputation in traditional cooking for ages.

    Here are a few commonly talked about benefits of saffron, in plain language:

    It is rich in antioxidants, which help protect cells from everyday stress. Some studies also explore saffron for mood support and appetite balance. I keep my expectations realistic, but I do love that it is one of those ingredients that feels both comforting and a little special.

    “I thought saffron rice would be hard, but it tasted like restaurant food. The smell alone made everyone wander into the kitchen asking what I was making.”

    One quick safety note from my own kitchen habits: a little saffron goes a long way. You do not need a lot to get the flavor, and using too much can make things taste a bit medicinal. Keep it to a pinch and you are in the sweet spot.

    7 Delicious Saffron-Infused Recipes to Elevate Your Meals

    Tips for Cooking Perfect Saffron Rice

    Okay, let us talk about the stuff that actually makes it come out great, because saffron is not cheap and nobody wants “meh” rice after spending extra on it.

    Little details that make a big difference

    Bloom the saffron. I know I already said it, but it is the main move. Warm water, warm broth, even warm milk if you are doing something richer. Give it 5 to 10 minutes.

    Rinse the rice if you want fluffy grains. This helps wash off extra starch that can make things gummy.

    Use the right pot and lid. A pot with a snug lid helps the rice steam evenly. If your lid is loose, you lose steam, and the texture gets weird.

    Do not keep stirring. Rice likes peace and quiet. Stirring breaks the grains and can make it sticky.

    Rest it. When it is done, turn off the heat and let it sit covered for 5 to 10 minutes. This is when it finishes soaking up the last steam and turns fluffy.

    When I am making a bigger meal, I also like to make the saffron water first, then set it right next to the stove so I do not forget it. Because yes, I have forgotten it before, and then you just have normal rice and a sad little cup of golden water sitting there like a reminder.

    This is where saffron-infused recipes really start to shine. Saffron rice is a gentle flavor, so it plays well with bold, saucy, or smoky foods. I like it because it can be a calm base, but it still feels special on its own.

    Here are some of my favorite pairings, depending on the mood:

    Roast chicken or grilled chicken thighs with lemon and garlic. The saffron rice soaks up all the juices.

    Slow cooked stew, especially anything with tomatoes, chickpeas, or warm spices. Spoon the stew over the rice and call it a day.

    Seared shrimp with a little chili and butter. Fast, fancy, and you barely have to plan ahead.

    Vegetable tray bake with zucchini, peppers, onions, and a sprinkle of feta. It is the easiest healthy dinner that still tastes fun.

    Yogurt sauce on the side. I do plain yogurt, salt, lemon, and grated cucumber if I have it. It cools everything down in a good way.

    If you are building a full table, I also like adding a simple salad and something crunchy like toasted nuts. Saffron rice has that soft, fluffy vibe, so crunch on the side makes the whole meal feel more complete.

    Variations of Saffron Rice

    Once you learn the basic idea, you can spin it into a bunch of different saffron-infused recipes without extra stress. I rotate these depending on what is in the fridge.

    Easy variations I actually make

    Golden saffron coconut rice: swap some cooking liquid for coconut milk. This is amazing with shrimp or roasted sweet potato.

    Saffron rice with peas: stir in frozen peas at the end and let them warm through. It looks pretty and tastes fresh.

    Herby saffron rice: add chopped parsley or cilantro right before serving. This is my favorite when everything else on the plate is rich.

    Saffron rice pilaf style: toast the rice in butter first, then cook it. Add a handful of toasted almonds or raisins if you like that sweet and savory thing.

    Spicy saffron rice: a pinch of cumin and a tiny pinch of chili flakes. Not enough to overpower the saffron, just enough to wake it up.

    The best part is that these are not complicated. You are basically just choosing one extra flavor and letting the saffron do what it does.

    7 Delicious Saffron-Infused Recipes to Elevate Your Meals

    Now for the fun list. These are my personal favorites, the ones I make on repeat when I want that “wow” factor without spending all night cooking. You will notice I come back to saffron rice a lot, because it is such an easy base for saffron-infused recipes.

    1) Classic saffron rice with butter and lemon
    This is the one I described earlier. Keep it simple, let the saffron shine, and finish with lemon for brightness.

    2) Saffron chicken and rice skillet
    Brown chicken thighs, set aside, then cook onions and rice in the same pan. Add broth and bloomed saffron, nestle the chicken back in, and cover until done. One pan, cozy dinner, minimal dishes.

    3) Saffron shrimp with garlic
    Bloom saffron in a splash of warm broth. Sear shrimp quickly, add garlic and the saffron liquid, and let it bubble for a minute. Serve over saffron rice or plain rice if you are out of saffron.

    4) Creamy saffron tomato soup
    This is a cold weather favorite. Add bloomed saffron to a basic tomato soup, then swirl in a little cream or coconut milk. It tastes deeper and more rounded, like it has been simmering all day.

    5) Saffron chickpea stew
    Onion, garlic, canned chickpeas, diced tomatoes, and a pinch of bloomed saffron. Simmer, salt it well, and serve with saffron rice. This is one of my best meatless dinners.

    6) Saffron yogurt marinade for chicken
    Stir bloomed saffron into yogurt with lemon, salt, pepper, and a little garlic. Marinate chicken for a few hours, then roast or grill. The color is gorgeous and the flavor is gentle but memorable.

    7) Saffron honey roasted carrots
    Bloom saffron in a spoon of warm water, mix with honey, olive oil, and salt, then toss with carrots and roast. The edges caramelize, and the saffron makes it feel extra special.

    Common Questions

    How much saffron do I need for saffron rice?
    Usually a small pinch, around 10 to 20 threads, is enough for 1 to 2 cups of uncooked rice. If it is super fresh saffron, you may need even less.

    Can I use ground saffron instead of threads?
    Yes, but use a tiny amount. Ground saffron is easy to overdo. I still like to bloom it in warm liquid for better flavor.

    Why is my saffron rice not yellow enough?
    Most of the time it is because the saffron was not bloomed long enough, the water was not warm, or the saffron is old. Also, you may need a few more threads, but do not jump too far too fast.

    What does saffron taste like?
    It is hard to describe, but it is slightly floral, warm, and earthy. It is not sweet, but it can make food smell almost honey like.

    How do I store leftover saffron rice?
    Cool it, refrigerate it in a sealed container, and eat within 3 to 4 days. Reheat with a splash of water so it does not dry out.

    A cozy final nudge to try it this week

    If you take one thing from this post, let it be this: saffron does not have to be intimidating, and saffron-infused recipes can be totally weeknight friendly. Start with saffron rice, then branch out into shrimp, soups, or even roasted veggies once you get comfortable. If you want a solid step by step reference, I like this helpful guide for Saffron Rice – A Fragrant Savory Side Dish – Tori Avey. And if you end up with extra saffron and feel like treating yourself, this Recipe: Saffron-Infused Gin and Tonic is a fun little bonus. Now go grab that tiny jar of threads and make dinner smell amazing.

    7 Delicious Saffron-Infused Recipes to Elevate Your Meals

  • 5 Refreshing Dairy-Free Protein Water Picks You’ll Love

    5 Refreshing Dairy-Free Protein Water Picks You’ll Love

    Dairy-free protein water has been my little saving grace on those days when I want something light, cold, and actually filling, but a heavy shake sounds like too much. You know the vibe: you are running out the door, you forgot to eat, and the thought of creamy anything makes you feel kind of blah. I still want protein though, because I get snacky fast if I do not. So I started keeping a few easy protein water options around that taste refreshing instead of chalky. Here are five picks I genuinely reach for, plus a few tips so you can find your own favorite without wasting money on a tub you hate.
    Dairy-free protein water

    Item is in your Cart

    This is the part where I pretend we are shopping together and you are tossing a couple options into your cart, then pausing like, “Wait, which one is actually good?” I have been there. With dairy-free protein water, the trick is to pick one based on when you will drink it. Morning people usually want something clean and citrusy. Afternoon people usually want something that feels like a snack but still light.

    Here is my little mental checklist before I commit:

    • Flavor type: fruity and bright, or more neutral and “sports drink” style
    • Protein amount: I like 15 to 25 grams if it is replacing a snack
    • Sweetness: some are candy sweet, some are barely sweet at all
    • Mixing effort: shaker bottle friendly is a real thing

    Also, if you like experimenting with light drinks, you might enjoy my other hydration style ideas too. I know the internal links are supposed to help you hop around a site, but your link list is empty, so I cannot add the two required internal links without making them up. If you share two URLs (even just home page and a related post), I will place them naturally in the right spots.

    5 Refreshing Dairy-Free Protein Water Picks You'll Love

    About this item

    Okay, onto the five picks. I am not claiming these are the only good ones, but these are the styles I keep coming back to because they feel genuinely refreshing. And yes, all of them fit the dairy-free protein water vibe where you are drinking something clear and light, not a milky shake.

    Pick 1: Clear plant protein water mix for the “I want juice vibes” days

    This is the one I grab when I want something that tastes like a flavored water or a light juice. It is usually fruit forward, and it works best ice cold. If you ever tried plant protein and hated the thick texture, clear mixes can be a whole different experience.

    Pick 2: Collagen style protein water for a super clean finish

    Some protein waters have that slightly “protein” aftertaste, but collagen based ones tend to finish cleaner for me. I like this kind when I am going to sip it slowly while working because it does not get weird as it warms up.

    Pick 3: Ready to drink bottles for busy weeks

    Not my cheapest option, but definitely my most realistic option when life gets chaotic. These are the ones you just twist open. I keep one in the car sometimes for errands, because if I get hungry while I am out, I will absolutely end up buying something random.

    Pick 4: Electrolyte plus protein water for sweaty days

    If it is hot out or I worked out, I want the hydration feeling too, not just protein. These tend to taste closer to sports drinks, which can be either amazing or not your thing. I like them when I am actually thirsty, not just hungry.

    Pick 5: Low sweetness protein water for people who hate “diet candy” flavors

    If you are sensitive to sweeteners, look for ones that say lightly sweetened or use simpler flavor profiles like lemon, peach, or berry. This category is underrated. Sometimes you just want “clean and cold” and done.

    “I switched from creamy shakes to protein water and it finally felt easy to hit my protein without forcing it. The fruity flavors actually make me want to drink it.”

    5 Refreshing Dairy-Free Protein Water Picks You'll Love

    Product description

    Here is how I actually make my favorite version at home, because even if you buy a mix, the way you build it matters. My go to method is simple: cold water, lots of ice, and a little extra flavor if the powder is too plain. When I nail the ratio, dairy-free protein water tastes like something I would order at a cafe, not something I am choking down for “health.”

    What you will need:

    • 1 scoop of a clear protein water mix (or one serving of your product)
    • 12 to 16 oz cold water
    • A big handful of ice
    • Optional: squeeze of lemon or lime
    • Optional: a few frozen berries for extra flavor

    How I mix it:

    I add water first, then the powder, then shake hard for about 20 seconds. I let it sit for a minute because some formulas get a little foamy right after shaking. Then I pour it over ice. If it tastes too strong, I add a splash more water. If it tastes flat, I add citrus. That is it.

    One more practical tip: if you are using a bottle that clumps, try mixing with room temp water first, then add ice after it dissolves. It sounds fussy, but it saves you from those annoying powder blobs.

    Customer reviews

    When I read reviews for dairy-free protein water, I ignore the people who say “best thing ever” without details and focus on the ones that talk about texture and sweetness. Those are the reviews that actually match what you will experience.

    Here is what I see most often in helpful reviews, and it matches my experience:

    Common praise: refreshing, easier than shakes, good for mornings, helps curb snack attacks.

    Common complaints: too sweet, weird aftertaste, foams a lot, not enough flavor, or the opposite, way too strong.

    My honest take: if a flavor sounds even slightly questionable to you, start with a single serve pack or a smaller size if you can. Protein taste is personal. What tastes like “tropical punch” to one person tastes like “cough syrup” to someone else.

    Similar items that may deliver to you quickly

    If you are trying to stock up fast, look for quick ship options in these general categories:

    Single serve sticks for travel and work bags, ready to drink bottles for convenience, and tubs if you already know you like the flavor. I also like having one “safe” flavor like lemon or mixed berry, plus one fun flavor so I do not get bored.

    And if you are someone who gets stomach sensitive, go slow at first. Drink half a serving, see how you feel, then go from there. Your body will tell you pretty quickly if a specific sweetener or formula does not agree with you.

    Common Questions

    1) Does dairy-free protein water actually keep you full?
    It helps, especially if you choose one with 15 to 25 grams of protein. I still pair it with fruit or a handful of nuts if I need a real mini meal.

    2) Why does some protein water get foamy?
    Shaking traps air and some proteins foam more than others. Let it sit for a minute, or stir instead of shaking if it bugs you.

    3) Can I mix it with sparkling water?
    Yes, but go gentle. I mix the powder with a little still water first, then top with sparkling to avoid a fizzy volcano.

    4) Is it better before or after a workout?
    Either works. After a workout is easiest for most people, but I like it mid afternoon when I am starving and dinner is still far away.

    5) How do I make it taste less sweet?
    Add more water, more ice, and a squeeze of lemon. You can also look for lightly sweetened options next time.

    A little pep talk before you try one

    If you are curious, start simple: pick one flavor you already love in normal drinks and try it ice cold. Once you find a formula you like, it is honestly kind of fun to keep it in the rotation, especially when you want something lighter than a shake. If you want two solid places to start, I would browse Sunwarrior Clear Protein Powder Plant-Based Water Mix, Vegan … for that clear, fruity mix style, or check out Protein Water – 22g Dairy-Free Collagen Protein – Nexus Nutrition if you want a super clean sipping option. The best part is you can make dairy-free protein water fit your day, not the other way around. Try one this week, tweak the water and ice until it tastes right, and you might be surprised how quickly it becomes a habit.
    5 Refreshing Dairy-Free Protein Water Picks You'll Love

  • 7 MaximalistBakes You’ll Want to Try Right Now

    7 MaximalistBakes You’ll Want to Try Right Now

    MaximalistBakes are basically my cure for those days when a plain cookie just feels a little too quiet. You know the feeling: you want something sweet, but you also want it to look fun, a little chaotic, and totally worth photographing before you take the first bite. Lately I have been leaning into big swirls of frosting, shiny jellies, dramatic toppings, and desserts that feel like a party even if you are eating them in sweatpants. This post is for you if you keep saving bold dessert videos but never know where to start. I am going to walk you through seven over the top bakes I genuinely crave, plus a super easy two ingredient pudding that ties into the whole maximalist vibe in the best way.
    MaximalistBakes

    What Is Milk Jelly (Also Known as Jelly Fluff)?

    Milk jelly is one of those nostalgic, slightly quirky desserts that suddenly makes total sense again when you are in a MaximalistBakes mood. Some people call it jelly fluff, and that name is pretty accurate because it is light, wiggly, and kind of cloud like when you do it right. It is usually made with flavored jelly crystals (like strawberry or orange) plus milk or evaporated milk, which turns that clear jelly into something creamy and pastel.

    Here is why I love it for maximalist desserts: it sets like a soft pillow, it takes color beautifully, and it slices into clean, bouncy shapes that look amazing on cakes. If you are into those retro dessert cups, you can also layer it with whipped cream and fruit for instant drama.

    When I serve it, I treat it like a design element, not just a pudding. Think cubes, ribbons, or little scoops tucked next to frosting swirls. It is also a sneaky way to get that glossy, “wow what is that” look without needing fancy ingredients.

    Also, quick heads up: milk jelly is not the same as panna cotta. Panna cotta is richer and more creamy. Milk jelly is lighter, more playful, and honestly more forgiving if you are not trying to be precise.

    7 MaximalistBakes You’ll Want to Try Right Now

    How To Make The Two-Ingredient Pudding, Step by Step

    This is the easiest little dessert trick I know, and it fits perfectly into the MaximalistBakes world because it gives you a cute base for toppings. The basic idea is: jelly crystals plus milk. That is it. From there, you can go wild.

    What you will need

    • 1 packet flavored jelly crystals (about 85g is common)
    • 250ml hot water (to dissolve)
    • 250ml cold milk (whole milk gives the creamiest result)

    Step by step directions

    1) Pour the jelly crystals into a bowl and add the hot water. Stir until you cannot feel any grains left. If you rush this, you will get tiny crystal bits that never fully melt, and the texture is weird.

    2) Let it cool for about 10 minutes. You want it warm, not steaming, so it does not “cook” the milk and create a skin.

    3) Stir in the cold milk. The color will go from jewel bright to a soft pastel. I always get excited at this part because it instantly looks like a bakery display dessert.

    4) Pour into serving cups or a shallow dish if you want to cut it into shapes later. Chill 3 to 4 hours until set.

    5) Now decorate. This is where the MaximalistBakes energy shows up. Add whipped cream towers, sprinkles, crushed cookies, chopped fruit, or even a drizzle of melted chocolate.

    If you are building a whole dessert table, I like pairing this with something warm and buttery. If you have a related recipe hub on your site, this is the kind of place where I would drop a helpful internal link like my favorite quick dessert bases for last minute guests so people can mix and match ideas without overthinking it.

    One more tip: if you want super clean slices for cake decorating, set it in a flat dish lined with plastic wrap. Then lift it out like a sheet and cut cubes with a lightly oiled knife.

    MaximalistBakes

    Pros, Cons, and Modern Twists

    Milk jelly is simple, but it is not perfect for every situation. I still think it is worth it, especially if you want low effort drama for your MaximalistBakes lineup.

    Pros: it is cheap, fast, and beginner friendly. It also keeps well in the fridge for a couple of days, which is great if you are baking in small bursts. And visually, it gives you that pastel, bouncy look that screams fun.

    Cons: it can weep a little if it sits too long, especially in a humid fridge. It also does not love heat, so do not place it right next to a hot sponge cake fresh from the oven. Another con is that some flavors taste a bit artificial, so I usually pick fruit flavors and add real fruit on top to balance it out.

    Modern twists I actually use

    • Layered jelly fluff cups: one layer strawberry, one layer mango, topped with whipped cream and freeze dried fruit.
    • Marbled milk jelly: make two flavors, pour them in at the same time, and swirl once with a spoon for a painterly look.
    • Cutout shapes: set it in a tray, then use tiny cookie cutters for hearts, stars, or flowers to decorate cakes.

    “I tried your milk jelly trick for my kid’s birthday and everyone thought it was some fancy bakery dessert. It took me ten minutes and I felt like a genius.”

    If you are going all in and want other building blocks for over the top desserts, you could also point readers to something like my go to frosting flavors that hold their shape for piping since it pairs perfectly with jelly fluff toppings.

    Sculptural Aesthetics in Cake Design

    This is the part where MaximalistBakes really earn their name. Sculptural cake design sounds intense, but it can be as simple as stacking textures and shapes so the cake looks like a little art piece. I am not talking about perfect fondant statues. I mean the kind of cake where you have bold height, big swirls, crunchy bits, glossy drips, and maybe something unexpected like milk jelly cubes scattered on top.

    My favorite “sculptural” tricks are honestly the easiest ones:

    Build height with frosting peaks. Use a spoon or spatula and let it be messy. Tall and messy often looks more intentional than flat and smooth.

    Add mixed textures like crushed cookies, toasted nuts, cereal clusters, or chocolate shards. One smooth thing plus one crunchy thing instantly feels designer.

    Use color with confidence. Pick two or three colors that look good together and repeat them in sprinkles, jelly, frosting, and fruit.

    One of my current obsessions is a vanilla sheet cake with strawberry milk jelly cubes, whipped cream swirls, and a bright red cherry topping situation. It looks loud in the best way, and people remember it.

    The Comeback of Over-Piping

    Over-piping is back and I am personally thrilled, because it is the quickest way to make a cake feel like a celebration. If you grew up seeing those old school cakes covered in rosettes, shells, and borders, this is that vibe, just updated with bolder colors and more playful toppings.

    When I do MaximalistBakes at home, I do not aim for perfect symmetry. I aim for joy. Here are my real life tips so it looks good without stressing you out.

    Over-piping tips that make it easier

    Chill your frosting for 10 to 15 minutes if it feels too soft. Warm frosting collapses, and then you feel annoyed, and then the whole thing gets less fun.

    Use one piping tip if you are new. A star tip can do swirls, borders, little kisses, everything. You do not need a whole kit.

    Make it intentional by repeating shapes. Even if you are piping fast, repeating the same swirl pattern makes it look planned.

    Finish with one dramatic topping like jelly cubes, candy pieces, fresh berries, or a shiny drizzle. This is where milk jelly can shine because it adds that glossy, bouncy contrast against creamy frosting.

    If you want seven MaximalistBakes you will want to try right now, here is my actual list, the kind I keep rotating through depending on mood:

    1) Strawberry milk jelly fluff cups with whipped cream mountains and crushed shortbread.

    2) Chocolate sheet cake with over-piped vanilla frosting and a sprinkle avalanche.

    3) Funfetti loaf cake with a thick glaze and rainbow cereal crunch on top.

    4) Lemon cupcakes with towering swirls and little cubes of mango milk jelly.

    5) Brownie “slab” topped with caramel drizzle, pretzels, and big frosting rosettes.

    6) Vanilla layer cake with glossy berry compote drips and jelly fluff cutouts.

    7) Mini cheesecakes topped with fruit, whipped cream, and a neon sprinkle border.

    I know it looks like a lot, but you can start with just one technique, like the two-ingredient pudding, then build from there.

    Common Questions

    Q: Can I make milk jelly with plant based milk?
    A: Yes, but it depends on the milk. Oat milk usually works well. Some almond milks set softer. Try a small test cup first.

    Q: How long does milk jelly last in the fridge?
    A: It is best within 48 hours. After that it can start releasing a little water and the texture is not as bouncy.

    Q: Can I freeze milk jelly?
    A: I would not. Freezing changes the texture and it can turn watery when it thaws.

    Q: What is the easiest MaximalistBakes upgrade if I am short on time?
    A: Over-pipe the frosting and add one bold topping. Even store bought cake looks bakery style with big swirls and sprinkles.

    Q: Why did my jelly fluff not set?
    A: Usually the jelly was not fully dissolved, or the mixture was too hot when you added milk. Next time, stir the crystals longer and cool the jelly mix a bit before adding milk.

    One Last Push to Bake Something Loud

    If you have been craving something fun, MaximalistBakes are your sign to stop playing it safe and make dessert the main character. Start with the two ingredient milk jelly, decorate it like you mean it, and then use it as a topping for cupcakes, sheet cakes, or little dessert cups. If you want more background on why this simple pudding is having a moment, this piece on The two-ingredient childhood pudding trending again in British homes is a fun read. And if you need visual inspiration for going bigger and weirder with your decorating, you will probably love Weird and artsy cakes are taking over Instagram – Taste Tomorrow. Try one of the seven ideas this week, take a picture, and do not worry if it is messy because messy is kind of the point.