Category: Uncategorized

  • 5 Chic KitchenCouture Items That Bring Style to Cooking

    5 Chic KitchenCouture Items That Bring Style to Cooking

    KitchenCouture is one of those little things that can flip your whole mood in the kitchen. You know the days when you are hungry, the sink is full, and cooking feels like a chore? That is usually when I reach for my cutest tools, put something simple on the stove, and suddenly I am back in the groove. Style is not just for going out, it can totally live on your countertop too. Today I am sharing five chic items I actually use, plus the easy cozy meal I make when I want to feel like I have my life together.
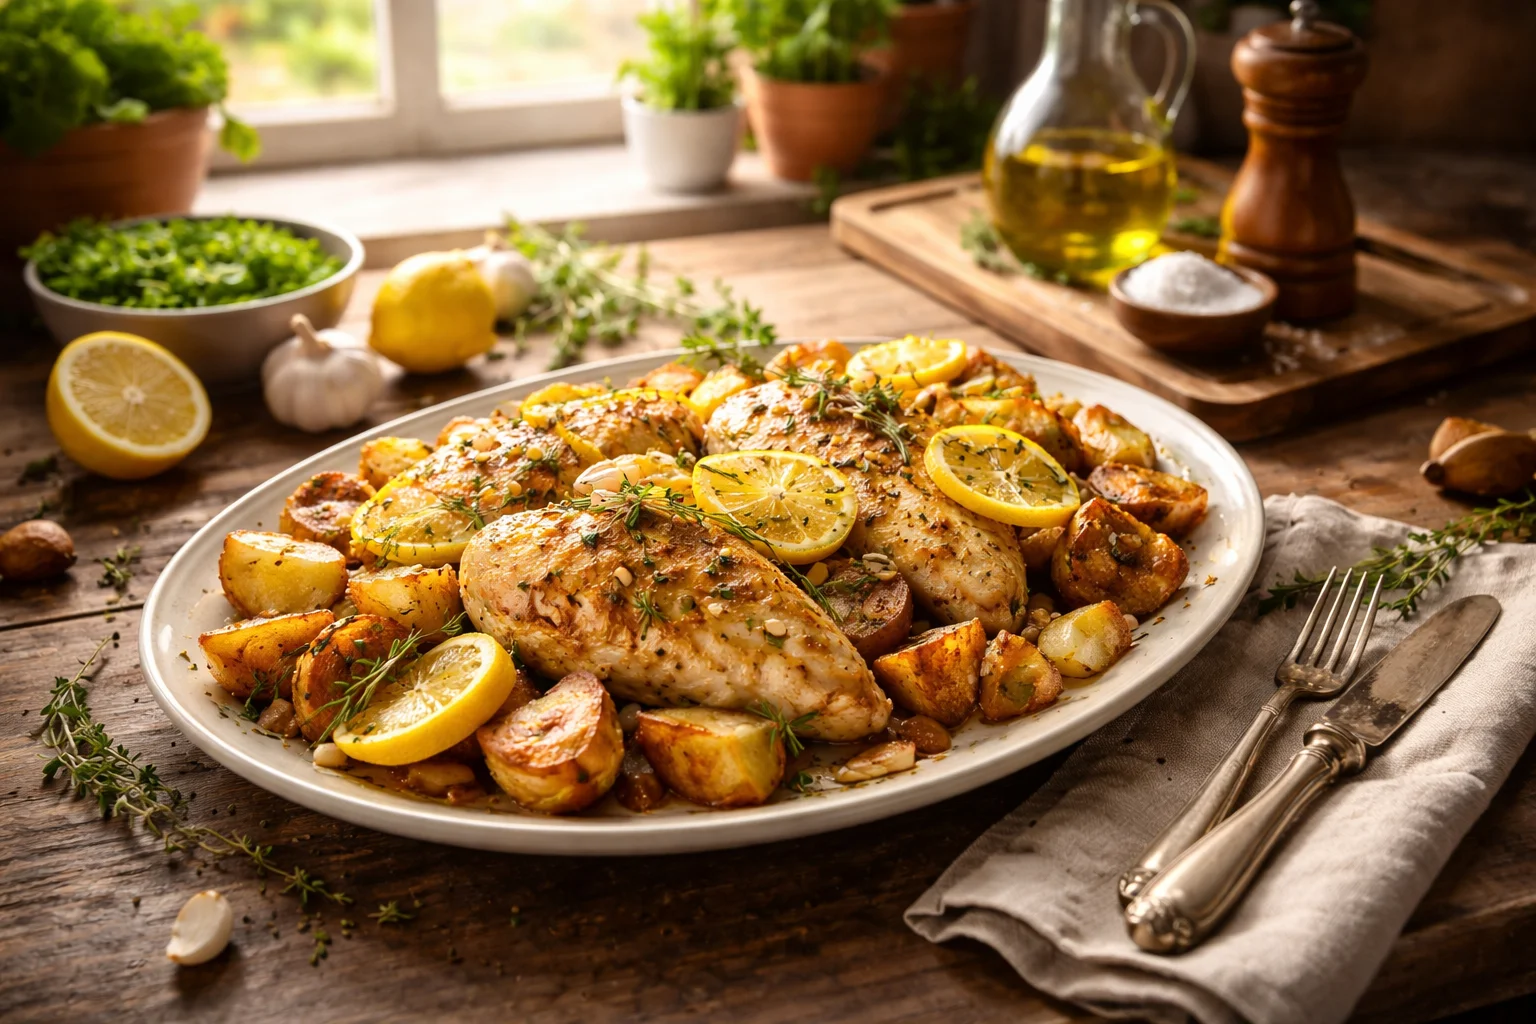
    5 Chic KitchenCouture Items That Bring Style to Cooking

    Country/region

    I grew up bouncing between weeknight comfort food and the kind of casual hosting where everyone ends up in the kitchen. I am based in Australia now, and I feel like our cooking vibe here is very practical but also secretly obsessed with nice looking home stuff. We love a good brunch, we love a quick dinner, and we definitely love anything that makes clean up easier.

    My “style to cooking” moment usually looks like this: I am making a simple lemon garlic chicken with crispy potatoes, but I want it to feel special without adding extra work. That is where chic gear comes in. When your tools look good and work well, it honestly makes you more likely to cook at home.

    And yes, I have noticed that friends from different regions have different kitchen “must haves.” My Italian friend cares about a great wooden board, my Korean friend cares about smart storage, and my Aussie neighbors want fast gadgets for busy nights. The fun part is mixing it all in your own way.

    So if you are building your own little “kitchen wardrobe,” start with pieces that match how you actually cook, not just what looks good in a photo.
    5 Chic KitchenCouture Items That Bring Style to Cooking

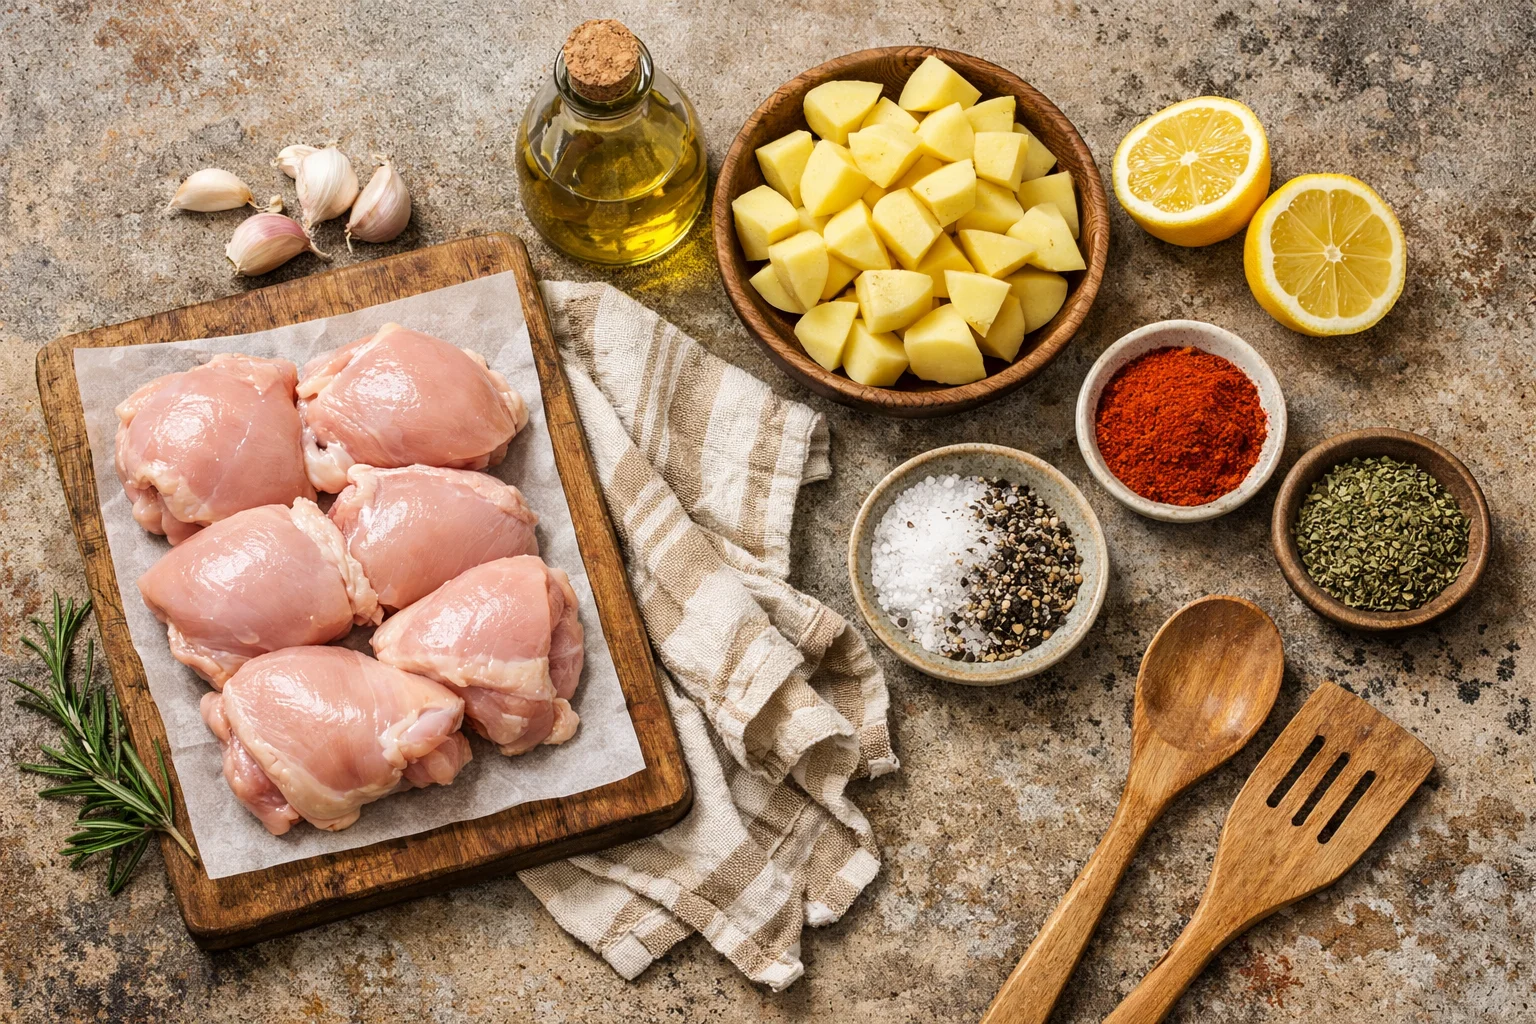
    Item added to your cart

    Let me tell you what I keep adding to my cart when I want my kitchen to look pulled together and also help me get dinner on the table faster. These are my five chic KitchenCouture items that bring style to cooking, and I am keeping it real: I am listing the stuff I use, not the stuff that just sits there looking pretty.

    My 5 chic picks that actually earn their space

    • A sleek air fryer that does crispy potatoes and reheats leftovers like they deserve a second chance
    • A matching utensil set with comfy grips, because the cheap spatula always melts at the worst time
    • A neutral apron that makes me feel instantly more organized, even if I am not
    • A good nonstick pan for fast weeknight cooking, especially eggs, chicken, and quick sautés
    • A compact food chopper for onions, herbs, and that one garlic moment when you cannot be bothered

    If you want one thing that gives the biggest “wow” for daily use, it is the air fryer. It helps me cook a full dinner while I pretend I am just casually tidying up. If you are browsing, I like starting at Kitchen Couture Store: Shop Kitchen Couture Air Fryers because it is easy to compare options and figure out what fits your kitchen space.

    Quick personal tip: choose a color you will still like in a year. I used to buy random bright gadgets, and then I got tired of them. Now I stick to neutrals with one fun accent, and my kitchen looks calmer.

    “I bought a matching set and it honestly made me cook more at home. It sounds silly, but it made my kitchen feel nicer and less stressful.”

    KitchenCouture

    Kitchen Couture

    Ok, let us talk about the vibe for a second. When I say Kitchen Couture, I mean those pieces that feel a little fashion like, but still practical. Not museum items. Not “too nice to use.” The sweet spot is tools that make cooking feel more fun and less like a duty.

    For me, KitchenCouture style comes down to two things: clean lines and easy cleaning. If it is annoying to wash, I will avoid it. And if it looks cluttery, it messes with my head when I am trying to cook.

    Here is how I pick a Kitchen Couture item without overthinking it:

    1) Does it solve a real problem? Like speed, mess, or uneven cooking.

    2) Will I use it weekly? If not, it is probably a want, not a need.

    3) Does it match my kitchen basics? I do not need everything to match, but I want it to feel intentional.

    And if you are building a set, it helps to shop a collection that already coordinates. I have browsed Kitchen Couture – Makers Collective when I want ideas that look cohesive without spending hours hunting around.

    One more thing: nice design does not replace safe cooking. Make sure anything that touches heat is heat safe, and anything that touches food is easy to sanitize. Pretty is great, but clean and safe is the real flex.

    Cooking tips and techniques

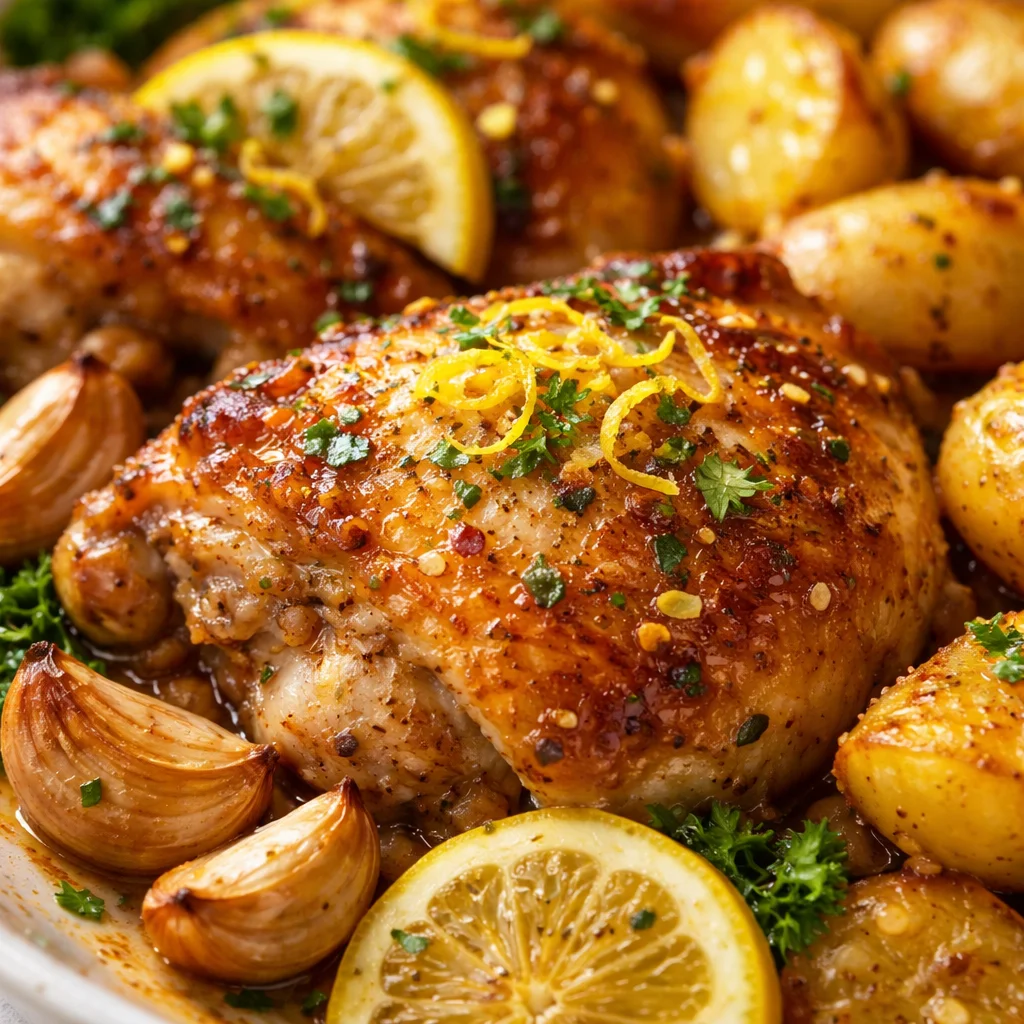
    Now for the part I promised you: the easy comfort dinner I make when I want the kitchen to feel stylish and calm. I call it my “crispy and cozy” plate. It is basically lemon garlic chicken plus air fryer potatoes and a quick salad. Nothing fancy, but it tastes like you tried.

    My go to lemon garlic chicken with crispy potatoes

    What you will need

    • Chicken thighs or breasts
    • Potatoes, chopped into bite size pieces
    • Olive oil
    • Garlic
    • Lemon
    • Salt and pepper
    • Optional: paprika or dried herbs
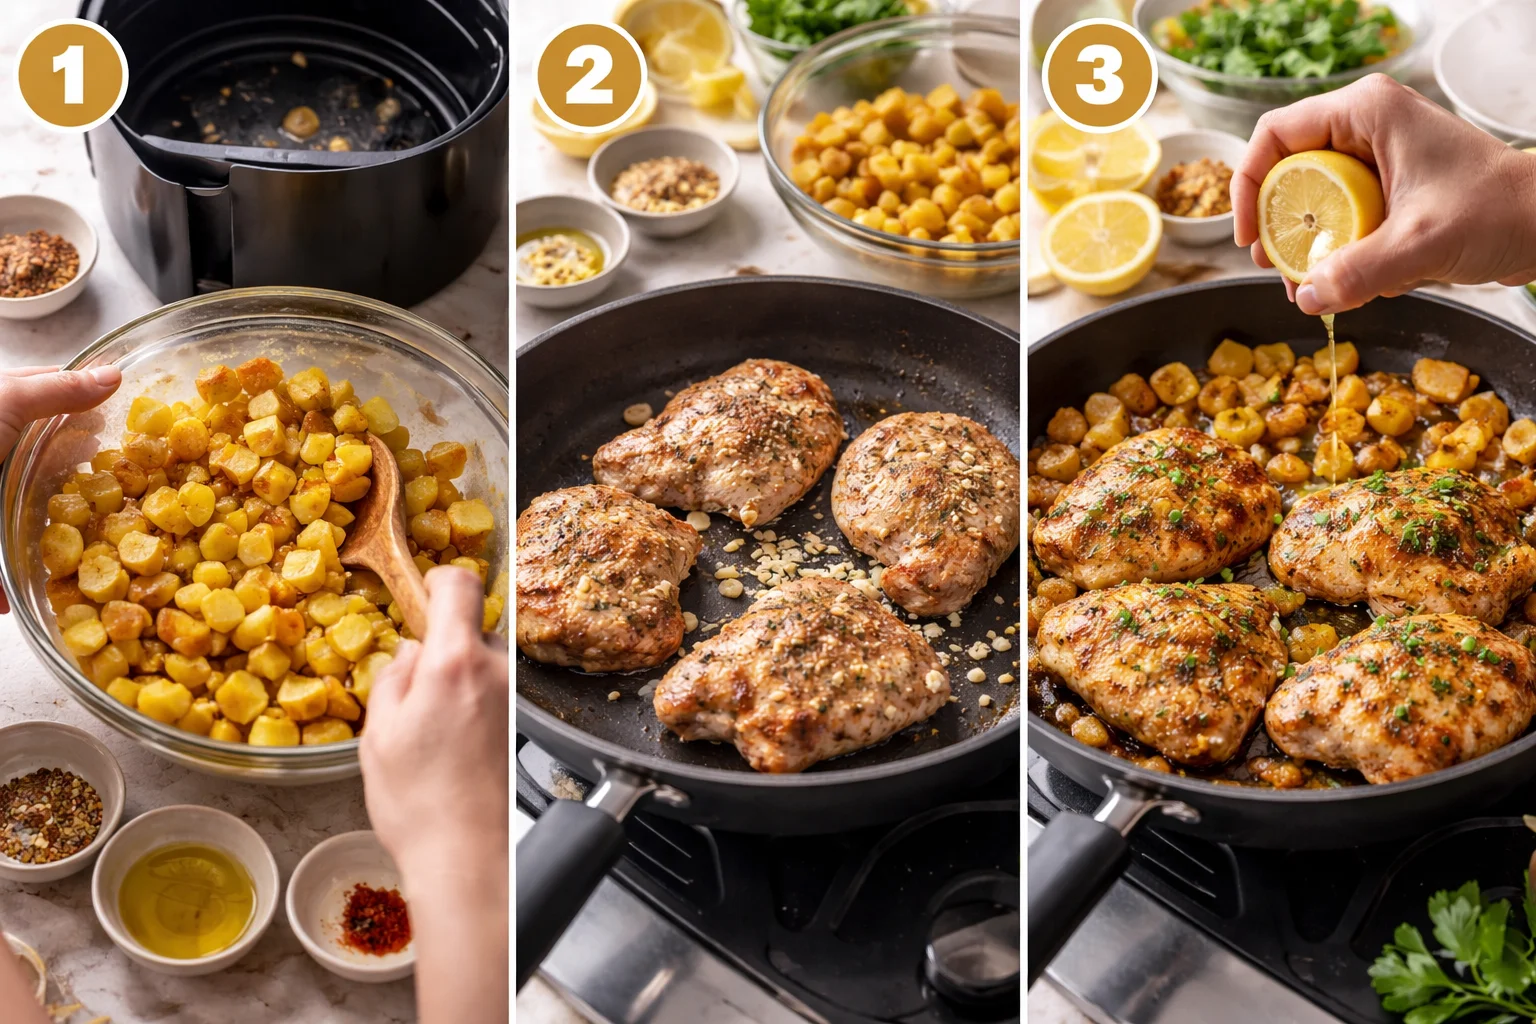
    How I do it

    First, I toss the potatoes with olive oil, salt, pepper, and a little paprika if I am feeling it. They go into the air fryer in a single layer if possible. If they are stacked, I just shake the basket more often.

    While those start crisping up, I heat my nonstick pan and cook the chicken with a bit of oil. I keep it simple: salt, pepper, and garlic. When it is almost done, I squeeze lemon over it and let it bubble for a few seconds. That is it. The lemon makes it taste bright, like you did something special.

    Little techniques that help a lot

    These are the small things that make a normal dinner taste better:

    • Dry the chicken with paper towel first so it browns better
    • Do not crowd the pan or it turns into steaming instead of browning
    • Salt the potatoes properly before cooking, they need it
    • Finish with lemon at the end so it stays fresh and not bitter

    And yes, I totally wear my apron for this even though it is quick. It keeps me from getting oil splatters on my shirt, and it weirdly makes me feel like I am in control of the evening.

    Let us be honest, gadgets can be a trap. I have bought things that looked cute and then lived in a drawer forever. So here is my quick filter for “popular kitchen gadgets” that are actually worth it if you want that KitchenCouture look and real daily use.

    My simple gadget rule

    If it saves me time on a weeknight or makes healthier cooking easier, it stays. If it takes ten parts to clean, it goes.

    These are the gadgets I see people loving right now, and why they work:

    • Air fryers for crisp food with less oil and less mess
    • Electric kettles that boil fast and look great on the counter
    • Mini choppers for onions, herbs, and quick sauces
    • Nonstick pans that cook evenly and clean up fast

    I also think a simple utensil rest is underrated. It keeps your stovetop cleaner, and it looks neat when you are cooking with friends around. It is a tiny thing, but it makes the whole scene feel more put together.

    One last real life tip: if you are buying a gadget for style, choose one you will not hate seeing on the counter. If it is bulky and ugly to you, you will shove it in a cabinet, and then you will not use it.

    Common Questions

    Q: How do I make my kitchen look stylish without buying everything new?
    A: Start with one or two visible upgrades like an apron, matching utensils, or a sleek gadget you will use daily. Keep the counter clear and it will instantly look better.

    Q: Are chic tools actually better for cooking?
    A: Not always, but good design often means better grip, sturdier materials, and easier cleaning. I focus on function first, then style.

    Q: What is the one KitchenCouture item you would buy first?
    A: An air fryer, because it helps with weeknight speed and makes basic food taste extra good.

    Q: How do I keep nonstick pans in good shape?
    A: Use soft utensils, avoid super high heat, and hand wash when you can. It keeps the coating happy longer.

    Q: Any trick for crispier air fryer potatoes?
    A: Cut them evenly, dry them a bit, do not overload the basket, and shake once or twice while cooking.

    A stylish little wrap up for your next dinner

    These five chic KitchenCouture items that bring style to cooking are really about making dinner feel easier and more enjoyable, not about being perfect. If you pick just one hero piece and build from there, your kitchen will start feeling like a place you actually want to hang out in. When you are ready to browse, I still recommend starting with Kitchen Couture Store: Shop Kitchen Couture Air Fryers for a practical upgrade that you will use constantly. And if you want more coordinated style ideas, Kitchen Couture – Makers Collective is a fun place to look for pieces that feel like they belong together. Now go make that lemon garlic chicken, get those potatoes crispy, and enjoy your own little KitchenCouture moment at home.

  • 7 Easy DumpAndBake Dinners for Hassle-Free Weeknights

    7 Easy DumpAndBake Dinners for Hassle-Free Weeknights

    DumpAndBake dinners are what I lean on when it is one of those weeknights where everyone is hungry right now, the sink is already full, and I cannot deal with three pots and a cutting board situation. If you have ever stood in front of the fridge hoping a fully cooked meal would appear, you are in the right place. These are the kinds of meals where you toss everything into a dish, slide it in the oven, and let heat do the heavy lifting. I am sharing my go to lineup of 7 Easy DumpAndBake Dinners for Hassle-Free Weeknights, plus the little tricks that make them actually work in real life. And yes, they are cozy, filling, and very forgiving.
    7 Easy DumpAndBake Dinners for Hassle-Free Weeknights

    Sausage Orzo Casserole is the Perfect One-Pan Dinner!

    If you want one recipe that makes you feel like you have your life together, this is it. Sausage Orzo Casserole is hearty, kid friendly, and it tastes like you spent way more effort than you did. The orzo cooks right in the pan, soaking up all the savory goodness from the sausage and broth. It is one of those dump and bake casseroles that I keep in my back pocket for busy weeks, because it checks every box: protein, carbs, and a little veg if you want it.

    What you will need (simple pantry stuff)

    • 1 pound sausage (Italian sausage is great, but any works)
    • 1 1/2 cups orzo
    • 3 cups broth (chicken or veggie)
    • 1 can diced tomatoes (or tomato sauce if that is what you have)
    • 1 small onion, chopped (optional but tasty)
    • 2 cloves garlic, minced (or garlic powder)
    • 1 cup shredded cheese (mozzarella or an Italian blend)
    • Salt, pepper, and Italian seasoning

    Here is the lazy but reliable method I use: brown the sausage quickly in a skillet if you have 5 extra minutes. If you do not, you can still make it work with fully cooked sausage or sausage crumbles. Then dump everything into a baking dish, stir, cover tightly with foil, and bake until the orzo is tender. Add cheese at the end so it gets melty and a little golden.

    If you are trying to build out a full week of easy meals, I usually pair this kind of casserole with a bagged salad and call it good. Also, if you like the vibe of easy pasta bakes, you would probably enjoy this quick pasta dinner idea from my other weeknight rotation.

    “I made the sausage orzo casserole on a Tuesday when I was exhausted. My picky teenager had seconds and asked if we can have it again next week. That basically never happens.”

    DumpAndBake

    A Few Testing Notes From My Kitchen to Yours

    I have made a lot of DumpAndBake dinners over the years, and I have learned that the difference between “wow, so easy” and “why is this still crunchy” comes down to a few small details. I am not saying you need to be fussy. I am saying a couple smart habits make these casseroles almost foolproof.

    Foil matters. Cover your dish tightly for most of the bake time. It traps steam, which is what cooks the pasta or rice through.

    Pan size matters too. If your baking dish is too big, the liquid spreads out and you can end up with uneven cooking. I usually use a 9×13 for most of these.

    Stir once if you can. Halfway through, pull the dish out and give it a quick stir, especially if pasta is involved. It keeps anything on the edges from drying out.

    Know your oven. My oven runs a little hot, so I check at the early end of the baking window. If yours runs cool, you may need an extra 5 to 10 minutes. Trust your eyes: you want bubbling edges and tender pasta.

    Also, keep in mind that different brands of rice and pasta can behave differently. If you swap ingredients, just stay flexible. That is the whole point of DumpAndBake cooking anyway.

    7 Easy DumpAndBake Dinners for Hassle-Free Weeknights

    Time-Saving Dinner Casseroles

    Now let us talk about the bigger picture: the 7 Easy DumpAndBake Dinners for Hassle-Free Weeknights that you can rotate through without getting bored. I like options that feel different even though the method is basically the same. You dump, you bake, you eat, you feel relieved.

    Here are my favorites, including the sausage orzo you already met:

    • Sausage Orzo Casserole with tomatoes and mozzarella
    • Chicken pesto rice bake using jarred pesto and frozen peas
    • BBQ pulled chicken casserole with canned beans and shredded cheddar
    • Taco beef and rice bake with salsa and corn
    • Lemon garlic shrimp and orzo with spinach stirred in at the end
    • Broccoli cheddar quinoa bake for a meatless night
    • Italian meatball sub casserole with marinara and provolone

    The nice thing is that you can keep the base formula the same. A starch like rice, orzo, or quinoa plus enough liquid to cook it, plus protein, plus seasoning, plus a topping that makes it feel fun. Cheese counts as fun, obviously.

    If you want another cozy comfort food angle, I also keep a similar method for baked chicken and potatoes over on this easy chicken dinner page. It is the same low stress energy.

    One more practical tip: I write two of these meals into my week every Sunday. Not every night, just two. That alone makes the week feel less chaotic, because I know there are at least two nights I will not be scrambling.

    Dinner in a Hurry

    Some nights you do not need a whole new recipe. You just need speed. When I am in that mode, I pick DumpAndBake dinners that use either fully cooked proteins or very quick cooking ingredients. Think rotisserie chicken, frozen meatballs, pre cooked sausage, or canned beans.

    My go to “hurry” formula looks like this:

    Protein (already cooked) + fast starch (orzo or quick rice) + big flavor shortcut (salsa, pesto, marinara) + one vegetable (frozen is fine).

    And here is a real life example from my house: frozen meatballs, marinara, a splash of broth, dry pasta, and a handful of spinach at the end. Bake covered until the pasta is tender, then top with cheese. It is not fancy. It is dinner, and everyone is happy.

    Also, do not underestimate the power of “serve it with something crunchy.” Even if the main dish is soft and cozy, adding a simple salad kit or even sliced cucumbers makes the meal feel more complete.

    In Defense of Dump-and-Bake Casseroles

    Some people hear “casserole” and think of bland cafeteria food. I get it. But I am here to defend it, because DumpAndBake dinners are not about impressing strangers. They are about feeding your family (or yourself) without burning out.

    They also help you waste less food. Half a bag of shredded cheese, a lonely can of tomatoes, that last cup of broth, they all have a place here. And if you are new to cooking, these recipes build confidence because the steps are simple and repeatable.

    For the record, I still love cooking from scratch when I have time. But on a random Wednesday, I would rather be hanging out after dinner than scrubbing a bunch of pans. These are my “future me will be grateful” meals.

    Common Questions

    Do I have to brown meat first?

    Not always. If you are using raw ground beef or raw sausage, browning helps with texture and safety. If you are using fully cooked sausage, rotisserie chicken, or frozen meatballs, you can usually dump them straight in.

    Why is my rice or pasta still hard?

    Usually it is one of three things: not enough liquid, the dish was not covered tightly, or your baking dish was too wide so the liquid got too shallow. Add a splash of broth, cover again, and bake 10 more minutes.

    Can I prep these ahead of time?

    Yes, but with a small caution. Pasta and rice can soak up liquid if they sit too long before baking. If you want to prep ahead, I suggest storing the dry starch separately, then mixing right before it goes in the oven.

    What is the best baking dish for DumpAndBake dinners?

    A basic 9×13 glass or ceramic dish is perfect. If you use metal, it may cook a bit faster, so start checking earlier.

    How do I make these healthier without losing the comfort vibe?

    Use leaner protein, add a couple cups of veggies (frozen works great), and swap in whole grains when you can. Also, you do not have to drown everything in cheese. A little on top still feels special.

    A weeknight plan you will actually stick with

    If you try even two of these 7 Easy DumpAndBake Dinners for Hassle-Free Weeknights, you will feel the difference on those busy nights when takeout sounds tempting. Keep a few smart staples around, cover your dish tightly, and let the oven do its thing. If you want even more ideas to add to your rotation, this list of 15 Dump-and-Bake Dinners for Busy Weeknights – Take Them A Meal is packed with practical options. And if you are in an orzo mood like I often am, you should also check out Sausage Orzo Bake (Dump-&-Bake w/ Butternut Squash!) for a cozy twist. Pick one recipe, make it this week, and give yourself the gift of an easier evening.

  • 5 Must-Try ChaosCakes That Will Spark Your Next Celebration

    5 Must-Try ChaosCakes That Will Spark Your Next Celebration

    ChaosCakes are basically what I bake when I want a celebration cake but I do not want to stress about perfect edges, flawless piping, or straight lines. You know those weeks where you have a birthday, a friend coming over, and your brain is already full? Yep, that. These cakes look wild on purpose, which means they feel fun before you even cut a slice. And somehow, they still taste like a real treat, not a joke. If you have ever stared at a smooth frosted cake online and thought, I could never, you are in the right place.
    ChaosCakes

    What is a Chaos Cake?

    A Chaos Cake is a celebration cake that leans into messy, silly, loud, and a little unhinged in the best way. Instead of chasing perfect symmetry, you go for playful layers, bold colors, and decorations that look like they were added mid laugh. The whole point is that it looks like a party.

    When I make ChaosCakes, I still care about flavor and texture, but I stop obsessing over the visuals. I let sprinkles fall where they fall. I let frosting swirls overlap. If the cake leans slightly, I do not panic. I just add more fun stuff to distract everyone, and it works every time.

    My no stress ChaosCake base (the part that makes it taste legit)

    I usually build my ChaosCakes on a simple setup that is hard to mess up.

    • Cake: boxed mix is totally fine, or your favorite homemade vanilla or chocolate
    • Filling: jam, pudding, cookie butter, or whipped cream
    • Frosting: buttercream, cream cheese frosting, or store bought if life is busy
    • Crunch: crushed cookies, cereal, toasted nuts, or candy bits
    • Chaos layer: sprinkles, food coloring drips, random piping, and a topper that makes you smile

    One practical tip: chill your cake layers for 20 to 30 minutes before stacking. Cold cake is calmer cake. It crumbles less and makes frosting easier, even if you are going for messy on purpose.

    5 Must-Try ChaosCakes That Will Spark Your Next Celebration

    What Makes these Silly Cakes Pop?

    The best ChaosCakes have contrast. Not perfect design. Contrast. Think soft frosting with crunchy bits, sweet cake with a salty snack on top, bright colors next to chocolate crumbs. If the cake makes people lean in and say, what is that on top, you nailed it.

    Here are my 5 must try ChaosCakes that always spark a celebration, even if the celebration is just making it to Friday.

    1) Sprinkle Punch Confetti Cake

    This is my go to for birthdays. Vanilla cake, a thick swipe of frosting, then a ridiculous amount of rainbow sprinkles. The trick is adding sprinkles in layers, not just on top. Toss some between layers, press them onto the sides, and let extra fall onto the cake stand. It looks like the cake exploded with joy.

    Chocolate cake, cookies crushed into chunks, and frosting that is swirled like you stopped caring halfway through, in a good way. Add cookie crumbs at the bottom edge so it looks messy and dramatic. If you want it extra fun, drizzle melted chocolate on top and then immediately add more crumbs so it sticks.

    3) PB and Jelly Drip Party Cake

    This one is for the people who like sweet with a little nostalgia. Yellow cake layers, peanut butter frosting, and a thin layer of jam in the middle. Let the jam peek out a bit when you stack it. It looks chaotic and also makes the slices look amazing. Add crushed peanuts or even little PB cup pieces on top.

    4) Neon Citrus Sour Candy Cake

    Okay, this one is loud. I like a lemon or orange cake, then I tint some frosting with bright colors. You do not need a perfect palette. Just go bold. Then I pile sour gummy candies on top. The combo of fluffy cake and tangy candy is weirdly addictive. This is the cake people remember.

    5) Salty Snack Surprise Cake

    My friends laughed the first time I put pretzels and potato chips on a cake. Then they tried it. Chocolate cake or caramel cake works best here. Add a caramel drizzle, then stick salty snacks into the frosting on top like a crown. It is chaotic, it is crunchy, and it disappears fast.

    If you want more party dessert inspiration, I usually keep a running list of ideas, and I love revisiting it before big weekends. You can also check my other posts like easy birthday dessert ideas when you want something fun but not complicated.

    5 Must-Try ChaosCakes That Will Spark Your Next Celebration

    What Makes this Movement Stand Out?

    I think ChaosCakes took off because they match how people actually celebrate. Real parties are not perfectly styled. Kids run around. Music is too loud. Someone forgets the candles. So a cake that is proudly imperfect feels kind of freeing.

    Also, these cakes are super flexible. You can make them fancy without needing fancy skills. You can use store bought frosting and still get a cake that looks like a centerpiece. And if you are nervous about baking, this trend is basically permission to experiment.

    Here are a few reasons I trust ChaosCakes for real life celebrations:

    • They are forgiving. Smudges and crumbs become part of the vibe.
    • They photograph well. Color and texture read great in photos.
    • They are customizable. You can match any theme using toppings and color.
    • They reduce pressure. You focus on flavor and fun, not perfection.

    “I made a ChaosCake for my sister and everyone thought it was from a bakery. I told them it was just me leaning into the mess and adding extra sprinkles. Best compliment ever.”

    And if you are wondering about storage and leftovers, I have a simple guide in another post like how to store frosted cakes that helps a lot when you are juggling party timing.

    The Great Cake Conversation

    This is the part I love most. ChaosCakes get people talking. Someone will always ask what flavor it is, what the filling is, or why there are gummy worms on top. It turns dessert into a little moment.

    My advice is to pick one “conversation starter” topping and commit. A mini bag of chips. A handful of sour candy. A pile of cereal. A glittery topper with a funny phrase. Then keep everything else simple so the cake still tastes balanced.

    Also, do not underestimate the power of a good slice reveal. If you hide a layer of jam, cookie crumbs, or candy inside, people get excited when the knife goes in. That is why I keep making ChaosCakes. They feel playful, and play is kind of the point of celebration.

    What’s Next for These Wild Cakes? {video_youtube}

    I think the next wave is going to be even more personal. People are building ChaosCakes around inside jokes, nostalgic snacks, and whatever their friends are obsessed with right now. I have seen cakes topped with fast food fries, tiny toys, and candy that matches a sports team. And honestly, I love that.

    My prediction is we will also see more “mix and match” flavors, like strawberry cake with chocolate frosting, or vanilla cake with espresso filling. The chaos is not just the decoration. It is the bold combo that somehow works.

    If you want to try it at home, here is my simple rule: pick one base flavor you know you like, then add one unexpected topping. Do not add five weird things at once. One weird thing is charming. Five weird things can taste confusing.

    Common Questions

    Do ChaosCakes have to look messy?

    They do not have to look messy, but they should look relaxed. Think fun, layered, and a bit playful. If it is perfectly smooth, it starts to feel like a traditional cake again.

    Can I use boxed cake mix for ChaosCakes?

    Yes, absolutely. Boxed mix is reliable and it saves time. Add an extra egg or swap water for milk if you want it a bit richer, but it is not required.

    How do I keep the frosting from melting while I decorate?

    Chill the cake layers first and do quick decorating in steps. Frost a bit, chill 10 minutes, then add more. Also, avoid decorating next to a hot oven if you can.

    What flavors work best for beginners?

    Vanilla, chocolate, and funfetti are the easiest. For fillings, go with jam, pudding, or crushed cookies. They are hard to mess up and they taste great.

    How far ahead can I make a ChaosCake?

    I like making it 1 day ahead. Wrap it or store it in a cake container in the fridge, then let it sit out 30 to 60 minutes before serving so it tastes soft again.

    Wrap it up and make it fun

    If you take anything from this, let it be this: ChaosCakes are about flavor, laughter, and letting go of perfect. Pick one of the five ideas, keep the base simple, then add a bold topping that fits your celebration. If you want more trend context and extra inspiration, this article on Chaos Cakes: The Ultimate Guide to This Year’s Funniest Cake Trend is a fun read. And if you want to see what a dedicated shop does with the concept, peek at Chaos Cakes Bakery: Home for ideas you can totally recreate at home. Now go make one of these ChaosCakes, take a picture, slice it big, and celebrate something, even if it is just making time to bake.

  • Crispy Cabbage and Broccolini with Tangy Endive Slaw

    Crispy Cabbage and Broccolini with Tangy Endive Slaw

    Cabbage / Broccolini / Endive is one of those combos that sounds a little fancy, but honestly it solves a very real weeknight problem for me: I want something crunchy and fresh, but I also want something hot and crispy on the plate. This is the recipe I make when I am tired of sad salads and boring roasted veggies. You get crispy edges, a little char, and then that tangy endive slaw that wakes everything up. It is simple food with big payoff, and it is easy to tweak based on what is in your fridge. If you have ever stared at a head of cabbage and thought, now what, this one is for you.

    {image_1}

    Health Benefits of Salad Ingredients

    Before we get into the crunchy bits, I want to quickly talk about why this bowl feels so good to eat. This is not diet talk. It is more like, you finish the meal and you do not feel weighed down. The base here is Crispy Cabbage and Broccolini with Tangy Endive Slaw, and each ingredient brings something useful, not just flavor.

    Cabbage is one of my favorite budget veggies because it lasts forever in the fridge and it is packed with fiber. I notice I stay full longer when cabbage is part of dinner, especially when it is roasted until the edges get browned and a little sweet.

    Broccolini cooks fast and has that tender stem that you actually want to eat. It is a great source of vitamins, and it has a slightly bitter green taste that balances the sweeter notes you get once it roasts.

    Endive is the secret weapon here. It is crisp, a little bitter, and perfect for slaw because it does not get soggy quickly. When you toss it in a tangy dressing, it becomes bright and snappy, like the friend who tells you the truth but still makes you laugh.

    And since the dressing usually includes lemon or vinegar and a bit of olive oil, you are also getting that satisfying richness without needing heavy sauces. This whole plate is basically crunchy vegetables plus a bold dressing, which is a pretty solid habit to have.

    How to Customize Your Salad

    This is where the recipe becomes your recipe. I make Crispy Cabbage and Broccolini with Tangy Endive Slaw one way when I want it light, and another way when I want it to feel more like a full dinner bowl. The best part is you can keep the core idea the same: roast the veggies until crispy, then top with slaw.

    My go to ingredient list

    • Green cabbage cut into wedges or thick slices
    • Broccolini trimmed
    • Endive sliced into thin strips
    • Olive oil
    • Salt and pepper
    • Lemon juice or vinegar for tang
    • Mustard for bite
    • Honey or maple syrup just a little
    • Garlic grated or minced

    Now for fun add ons, depending on your mood:

    To make it more filling: add chickpeas, crispy tofu, shredded rotisserie chicken, or a couple of fried eggs on top.

    To make it extra crunchy: throw on toasted almonds, sunflower seeds, or crushed pita chips.

    To make it more savory: sprinkle parmesan, feta, or a salty crumble like cotija.

    Also, if you love a cozy side with a crispy main, I often serve this with something potato based. These baked garlic parmesan potato wedges are especially good next to the tangy slaw because you can drag the wedges through any extra dressing on your plate. No shame.

    If you are sensitive to bitterness, use a little less endive and add shredded romaine or even thin sliced cucumber. The dressing will still carry the whole thing.

    Tips for Making the Perfect Salad Dressing

    The dressing is what turns this from roasted vegetables to the kind of meal you keep thinking about the next day. For Crispy Cabbage and Broccolini with Tangy Endive Slaw, I like a dressing that is sharp but not harsh, with enough sweetness to smooth it out.

    Here is my simple method that never fails:

    1) Start with acid. Lemon juice makes it bright. Vinegar makes it punchy. I usually do lemon plus a small splash of apple cider vinegar.

    2) Add mustard. Dijon is my favorite. It gives flavor and helps the dressing cling to the endive.

    3) Add a little sweet. Honey or maple syrup. Not enough to make it sweet, just enough to balance the bitterness from endive and the sharpness from the acid.

    4) Add olive oil. Pour it in slowly while whisking. If you do not feel like whisking, put it in a jar and shake it like you mean it.

    5) Taste, then adjust. If it tastes flat, add salt. If it is too sharp, add a tiny bit more sweet or oil.

    I also like adding grated garlic because it disappears into the dressing and makes it taste like you tried harder than you did. If raw garlic feels too strong, use a pinch of garlic powder instead.

    “I made this on a random Tuesday and it somehow tasted like restaurant food. The crispy cabbage edges plus the tangy slaw is such a good combo. Even my partner, who claims he hates cabbage, went back for seconds.”

    Popular Salad Variations to Try

    Once you have the core recipe down, you can switch the vibe without changing the effort level. I love recipes like this because you can cook the same way but change the flavor direction.

    Here are a few variations I actually make:

    1) Sesame ginger twist
    Swap the mustard for a little tahini or sesame oil, use rice vinegar, and add grated ginger. Top with sesame seeds.

    2) Mediterranean style
    Use red wine vinegar and lemon, add oregano, and finish with feta and chopped olives. It tastes bold and salty in a really good way.

    3) Spicy crunchy version
    Add chili crisp or a spoon of sriracha into the dressing. Top with peanuts or cashews for crunch.

    4) Creamy but still bright
    Add a spoonful of Greek yogurt to the dressing. It becomes creamy without turning heavy, and it still keeps that tangy bite.

    If you are meal prepping, keep the slaw and the roasted veggies separate until you are ready to eat. That way the endive stays crisp and the cabbage stays roasty, not steamy.

    Common Mistakes to Avoid When Making Salads

    I have made every salad mistake there is, usually when I am hungry and rushing. So here are the big ones to avoid so your Crispy Cabbage and Broccolini with Tangy Endive Slaw turns out exactly how you want.

    Little things that make a big difference

    Overcrowding the pan. If you pile cabbage and broccolini on top of each other, they steam instead of crisp. Use two pans if you need to. It is worth it.

    Cutting cabbage too thin. Thin shreds are great for slaw, but for roasting you want wedges or thick slabs so the edges caramelize and the center stays tender.

    Not drying your greens. If the endive is wet, the dressing gets watered down and the slaw goes limp faster. Pat it dry after washing.

    Skipping the taste test. Dressing needs a quick taste. It takes ten seconds and saves the whole bowl.

    Adding slaw too early. Hot veggies plus slaw is amazing, but do not toss them together in the pan. Plate the crispy veggies first, then pile the slaw on top so it stays crunchy.

    The last tip is emotional as much as practical: do not aim for perfection. If the cabbage gets a little extra char, it is still delicious. If the dressing is a bit more tangy than planned, you will probably love it anyway.

    Common Questions

    Can I use regular broccoli instead of broccolini?

    Yes. Just cut it into smaller florets and keep an eye on it so it does not overcook. Broccolini is a bit more tender, but broccoli works great.

    How do I get the cabbage really crispy?

    High heat, enough oil, and space on the pan. Roast it cut side down for a while so it browns, then flip if you want more color on top.

    Is endive necessary? What can I swap it with?

    Endive gives that crisp bitter bite, but you can use romaine, radicchio, or even shredded green cabbage for the slaw if that is what you have.

    Can I make the dressing ahead of time?

    Totally. Keep it in a jar in the fridge for up to about a week. Shake before using since it will separate a little.

    What protein goes best with this?

    Chicken thighs, salmon, tofu, or chickpeas all work. I pick based on what I have, and it is great either way.

    A crunchy dinner you will actually crave again

    If you try this, I think you will understand why I keep coming back to it. The whole point of Crispy Cabbage and Broccolini with Tangy Endive Slaw is that you get hot, crispy roasted veggies and a cold, tangy crunch in the same bite, and it never feels boring. Keep the dressing bold, do not crowd your pan, and let the endive stay crisp until the very end. And if you are on a salad kick and want another colorful, fresh idea, check out Rice Noodle Rainbow Salad – Food: A Love Story for a totally different but equally fun vibe. Now go grab that cabbage, crank your oven up, and make this once, because I am pretty sure you will make it again.

  • Flaky Scones

    Flaky Scones

    why make this recipe

    These scones are quick and simple. They bake up light and flaky. You can make them with easy pantry ingredients. They work for breakfast, tea, or a snack.

    introduction

    Flaky Scones are tender, buttery, and crisp on the outside. The dough stays simple and you can mix it by hand. They bake in about 15–20 minutes and taste best warm with marmalade butter.

    how to make Flaky Scones

    Follow simple steps and keep the butter cold. Work gently so the dough stays flaky. Cut the dough into shapes and bake until golden.

    Ingredients :

    • 2 cups all-purpose flour
    • 1/4 cup sugar
    • 1 tablespoon baking powder
    • 1/2 teaspoon salt
    • 1/2 cup unsalted butter, cold and cubed
    • 3/4 cup heavy cream
    • 1 teaspoon vanilla extract
    • Marmalade butter (for serving)

    Directions :

    1. Preheat your oven to 400°F (200°C) and line a baking sheet with parchment paper.
    2. In a large bowl, mix flour, sugar, baking powder, and salt.
    3. Add cold butter and mix until the mixture resembles coarse crumbs.
    4. Stir in heavy cream and vanilla extract until just combined.
    5. Turn the dough out onto a floured surface and gently knead it a few times.
    6. Roll the dough out to about 1-inch thickness and cut into desired shapes.
    7. Place scones on prepared baking sheet and bake for 15-20 minutes or until golden brown.
    8. Serve warm with marmalade butter.

    how to serve Flaky Scones

    Serve warm from the oven. Spread marmalade butter or your favorite jam. Pair with tea or coffee. You can split them and fill with cream or lemon curd.

    how to store Flaky Scones

    Cool fully before storing. Keep in an airtight container at room temperature for 1–2 days. For longer storage, freeze wrapped scones for up to 1 month. Reheat in a low oven until warm.

    tips to make Flaky Scones

    • Keep the butter very cold. This makes the scones flaky.
    • Do not overmix the dough. Mix just until it comes together.
    • Use a light hand when kneading. A few turns are enough.
    • Chill the cut scones briefly if your kitchen is warm before baking.
    • Bake on a hot sheet for a better rise.

    variation (if any)

    • Add 1/2 cup dried fruit like raisins or currants.
    • Fold in 1/2 cup grated cheddar for savory scones.
    • Replace vanilla with lemon zest for citrus flavor.

    FAQs

    Q: Can I use milk instead of heavy cream?
    A: Yes. Milk will work, but the scones may be a bit less rich and tender.

    Q: How do I know when scones are done?
    A: They are done when the tops are golden brown and a toothpick comes out clean.

    Q: Can I make the dough ahead?
    A: Yes. Make the dough, cut the shapes, and freeze the raw scones on a tray. Transfer to a bag and bake from frozen, adding a few extra minutes.

    Conclusion

    For another clear and reliable guide to flaky scones and more tips, see Never-fail Flaky Scones | The only Scone Recipe you’ll ever need!

  • Irish Soda Bread Muffins

    Irish Soda Bread Muffins

    A quick, easy muffin version of Irish soda bread. These bake fast and taste warm and soft.

    introduction

    This recipe turns classic Irish soda bread into small muffins you can make any day. They bake in about 15 to 18 minutes and need no yeast. If you like warm quick breads, try a related recipe for gingerbread cake with cinnamon molasses for another simple treat.

    why make this recipe

    • It is fast. The batter mixes in one bowl.
    • It needs no yeast or long rise time.
    • Muffins are easy to share and store.
    • Raisins add sweet bites and a good texture.

    how to make Irish Soda Bread Muffins

    These steps give a clear view of what to do. Mix dry ingredients, mix wet, fold together, add raisins, pour into a tin, and bake.

    Ingredients :

    • 2 cups all-purpose flour
    • 1 teaspoon baking soda
    • 1/2 teaspoon salt
    • 1 cup buttermilk
    • 1/2 cup raisins
    • 1/4 cup sugar
    • 1 large egg
    • 2 tablespoons melted butter

    Directions :

    1. Preheat your oven to 400°F (200°C) and line a muffin tin with paper liners.
    2. In a large bowl, combine the flour, baking soda, salt, and sugar.
    3. In a separate bowl, whisk together the buttermilk, egg, and melted butter.
    4. Pour the wet ingredients into the dry ingredients and stir until just combined.
    5. Gently fold in the raisins.
    6. Divide the batter evenly among the muffin cups.
    7. Bake for 15-18 minutes, or until golden brown and a toothpick inserted in the center comes out clean.
    8. Let cool slightly before serving.

    how to serve Irish Soda Bread Muffins

    • Serve warm with butter or jam.
    • Offer with a hot drink for breakfast or tea time.
    • Split and toast them lightly for a crisp edge.

    how to store Irish Soda Bread Muffins

    • At room temperature: keep in an airtight container for 2 days.
    • In the fridge: store up to 5 days in a sealed container. Warm before serving.
    • In the freezer: wrap each muffin and freeze up to 3 months. Thaw at room temperature or warm in the oven.

    tips to make Irish Soda Bread Muffins

    • Do not overmix the batter. Mix until just combined for tender muffins.
    • Measure flour by spooning it into the cup and leveling it for best results.
    • If you do not have buttermilk, mix 1 cup milk with 1 tablespoon lemon juice or vinegar and let sit 5 minutes.
    • Check muffins at 12 minutes; ovens vary, and you want golden tops but not dry centers.

    variation (if any)

    • Swap raisins for currants or dried cranberries.
    • Add 1 teaspoon ground cinnamon for warm spice.
    • Stir in 1/2 cup grated cheddar and 1 teaspoon caraway seeds for a savory twist.
    • Use whole wheat pastry flour for a nuttier flavor (may need a splash more buttermilk).

    FAQs

    Q: Can I skip the raisins?
    A: Yes. Leave them out or replace with other dried fruit or chocolate chips.

    Q: My muffins are dense. What went wrong?
    A: You may have overmixed or used too much flour. Mix until just combined and measure flour correctly.

    Q: Can I make these dairy-free?
    A: Yes. Use a plant milk plus 1 tablespoon vinegar for buttermilk and a dairy-free butter.

    Q: Can I make a larger loaf instead of muffins?
    A: Yes. Bake in a greased loaf pan at 375°F (190°C) for about 30-40 minutes, until a toothpick comes out clean.

    Conclusion

    For another take on this recipe and more notes, see Irish Soda Bread Muffins (not so traditional but oh so delicious!).

  • Classic Marry Me Chicken Orzo

    Classic Marry Me Chicken Orzo

    introduction

    This Classic Marry Me Chicken Orzo is a simple, creamy one-pan meal with chicken, orzo, spinach, and sun-dried tomatoes. It makes a cozy dinner any night. If you want a simple side, try baked garlic parmesan potato wedges to go with it.

    why make this recipe

    Make this recipe because it cooks fast, uses one pan, and fills the plate with protein and pasta. The cream and sun-dried tomatoes give rich flavor without a lot of work. It is great for busy weeknights or for when you want a comforting dinner.

    how to make Classic Marry Me Chicken Orzo

    Start by sautéing onions and garlic. Brown the chicken until it is cooked through. Add the orzo and chicken broth, cook until the pasta is tender. Stir in cream, spinach, and sun-dried tomatoes. Heat until the spinach wilts and everything is warm. Finish with Parmesan on top.

    Ingredients :

    • 4 boneless, skinless chicken breasts
    • 1 tablespoon olive oil
    • 1 onion, chopped
    • 3 garlic cloves, minced
    • 1 cup orzo pasta
    • 2 cups chicken broth
    • 1 cup heavy cream
    • 1 cup spinach, chopped
    • 1/2 cup sun-dried tomatoes, chopped
    • Salt and pepper to taste
    • Parmesan cheese for garnish

    Directions :

    1. In a large skillet, heat olive oil over medium heat. Add chopped onion and garlic; sauté until softened.
    2. Add chicken breasts to the skillet, season with salt and pepper, and brown each side until cooked through.
    3. Stir in the orzo pasta and chicken broth; bring to a boil. Reduce the heat and simmer until the orzo is tender (about 8-10 minutes).
    4. Stir in heavy cream, spinach, and sun-dried tomatoes; cook until the spinach is wilted and everything is heated through.
    5. Serve hot, garnished with Parmesan cheese.

    how to serve Classic Marry Me Chicken Orzo

    Serve hot from the pan. Sprinkle extra Parmesan and a little black pepper. A green side salad or steamed vegetables make a good balance. Crusty bread also works for dipping in the creamy sauce.

    how to store Classic Marry Me Chicken Orzo

    Let the dish cool to room temperature. Put it in an airtight container and store in the refrigerator for up to 3–4 days. Reheat on the stove over low heat, stirring and adding a splash of broth or water if the sauce is too thick. You can freeze in a sealed container for up to 2 months, but cream may change texture after thawing.

    tips to make Classic Marry Me Chicken Orzo

    • Pound chicken breasts to even thickness so they cook evenly.
    • Brown chicken well for more flavor.
    • Taste and adjust salt near the end after adding broth and cream.
    • If the sauce is too thick, add a bit more chicken broth.
    • Use fresh spinach for best texture; frozen spinach can be used but drain well.

    variation (if any)

    • Add mushrooms or bell peppers with the onions for extra vegetables.
    • Use half-and-half instead of heavy cream for a lighter sauce.
    • Swap orzo for small pasta like ditalini or small shells, but adjust cooking time.
    • Add red pepper flakes for a little heat.

    FAQs

    Q: Can I use chicken thighs instead of breasts?
    A: Yes. Boneless thighs work well and stay moist. Cook time may change slightly.

    Q: Can I make this dairy-free?
    A: Use coconut cream or a dairy-free cream substitute and skip the Parmesan or use a dairy-free cheese.

    Q: How do I know when the chicken is done?
    A: Cut into the thickest part to check there is no pink, or use a meat thermometer—165°F (74°C) is safe.

    Q: Can I cook the orzo separately?
    A: Yes. If you cook it separately, drain it and add at the end. You may need less broth when cooking separately.

    Conclusion

    For a tested one-pan version and more tips, see Kalejunkie’s one-pan Marry Me Chicken Orzo recipe.

  • Classic Baked Cherry Pie with Flaky Crust

    Classic Baked Cherry Pie with Flaky Crust

    introduction

    This classic baked cherry pie has a flaky crust and a bright, sweet filling. It is easy to follow and uses simple steps. If you like a warm, homemade pie with a scoop of ice cream, this is a good pick. For a simple side idea to serve with other dishes, try this baked garlic parmesan potato wedges recipe.

    why make this recipe

    Make this pie because it tastes like home. The crust turns flaky and the cherries stay full of flavor. You can use fresh or frozen cherries. It works for a family meal, a holiday, or a small gathering. The steps are clear and the result is reliable.

    how to make Classic Baked Cherry Pie with Flaky Crust

    Follow the steps below to make the crust, the filling, and to bake the pie. Take your time to chill the dough and to let the filling sit so the flavors blend.

    Ingredients :

    For the Flaky Pie Crust:

    • 2 1/2 cups all-purpose flour
    • 1 teaspoon salt
    • 1 tablespoon sugar
    • 1 cup unsalted butter, chilled and diced
    • 6 to 8 tablespoons ice water

    For the Cherry Filling:

    • 4 cups fresh or frozen cherries, pitted
    • 1 cup granulated sugar
    • 1/4 cup cornstarch
    • 1 tablespoon lemon juice
    • 1 teaspoon vanilla extract
    • 1/4 teaspoon almond extract
    • Pinch of salt

    For Assembly:

    • 1 tablespoon unsalted butter, cut into small pieces
    • 1 egg, beaten (for egg wash)
    • Sugar, for sprinkling on top

    Directions :

    Prepare the Flaky Pie Crust:

    • In a large bowl, mix the flour, salt, and sugar.
    • Add the chilled butter and use a pastry cutter or forks to blend until the mixture resembles coarse crumbs.
    • Gradually add ice water, one tablespoon at a time, stirring with a fork until the dough holds together.
    • Divide dough in half, shape into discs, wrap in plastic, and refrigerate for at least 1 hour.

    Make the Cherry Filling:

    • In a medium-sized bowl, combine cherries, sugar, cornstarch, lemon juice, vanilla extract, almond extract, and a pinch of salt. Mix well until coated.
    • Let the filling sit for a minimum of 15 minutes to macerate and let flavors blend.

    Assemble the Pie:

    • Preheat oven to 425°F (220°C).
    • Roll out one disc of dough on a floured surface to fit the bottom of a 9-inch pie plate. Place in plate and trim excess dough.
    • Pour the cherry filling into the crust and dot with small pieces of butter on top.
    • Roll out the second disc of dough for the top crust. Place over the filling, trim excess, and crimp edges to seal.
    • Cut slits in the top crust for steam vents.
    • Brush top crust with beaten egg and sprinkle with sugar.

    Bake the Pie:

    • Place pie on a baking sheet and bake in preheated oven for 20 minutes.
    • Lower the temperature to 375°F (190°C) and continue baking for an additional 35-45 minutes, until crust is golden and filling is bubbling.
    • Cool completely on a wire rack before serving.

    how to serve Classic Baked Cherry Pie with Flaky Crust

    Serve the pie at room temperature or slightly warm. A scoop of vanilla ice cream or a dollop of whipped cream goes well with it. Use a sharp knife or pie server to cut clean slices. Let the pie cool enough so the filling sets; this makes nicer slices.

    how to store Classic Baked Cherry Pie with Flaky Crust

    Cool the pie fully before storing. Cover the pie loosely with foil or plastic wrap. Store at room temperature for up to 2 days. For longer storage, refrigerate for up to 4 days. You can freeze a whole baked pie or single slices for up to 2 months; wrap tightly in foil and then in plastic.

    tips to make Classic Baked Cherry Pie with Flaky Crust

    • Keep the butter cold for a flakier crust.
    • Do not overwork the dough; mix until it just comes together.
    • If using frozen cherries, do not thaw them fully before mixing to avoid extra liquid.
    • Brush the edges of the crust with egg wash for a golden color.
    • Bake on a sheet to catch any drips and keep your oven clean.

    variation (if any)

    • Make a lattice top instead of a full top crust for a classic look.
    • Add a pinch of cinnamon to the filling for warm spice.
    • Use a mix of cherries, or add a few sliced strawberries for a blend of fruit flavors.

    FAQs

    Q: Can I use a store-bought crust instead of making my own?
    A: Yes. A store-bought crust works fine and saves time. Fill and bake as directed.

    Q: How do I keep the filling from being too runny?
    A: Use the cornstarch as listed and let the pie cool fully so the filling sets. If cherries are very juicy, add a little more cornstarch.

    Q: Can I make the pie ahead of time?
    A: Yes. Bake the pie and cool it. Store in the fridge and reheat slices in the oven or microwave before serving.

    Q: Do I need to pit fresh cherries?
    A: Yes. Pit fresh cherries before using to make eating the pie safe and easy.

    Q: Can I skip the almond extract?
    A: Yes. The vanilla alone still gives good flavor, but almond extract adds a nice lift.

    Conclusion

    This classic baked cherry pie is simple to make and full of bright cherry flavor with a flaky crust. For another recipe idea and a guide that builds on cherry pie techniques, see Homemade Cherry Pie (With Thick Filling) – Sally’s Baking Addiction.