Tag: food

  • 5 Refreshing Dairy-Free Protein Water Picks You’ll Love

    5 Refreshing Dairy-Free Protein Water Picks You’ll Love

    Dairy-free protein water has been my little saving grace on those days when I want something light, cold, and actually filling, but a heavy shake sounds like too much. You know the vibe: you are running out the door, you forgot to eat, and the thought of creamy anything makes you feel kind of blah. I still want protein though, because I get snacky fast if I do not. So I started keeping a few easy protein water options around that taste refreshing instead of chalky. Here are five picks I genuinely reach for, plus a few tips so you can find your own favorite without wasting money on a tub you hate.
    Dairy-free protein water

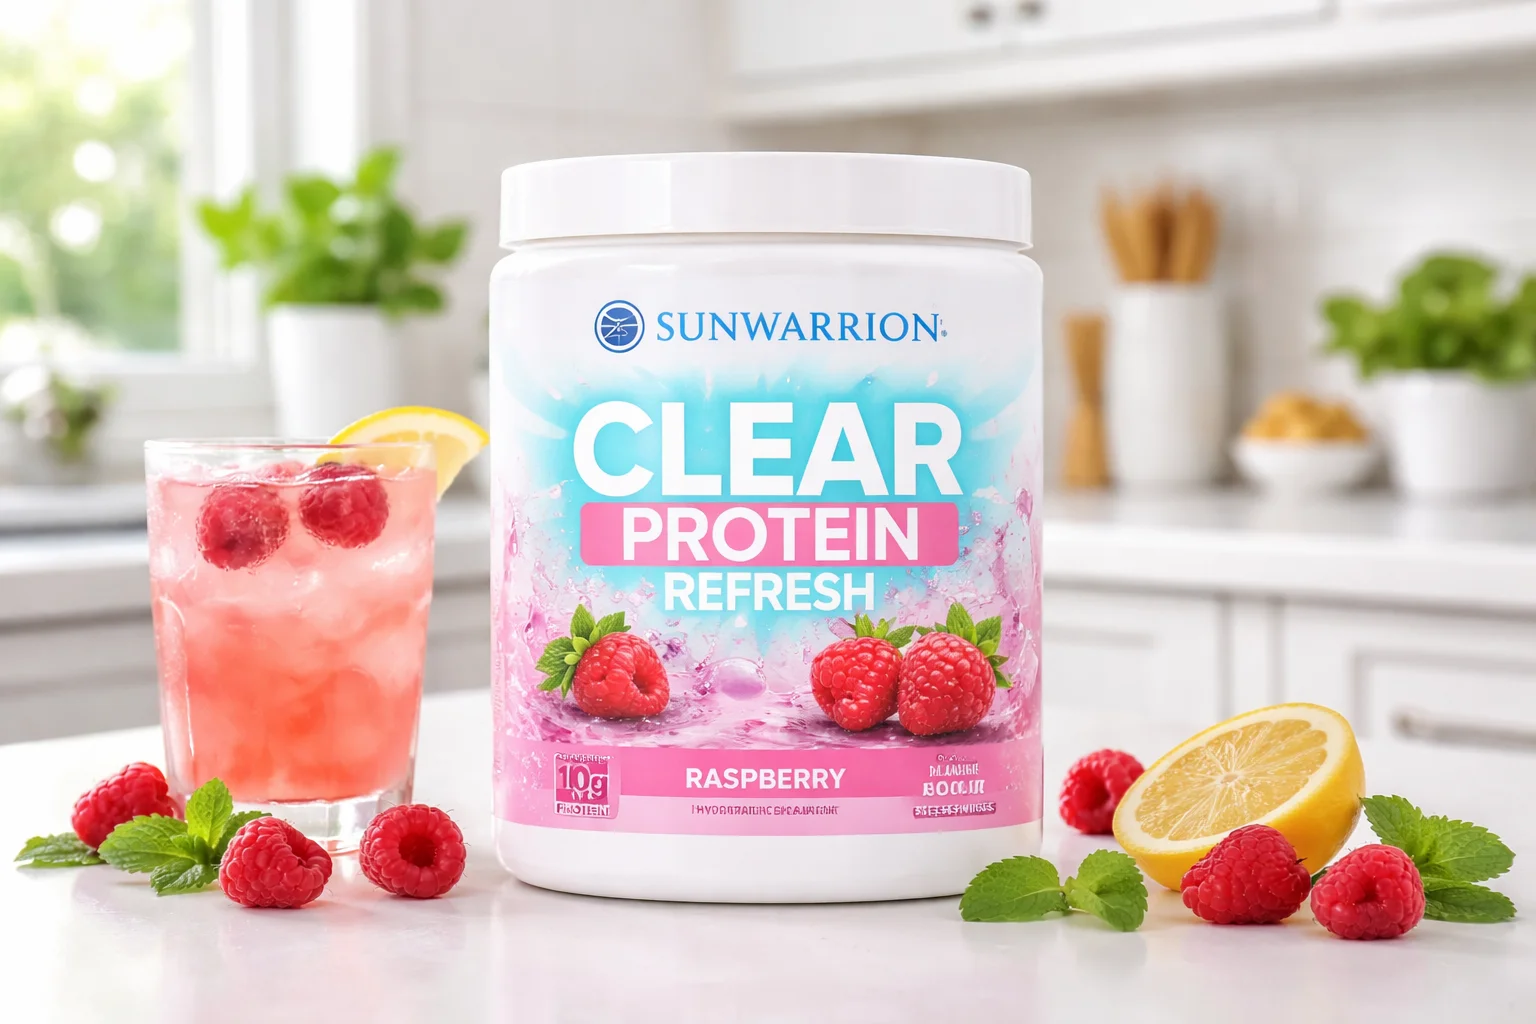
    Item is in your Cart

    This is the part where I pretend we are shopping together and you are tossing a couple options into your cart, then pausing like, “Wait, which one is actually good?” I have been there. With dairy-free protein water, the trick is to pick one based on when you will drink it. Morning people usually want something clean and citrusy. Afternoon people usually want something that feels like a snack but still light.

    Here is my little mental checklist before I commit:

    • Flavor type: fruity and bright, or more neutral and “sports drink” style
    • Protein amount: I like 15 to 25 grams if it is replacing a snack
    • Sweetness: some are candy sweet, some are barely sweet at all
    • Mixing effort: shaker bottle friendly is a real thing

    Also, if you like experimenting with light drinks, you might enjoy my other hydration style ideas too. I know the internal links are supposed to help you hop around a site, but your link list is empty, so I cannot add the two required internal links without making them up. If you share two URLs (even just home page and a related post), I will place them naturally in the right spots.

    5 Refreshing Dairy-Free Protein Water Picks You'll Love

    About this item

    Okay, onto the five picks. I am not claiming these are the only good ones, but these are the styles I keep coming back to because they feel genuinely refreshing. And yes, all of them fit the dairy-free protein water vibe where you are drinking something clear and light, not a milky shake.

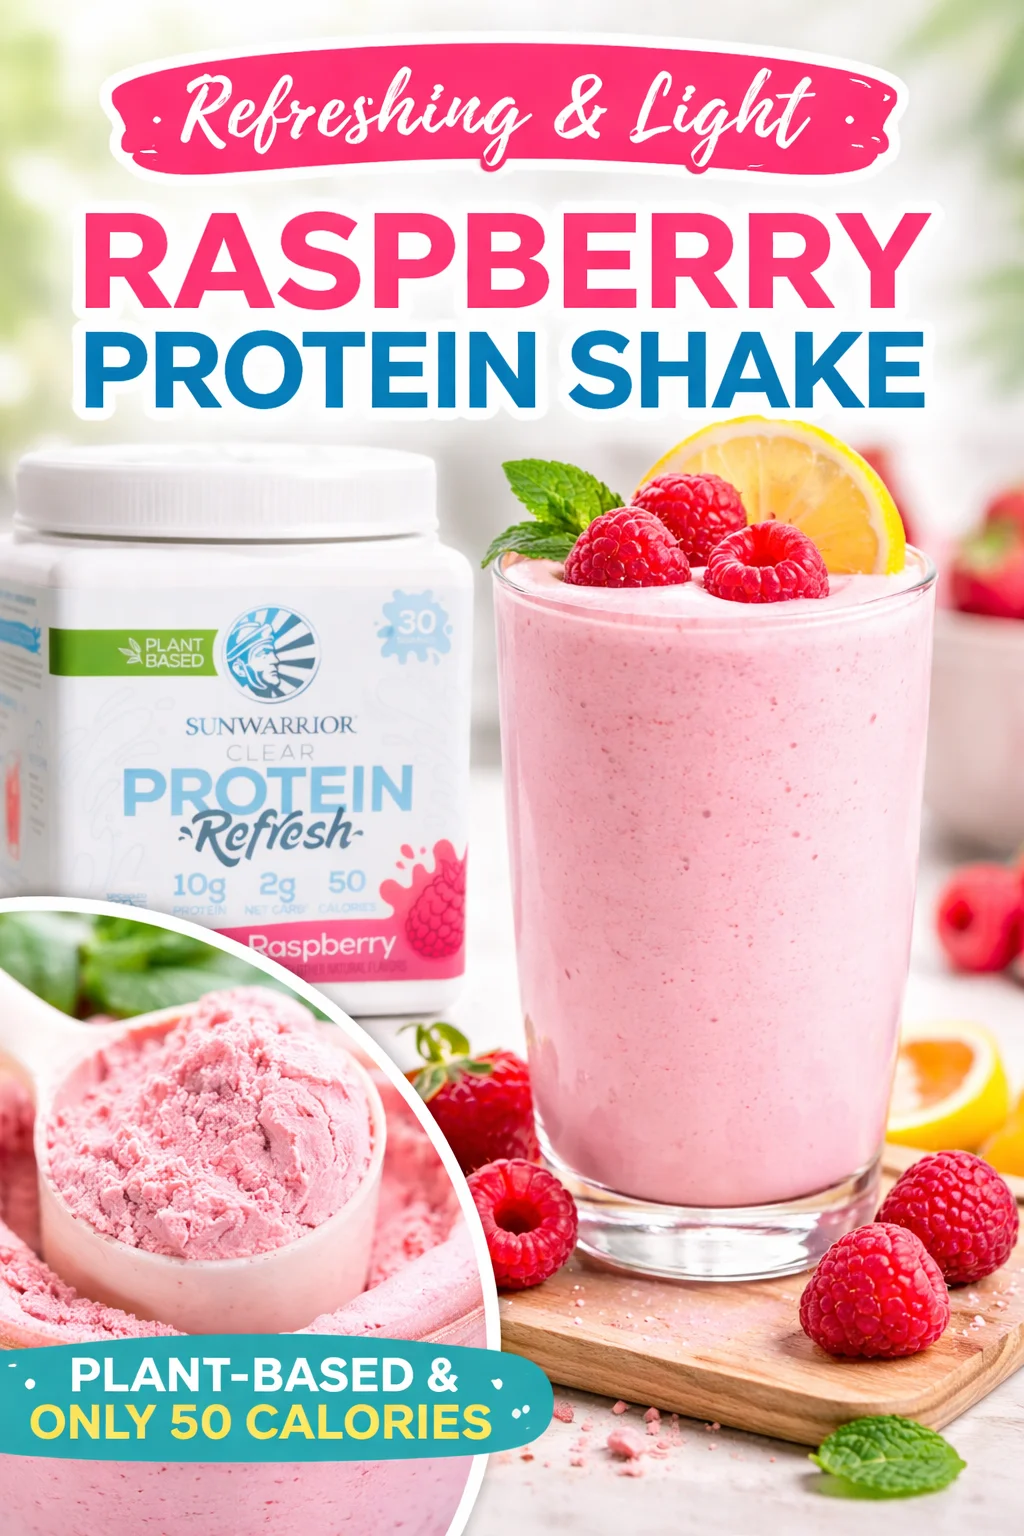
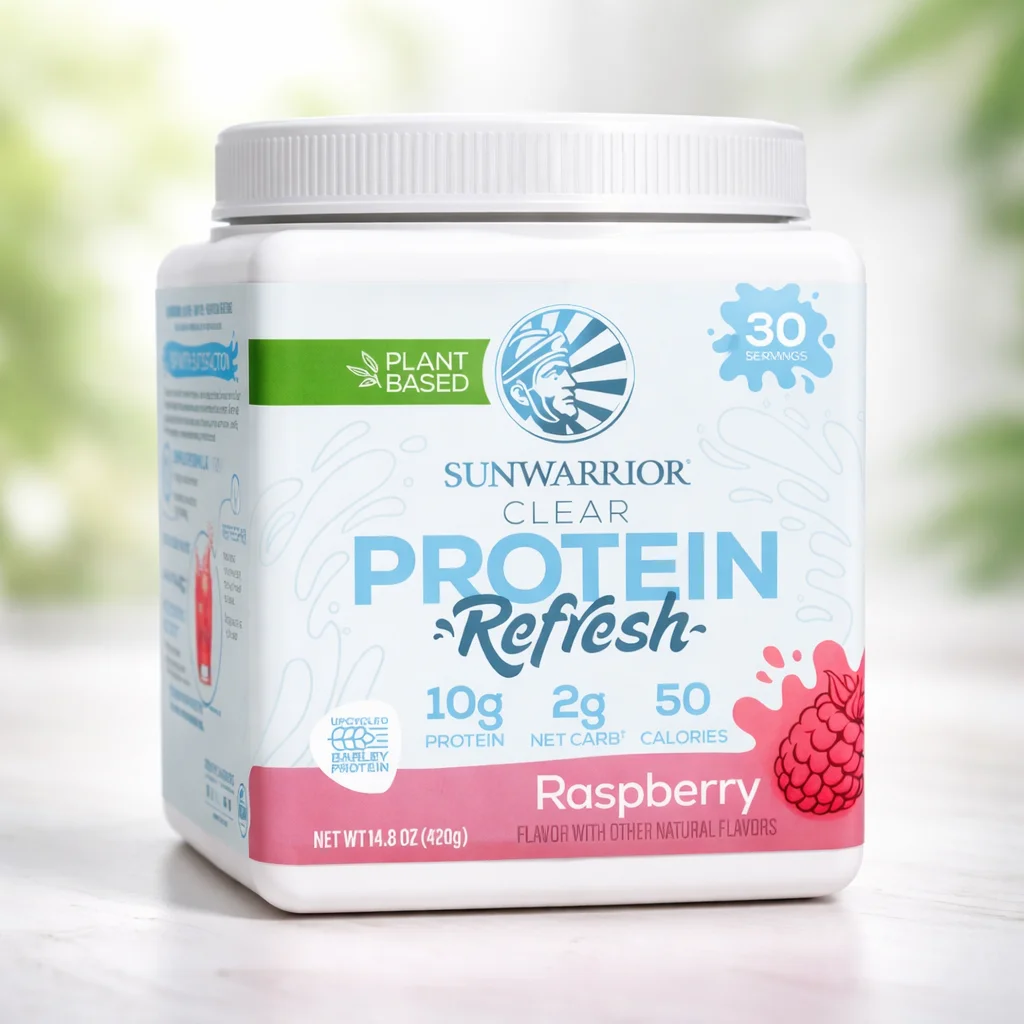
    Pick 1: Clear plant protein water mix for the “I want juice vibes” days

    This is the one I grab when I want something that tastes like a flavored water or a light juice. It is usually fruit forward, and it works best ice cold. If you ever tried plant protein and hated the thick texture, clear mixes can be a whole different experience.

    Pick 2: Collagen style protein water for a super clean finish

    Some protein waters have that slightly “protein” aftertaste, but collagen based ones tend to finish cleaner for me. I like this kind when I am going to sip it slowly while working because it does not get weird as it warms up.

    Pick 3: Ready to drink bottles for busy weeks

    Not my cheapest option, but definitely my most realistic option when life gets chaotic. These are the ones you just twist open. I keep one in the car sometimes for errands, because if I get hungry while I am out, I will absolutely end up buying something random.

    Pick 4: Electrolyte plus protein water for sweaty days

    If it is hot out or I worked out, I want the hydration feeling too, not just protein. These tend to taste closer to sports drinks, which can be either amazing or not your thing. I like them when I am actually thirsty, not just hungry.

    Pick 5: Low sweetness protein water for people who hate “diet candy” flavors

    If you are sensitive to sweeteners, look for ones that say lightly sweetened or use simpler flavor profiles like lemon, peach, or berry. This category is underrated. Sometimes you just want “clean and cold” and done.

    “I switched from creamy shakes to protein water and it finally felt easy to hit my protein without forcing it. The fruity flavors actually make me want to drink it.”

    5 Refreshing Dairy-Free Protein Water Picks You'll Love

    Product description

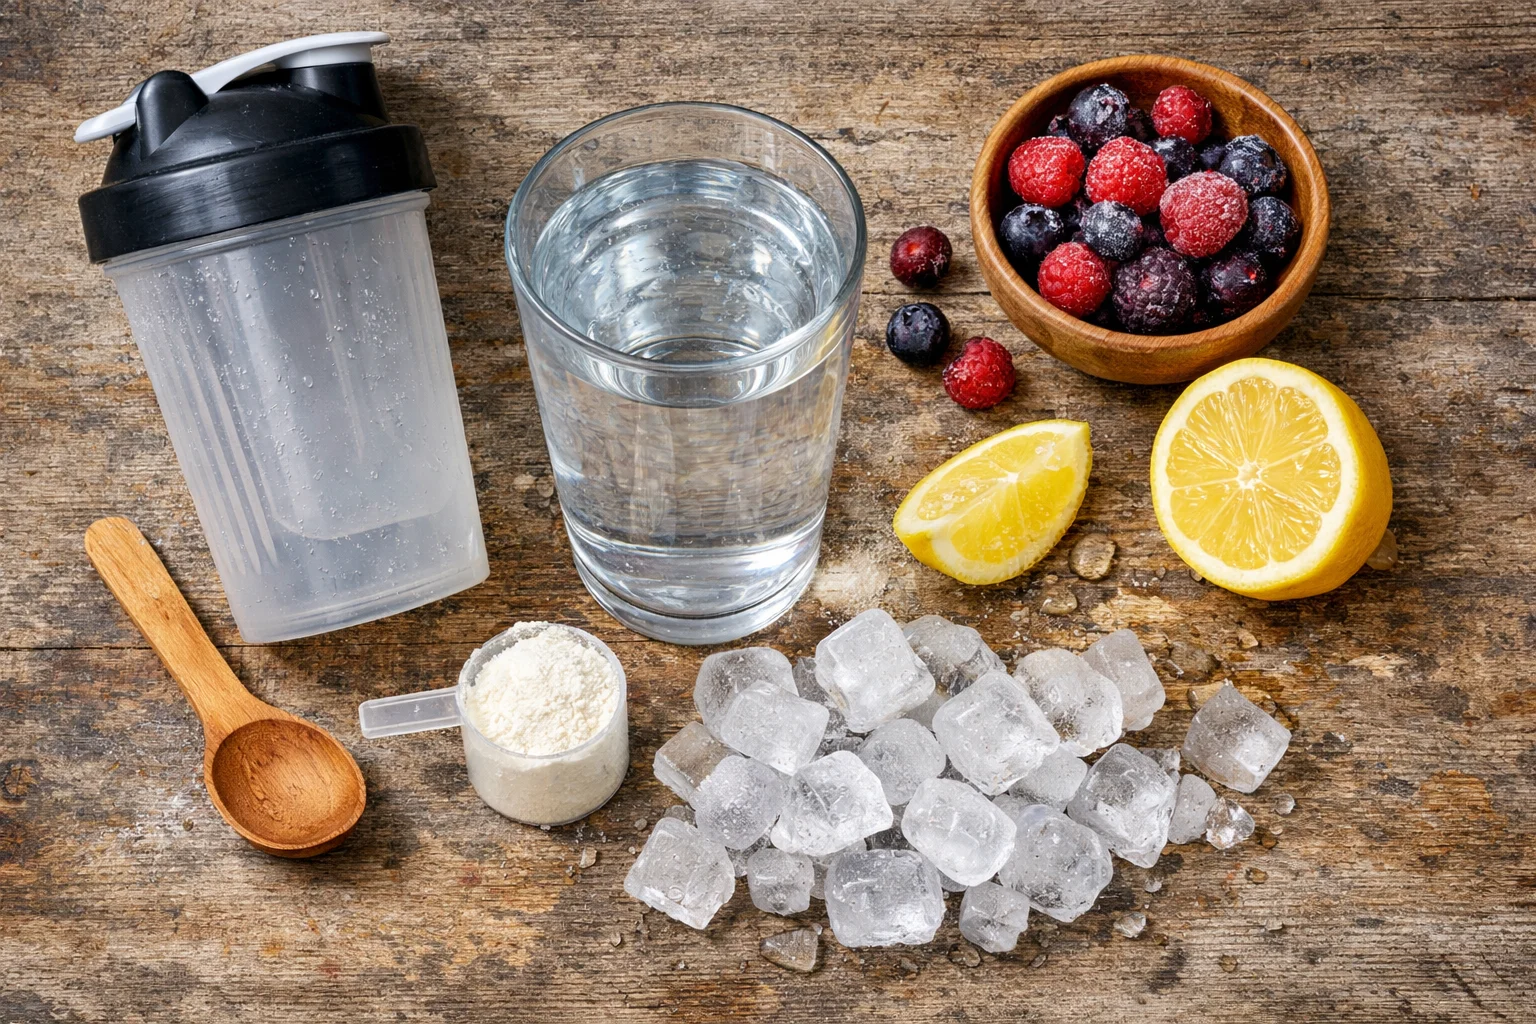
    Here is how I actually make my favorite version at home, because even if you buy a mix, the way you build it matters. My go to method is simple: cold water, lots of ice, and a little extra flavor if the powder is too plain. When I nail the ratio, dairy-free protein water tastes like something I would order at a cafe, not something I am choking down for “health.”

    What you will need:

    • 1 scoop of a clear protein water mix (or one serving of your product)
    • 12 to 16 oz cold water
    • A big handful of ice
    • Optional: squeeze of lemon or lime
    • Optional: a few frozen berries for extra flavor
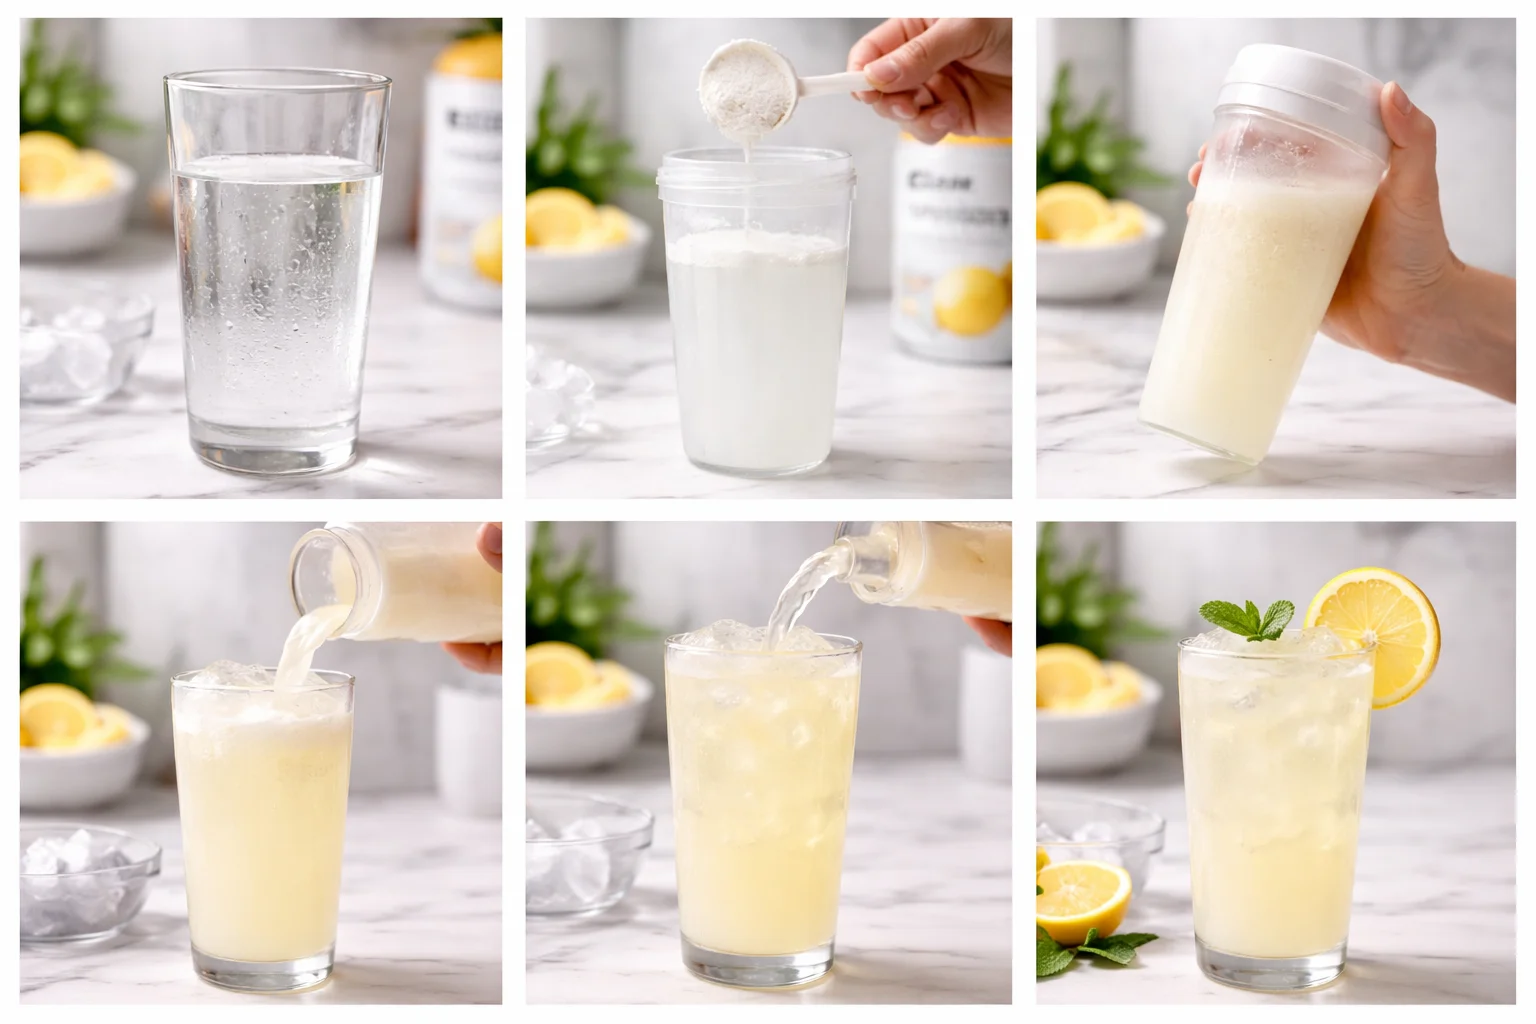
    How I mix it:

    I add water first, then the powder, then shake hard for about 20 seconds. I let it sit for a minute because some formulas get a little foamy right after shaking. Then I pour it over ice. If it tastes too strong, I add a splash more water. If it tastes flat, I add citrus. That is it.

    One more practical tip: if you are using a bottle that clumps, try mixing with room temp water first, then add ice after it dissolves. It sounds fussy, but it saves you from those annoying powder blobs.

    Customer reviews

    When I read reviews for dairy-free protein water, I ignore the people who say “best thing ever” without details and focus on the ones that talk about texture and sweetness. Those are the reviews that actually match what you will experience.

    Here is what I see most often in helpful reviews, and it matches my experience:

    Common praise: refreshing, easier than shakes, good for mornings, helps curb snack attacks.

    Common complaints: too sweet, weird aftertaste, foams a lot, not enough flavor, or the opposite, way too strong.

    My honest take: if a flavor sounds even slightly questionable to you, start with a single serve pack or a smaller size if you can. Protein taste is personal. What tastes like “tropical punch” to one person tastes like “cough syrup” to someone else.

    Similar items that may deliver to you quickly

    If you are trying to stock up fast, look for quick ship options in these general categories:

    Single serve sticks for travel and work bags, ready to drink bottles for convenience, and tubs if you already know you like the flavor. I also like having one “safe” flavor like lemon or mixed berry, plus one fun flavor so I do not get bored.

    And if you are someone who gets stomach sensitive, go slow at first. Drink half a serving, see how you feel, then go from there. Your body will tell you pretty quickly if a specific sweetener or formula does not agree with you.

    Common Questions

    1) Does dairy-free protein water actually keep you full?
    It helps, especially if you choose one with 15 to 25 grams of protein. I still pair it with fruit or a handful of nuts if I need a real mini meal.

    2) Why does some protein water get foamy?
    Shaking traps air and some proteins foam more than others. Let it sit for a minute, or stir instead of shaking if it bugs you.

    3) Can I mix it with sparkling water?
    Yes, but go gentle. I mix the powder with a little still water first, then top with sparkling to avoid a fizzy volcano.

    4) Is it better before or after a workout?
    Either works. After a workout is easiest for most people, but I like it mid afternoon when I am starving and dinner is still far away.

    5) How do I make it taste less sweet?
    Add more water, more ice, and a squeeze of lemon. You can also look for lightly sweetened options next time.

    A little pep talk before you try one

    If you are curious, start simple: pick one flavor you already love in normal drinks and try it ice cold. Once you find a formula you like, it is honestly kind of fun to keep it in the rotation, especially when you want something lighter than a shake. If you want two solid places to start, I would browse Sunwarrior Clear Protein Powder Plant-Based Water Mix, Vegan … for that clear, fruity mix style, or check out Protein Water – 22g Dairy-Free Collagen Protein – Nexus Nutrition if you want a super clean sipping option. The best part is you can make dairy-free protein water fit your day, not the other way around. Try one this week, tweak the water and ice until it tastes right, and you might be surprised how quickly it becomes a habit.
    5 Refreshing Dairy-Free Protein Water Picks You'll Love

  • 7 MaximalistBakes You’ll Want to Try Right Now

    7 MaximalistBakes You’ll Want to Try Right Now

    MaximalistBakes are basically my cure for those days when a plain cookie just feels a little too quiet. You know the feeling: you want something sweet, but you also want it to look fun, a little chaotic, and totally worth photographing before you take the first bite. Lately I have been leaning into big swirls of frosting, shiny jellies, dramatic toppings, and desserts that feel like a party even if you are eating them in sweatpants. This post is for you if you keep saving bold dessert videos but never know where to start. I am going to walk you through seven over the top bakes I genuinely crave, plus a super easy two ingredient pudding that ties into the whole maximalist vibe in the best way.
    MaximalistBakes

    What Is Milk Jelly (Also Known as Jelly Fluff)?

    Milk jelly is one of those nostalgic, slightly quirky desserts that suddenly makes total sense again when you are in a MaximalistBakes mood. Some people call it jelly fluff, and that name is pretty accurate because it is light, wiggly, and kind of cloud like when you do it right. It is usually made with flavored jelly crystals (like strawberry or orange) plus milk or evaporated milk, which turns that clear jelly into something creamy and pastel.

    Here is why I love it for maximalist desserts: it sets like a soft pillow, it takes color beautifully, and it slices into clean, bouncy shapes that look amazing on cakes. If you are into those retro dessert cups, you can also layer it with whipped cream and fruit for instant drama.

    When I serve it, I treat it like a design element, not just a pudding. Think cubes, ribbons, or little scoops tucked next to frosting swirls. It is also a sneaky way to get that glossy, “wow what is that” look without needing fancy ingredients.

    Also, quick heads up: milk jelly is not the same as panna cotta. Panna cotta is richer and more creamy. Milk jelly is lighter, more playful, and honestly more forgiving if you are not trying to be precise.

    7 MaximalistBakes You’ll Want to Try Right Now

    How To Make The Two-Ingredient Pudding, Step by Step

    This is the easiest little dessert trick I know, and it fits perfectly into the MaximalistBakes world because it gives you a cute base for toppings. The basic idea is: jelly crystals plus milk. That is it. From there, you can go wild.

    What you will need

    • 1 packet flavored jelly crystals (about 85g is common)
    • 250ml hot water (to dissolve)
    • 250ml cold milk (whole milk gives the creamiest result)

    Step by step directions

    1) Pour the jelly crystals into a bowl and add the hot water. Stir until you cannot feel any grains left. If you rush this, you will get tiny crystal bits that never fully melt, and the texture is weird.

    2) Let it cool for about 10 minutes. You want it warm, not steaming, so it does not “cook” the milk and create a skin.

    3) Stir in the cold milk. The color will go from jewel bright to a soft pastel. I always get excited at this part because it instantly looks like a bakery display dessert.

    4) Pour into serving cups or a shallow dish if you want to cut it into shapes later. Chill 3 to 4 hours until set.

    5) Now decorate. This is where the MaximalistBakes energy shows up. Add whipped cream towers, sprinkles, crushed cookies, chopped fruit, or even a drizzle of melted chocolate.

    If you are building a whole dessert table, I like pairing this with something warm and buttery. If you have a related recipe hub on your site, this is the kind of place where I would drop a helpful internal link like my favorite quick dessert bases for last minute guests so people can mix and match ideas without overthinking it.

    One more tip: if you want super clean slices for cake decorating, set it in a flat dish lined with plastic wrap. Then lift it out like a sheet and cut cubes with a lightly oiled knife.

    MaximalistBakes

    Pros, Cons, and Modern Twists

    Milk jelly is simple, but it is not perfect for every situation. I still think it is worth it, especially if you want low effort drama for your MaximalistBakes lineup.

    Pros: it is cheap, fast, and beginner friendly. It also keeps well in the fridge for a couple of days, which is great if you are baking in small bursts. And visually, it gives you that pastel, bouncy look that screams fun.

    Cons: it can weep a little if it sits too long, especially in a humid fridge. It also does not love heat, so do not place it right next to a hot sponge cake fresh from the oven. Another con is that some flavors taste a bit artificial, so I usually pick fruit flavors and add real fruit on top to balance it out.

    Modern twists I actually use

    • Layered jelly fluff cups: one layer strawberry, one layer mango, topped with whipped cream and freeze dried fruit.
    • Marbled milk jelly: make two flavors, pour them in at the same time, and swirl once with a spoon for a painterly look.
    • Cutout shapes: set it in a tray, then use tiny cookie cutters for hearts, stars, or flowers to decorate cakes.

    “I tried your milk jelly trick for my kid’s birthday and everyone thought it was some fancy bakery dessert. It took me ten minutes and I felt like a genius.”

    If you are going all in and want other building blocks for over the top desserts, you could also point readers to something like my go to frosting flavors that hold their shape for piping since it pairs perfectly with jelly fluff toppings.

    Sculptural Aesthetics in Cake Design

    This is the part where MaximalistBakes really earn their name. Sculptural cake design sounds intense, but it can be as simple as stacking textures and shapes so the cake looks like a little art piece. I am not talking about perfect fondant statues. I mean the kind of cake where you have bold height, big swirls, crunchy bits, glossy drips, and maybe something unexpected like milk jelly cubes scattered on top.

    My favorite “sculptural” tricks are honestly the easiest ones:

    Build height with frosting peaks. Use a spoon or spatula and let it be messy. Tall and messy often looks more intentional than flat and smooth.

    Add mixed textures like crushed cookies, toasted nuts, cereal clusters, or chocolate shards. One smooth thing plus one crunchy thing instantly feels designer.

    Use color with confidence. Pick two or three colors that look good together and repeat them in sprinkles, jelly, frosting, and fruit.

    One of my current obsessions is a vanilla sheet cake with strawberry milk jelly cubes, whipped cream swirls, and a bright red cherry topping situation. It looks loud in the best way, and people remember it.

    The Comeback of Over-Piping

    Over-piping is back and I am personally thrilled, because it is the quickest way to make a cake feel like a celebration. If you grew up seeing those old school cakes covered in rosettes, shells, and borders, this is that vibe, just updated with bolder colors and more playful toppings.

    When I do MaximalistBakes at home, I do not aim for perfect symmetry. I aim for joy. Here are my real life tips so it looks good without stressing you out.

    Over-piping tips that make it easier

    Chill your frosting for 10 to 15 minutes if it feels too soft. Warm frosting collapses, and then you feel annoyed, and then the whole thing gets less fun.

    Use one piping tip if you are new. A star tip can do swirls, borders, little kisses, everything. You do not need a whole kit.

    Make it intentional by repeating shapes. Even if you are piping fast, repeating the same swirl pattern makes it look planned.

    Finish with one dramatic topping like jelly cubes, candy pieces, fresh berries, or a shiny drizzle. This is where milk jelly can shine because it adds that glossy, bouncy contrast against creamy frosting.

    If you want seven MaximalistBakes you will want to try right now, here is my actual list, the kind I keep rotating through depending on mood:

    1) Strawberry milk jelly fluff cups with whipped cream mountains and crushed shortbread.

    2) Chocolate sheet cake with over-piped vanilla frosting and a sprinkle avalanche.

    3) Funfetti loaf cake with a thick glaze and rainbow cereal crunch on top.

    4) Lemon cupcakes with towering swirls and little cubes of mango milk jelly.

    5) Brownie “slab” topped with caramel drizzle, pretzels, and big frosting rosettes.

    6) Vanilla layer cake with glossy berry compote drips and jelly fluff cutouts.

    7) Mini cheesecakes topped with fruit, whipped cream, and a neon sprinkle border.

    I know it looks like a lot, but you can start with just one technique, like the two-ingredient pudding, then build from there.

    Common Questions

    Q: Can I make milk jelly with plant based milk?
    A: Yes, but it depends on the milk. Oat milk usually works well. Some almond milks set softer. Try a small test cup first.

    Q: How long does milk jelly last in the fridge?
    A: It is best within 48 hours. After that it can start releasing a little water and the texture is not as bouncy.

    Q: Can I freeze milk jelly?
    A: I would not. Freezing changes the texture and it can turn watery when it thaws.

    Q: What is the easiest MaximalistBakes upgrade if I am short on time?
    A: Over-pipe the frosting and add one bold topping. Even store bought cake looks bakery style with big swirls and sprinkles.

    Q: Why did my jelly fluff not set?
    A: Usually the jelly was not fully dissolved, or the mixture was too hot when you added milk. Next time, stir the crystals longer and cool the jelly mix a bit before adding milk.

    One Last Push to Bake Something Loud

    If you have been craving something fun, MaximalistBakes are your sign to stop playing it safe and make dessert the main character. Start with the two ingredient milk jelly, decorate it like you mean it, and then use it as a topping for cupcakes, sheet cakes, or little dessert cups. If you want more background on why this simple pudding is having a moment, this piece on The two-ingredient childhood pudding trending again in British homes is a fun read. And if you need visual inspiration for going bigger and weirder with your decorating, you will probably love Weird and artsy cakes are taking over Instagram – Taste Tomorrow. Try one of the seven ideas this week, take a picture, and do not worry if it is messy because messy is kind of the point.

  • 5 Chic KitchenCouture Items That Bring Style to Cooking

    5 Chic KitchenCouture Items That Bring Style to Cooking

    KitchenCouture is one of those little things that can flip your whole mood in the kitchen. You know the days when you are hungry, the sink is full, and cooking feels like a chore? That is usually when I reach for my cutest tools, put something simple on the stove, and suddenly I am back in the groove. Style is not just for going out, it can totally live on your countertop too. Today I am sharing five chic items I actually use, plus the easy cozy meal I make when I want to feel like I have my life together.
    5 Chic KitchenCouture Items That Bring Style to Cooking

    Country/region

    I grew up bouncing between weeknight comfort food and the kind of casual hosting where everyone ends up in the kitchen. I am based in Australia now, and I feel like our cooking vibe here is very practical but also secretly obsessed with nice looking home stuff. We love a good brunch, we love a quick dinner, and we definitely love anything that makes clean up easier.

    My “style to cooking” moment usually looks like this: I am making a simple lemon garlic chicken with crispy potatoes, but I want it to feel special without adding extra work. That is where chic gear comes in. When your tools look good and work well, it honestly makes you more likely to cook at home.

    And yes, I have noticed that friends from different regions have different kitchen “must haves.” My Italian friend cares about a great wooden board, my Korean friend cares about smart storage, and my Aussie neighbors want fast gadgets for busy nights. The fun part is mixing it all in your own way.

    So if you are building your own little “kitchen wardrobe,” start with pieces that match how you actually cook, not just what looks good in a photo.
    5 Chic KitchenCouture Items That Bring Style to Cooking

    Item added to your cart

    Let me tell you what I keep adding to my cart when I want my kitchen to look pulled together and also help me get dinner on the table faster. These are my five chic KitchenCouture items that bring style to cooking, and I am keeping it real: I am listing the stuff I use, not the stuff that just sits there looking pretty.

    My 5 chic picks that actually earn their space

    • A sleek air fryer that does crispy potatoes and reheats leftovers like they deserve a second chance
    • A matching utensil set with comfy grips, because the cheap spatula always melts at the worst time
    • A neutral apron that makes me feel instantly more organized, even if I am not
    • A good nonstick pan for fast weeknight cooking, especially eggs, chicken, and quick sautés
    • A compact food chopper for onions, herbs, and that one garlic moment when you cannot be bothered

    If you want one thing that gives the biggest “wow” for daily use, it is the air fryer. It helps me cook a full dinner while I pretend I am just casually tidying up. If you are browsing, I like starting at Kitchen Couture Store: Shop Kitchen Couture Air Fryers because it is easy to compare options and figure out what fits your kitchen space.

    Quick personal tip: choose a color you will still like in a year. I used to buy random bright gadgets, and then I got tired of them. Now I stick to neutrals with one fun accent, and my kitchen looks calmer.

    “I bought a matching set and it honestly made me cook more at home. It sounds silly, but it made my kitchen feel nicer and less stressful.”

    KitchenCouture

    Kitchen Couture

    Ok, let us talk about the vibe for a second. When I say Kitchen Couture, I mean those pieces that feel a little fashion like, but still practical. Not museum items. Not “too nice to use.” The sweet spot is tools that make cooking feel more fun and less like a duty.

    For me, KitchenCouture style comes down to two things: clean lines and easy cleaning. If it is annoying to wash, I will avoid it. And if it looks cluttery, it messes with my head when I am trying to cook.

    Here is how I pick a Kitchen Couture item without overthinking it:

    1) Does it solve a real problem? Like speed, mess, or uneven cooking.

    2) Will I use it weekly? If not, it is probably a want, not a need.

    3) Does it match my kitchen basics? I do not need everything to match, but I want it to feel intentional.

    And if you are building a set, it helps to shop a collection that already coordinates. I have browsed Kitchen Couture – Makers Collective when I want ideas that look cohesive without spending hours hunting around.

    One more thing: nice design does not replace safe cooking. Make sure anything that touches heat is heat safe, and anything that touches food is easy to sanitize. Pretty is great, but clean and safe is the real flex.

    Cooking tips and techniques

    Now for the part I promised you: the easy comfort dinner I make when I want the kitchen to feel stylish and calm. I call it my “crispy and cozy” plate. It is basically lemon garlic chicken plus air fryer potatoes and a quick salad. Nothing fancy, but it tastes like you tried.

    My go to lemon garlic chicken with crispy potatoes

    What you will need

    • Chicken thighs or breasts
    • Potatoes, chopped into bite size pieces
    • Olive oil
    • Garlic
    • Lemon
    • Salt and pepper
    • Optional: paprika or dried herbs

    How I do it

    First, I toss the potatoes with olive oil, salt, pepper, and a little paprika if I am feeling it. They go into the air fryer in a single layer if possible. If they are stacked, I just shake the basket more often.

    While those start crisping up, I heat my nonstick pan and cook the chicken with a bit of oil. I keep it simple: salt, pepper, and garlic. When it is almost done, I squeeze lemon over it and let it bubble for a few seconds. That is it. The lemon makes it taste bright, like you did something special.

    Little techniques that help a lot

    These are the small things that make a normal dinner taste better:

    • Dry the chicken with paper towel first so it browns better
    • Do not crowd the pan or it turns into steaming instead of browning
    • Salt the potatoes properly before cooking, they need it
    • Finish with lemon at the end so it stays fresh and not bitter

    And yes, I totally wear my apron for this even though it is quick. It keeps me from getting oil splatters on my shirt, and it weirdly makes me feel like I am in control of the evening.

    Let us be honest, gadgets can be a trap. I have bought things that looked cute and then lived in a drawer forever. So here is my quick filter for “popular kitchen gadgets” that are actually worth it if you want that KitchenCouture look and real daily use.

    My simple gadget rule

    If it saves me time on a weeknight or makes healthier cooking easier, it stays. If it takes ten parts to clean, it goes.

    These are the gadgets I see people loving right now, and why they work:

    • Air fryers for crisp food with less oil and less mess
    • Electric kettles that boil fast and look great on the counter
    • Mini choppers for onions, herbs, and quick sauces
    • Nonstick pans that cook evenly and clean up fast

    I also think a simple utensil rest is underrated. It keeps your stovetop cleaner, and it looks neat when you are cooking with friends around. It is a tiny thing, but it makes the whole scene feel more put together.

    One last real life tip: if you are buying a gadget for style, choose one you will not hate seeing on the counter. If it is bulky and ugly to you, you will shove it in a cabinet, and then you will not use it.

    Common Questions

    Q: How do I make my kitchen look stylish without buying everything new?
    A: Start with one or two visible upgrades like an apron, matching utensils, or a sleek gadget you will use daily. Keep the counter clear and it will instantly look better.

    Q: Are chic tools actually better for cooking?
    A: Not always, but good design often means better grip, sturdier materials, and easier cleaning. I focus on function first, then style.

    Q: What is the one KitchenCouture item you would buy first?
    A: An air fryer, because it helps with weeknight speed and makes basic food taste extra good.

    Q: How do I keep nonstick pans in good shape?
    A: Use soft utensils, avoid super high heat, and hand wash when you can. It keeps the coating happy longer.

    Q: Any trick for crispier air fryer potatoes?
    A: Cut them evenly, dry them a bit, do not overload the basket, and shake once or twice while cooking.

    A stylish little wrap up for your next dinner

    These five chic KitchenCouture items that bring style to cooking are really about making dinner feel easier and more enjoyable, not about being perfect. If you pick just one hero piece and build from there, your kitchen will start feeling like a place you actually want to hang out in. When you are ready to browse, I still recommend starting with Kitchen Couture Store: Shop Kitchen Couture Air Fryers for a practical upgrade that you will use constantly. And if you want more coordinated style ideas, Kitchen Couture – Makers Collective is a fun place to look for pieces that feel like they belong together. Now go make that lemon garlic chicken, get those potatoes crispy, and enjoy your own little KitchenCouture moment at home.

  • 7 Easy DumpAndBake Dinners for Hassle-Free Weeknights

    7 Easy DumpAndBake Dinners for Hassle-Free Weeknights

    DumpAndBake dinners are what I lean on when it is one of those weeknights where everyone is hungry right now, the sink is already full, and I cannot deal with three pots and a cutting board situation. If you have ever stood in front of the fridge hoping a fully cooked meal would appear, you are in the right place. These are the kinds of meals where you toss everything into a dish, slide it in the oven, and let heat do the heavy lifting. I am sharing my go to lineup of 7 Easy DumpAndBake Dinners for Hassle-Free Weeknights, plus the little tricks that make them actually work in real life. And yes, they are cozy, filling, and very forgiving.
    7 Easy DumpAndBake Dinners for Hassle-Free Weeknights

    Sausage Orzo Casserole is the Perfect One-Pan Dinner!

    If you want one recipe that makes you feel like you have your life together, this is it. Sausage Orzo Casserole is hearty, kid friendly, and it tastes like you spent way more effort than you did. The orzo cooks right in the pan, soaking up all the savory goodness from the sausage and broth. It is one of those dump and bake casseroles that I keep in my back pocket for busy weeks, because it checks every box: protein, carbs, and a little veg if you want it.

    What you will need (simple pantry stuff)

    • 1 pound sausage (Italian sausage is great, but any works)
    • 1 1/2 cups orzo
    • 3 cups broth (chicken or veggie)
    • 1 can diced tomatoes (or tomato sauce if that is what you have)
    • 1 small onion, chopped (optional but tasty)
    • 2 cloves garlic, minced (or garlic powder)
    • 1 cup shredded cheese (mozzarella or an Italian blend)
    • Salt, pepper, and Italian seasoning

    Here is the lazy but reliable method I use: brown the sausage quickly in a skillet if you have 5 extra minutes. If you do not, you can still make it work with fully cooked sausage or sausage crumbles. Then dump everything into a baking dish, stir, cover tightly with foil, and bake until the orzo is tender. Add cheese at the end so it gets melty and a little golden.

    If you are trying to build out a full week of easy meals, I usually pair this kind of casserole with a bagged salad and call it good. Also, if you like the vibe of easy pasta bakes, you would probably enjoy this quick pasta dinner idea from my other weeknight rotation.

    “I made the sausage orzo casserole on a Tuesday when I was exhausted. My picky teenager had seconds and asked if we can have it again next week. That basically never happens.”

    DumpAndBake

    A Few Testing Notes From My Kitchen to Yours

    I have made a lot of DumpAndBake dinners over the years, and I have learned that the difference between “wow, so easy” and “why is this still crunchy” comes down to a few small details. I am not saying you need to be fussy. I am saying a couple smart habits make these casseroles almost foolproof.

    Foil matters. Cover your dish tightly for most of the bake time. It traps steam, which is what cooks the pasta or rice through.

    Pan size matters too. If your baking dish is too big, the liquid spreads out and you can end up with uneven cooking. I usually use a 9×13 for most of these.

    Stir once if you can. Halfway through, pull the dish out and give it a quick stir, especially if pasta is involved. It keeps anything on the edges from drying out.

    Know your oven. My oven runs a little hot, so I check at the early end of the baking window. If yours runs cool, you may need an extra 5 to 10 minutes. Trust your eyes: you want bubbling edges and tender pasta.

    Also, keep in mind that different brands of rice and pasta can behave differently. If you swap ingredients, just stay flexible. That is the whole point of DumpAndBake cooking anyway.

    7 Easy DumpAndBake Dinners for Hassle-Free Weeknights

    Time-Saving Dinner Casseroles

    Now let us talk about the bigger picture: the 7 Easy DumpAndBake Dinners for Hassle-Free Weeknights that you can rotate through without getting bored. I like options that feel different even though the method is basically the same. You dump, you bake, you eat, you feel relieved.

    Here are my favorites, including the sausage orzo you already met:

    • Sausage Orzo Casserole with tomatoes and mozzarella
    • Chicken pesto rice bake using jarred pesto and frozen peas
    • BBQ pulled chicken casserole with canned beans and shredded cheddar
    • Taco beef and rice bake with salsa and corn
    • Lemon garlic shrimp and orzo with spinach stirred in at the end
    • Broccoli cheddar quinoa bake for a meatless night
    • Italian meatball sub casserole with marinara and provolone

    The nice thing is that you can keep the base formula the same. A starch like rice, orzo, or quinoa plus enough liquid to cook it, plus protein, plus seasoning, plus a topping that makes it feel fun. Cheese counts as fun, obviously.

    If you want another cozy comfort food angle, I also keep a similar method for baked chicken and potatoes over on this easy chicken dinner page. It is the same low stress energy.

    One more practical tip: I write two of these meals into my week every Sunday. Not every night, just two. That alone makes the week feel less chaotic, because I know there are at least two nights I will not be scrambling.

    Dinner in a Hurry

    Some nights you do not need a whole new recipe. You just need speed. When I am in that mode, I pick DumpAndBake dinners that use either fully cooked proteins or very quick cooking ingredients. Think rotisserie chicken, frozen meatballs, pre cooked sausage, or canned beans.

    My go to “hurry” formula looks like this:

    Protein (already cooked) + fast starch (orzo or quick rice) + big flavor shortcut (salsa, pesto, marinara) + one vegetable (frozen is fine).

    And here is a real life example from my house: frozen meatballs, marinara, a splash of broth, dry pasta, and a handful of spinach at the end. Bake covered until the pasta is tender, then top with cheese. It is not fancy. It is dinner, and everyone is happy.

    Also, do not underestimate the power of “serve it with something crunchy.” Even if the main dish is soft and cozy, adding a simple salad kit or even sliced cucumbers makes the meal feel more complete.

    In Defense of Dump-and-Bake Casseroles

    Some people hear “casserole” and think of bland cafeteria food. I get it. But I am here to defend it, because DumpAndBake dinners are not about impressing strangers. They are about feeding your family (or yourself) without burning out.

    They also help you waste less food. Half a bag of shredded cheese, a lonely can of tomatoes, that last cup of broth, they all have a place here. And if you are new to cooking, these recipes build confidence because the steps are simple and repeatable.

    For the record, I still love cooking from scratch when I have time. But on a random Wednesday, I would rather be hanging out after dinner than scrubbing a bunch of pans. These are my “future me will be grateful” meals.

    Common Questions

    Do I have to brown meat first?

    Not always. If you are using raw ground beef or raw sausage, browning helps with texture and safety. If you are using fully cooked sausage, rotisserie chicken, or frozen meatballs, you can usually dump them straight in.

    Why is my rice or pasta still hard?

    Usually it is one of three things: not enough liquid, the dish was not covered tightly, or your baking dish was too wide so the liquid got too shallow. Add a splash of broth, cover again, and bake 10 more minutes.

    Can I prep these ahead of time?

    Yes, but with a small caution. Pasta and rice can soak up liquid if they sit too long before baking. If you want to prep ahead, I suggest storing the dry starch separately, then mixing right before it goes in the oven.

    What is the best baking dish for DumpAndBake dinners?

    A basic 9×13 glass or ceramic dish is perfect. If you use metal, it may cook a bit faster, so start checking earlier.

    How do I make these healthier without losing the comfort vibe?

    Use leaner protein, add a couple cups of veggies (frozen works great), and swap in whole grains when you can. Also, you do not have to drown everything in cheese. A little on top still feels special.

    A weeknight plan you will actually stick with

    If you try even two of these 7 Easy DumpAndBake Dinners for Hassle-Free Weeknights, you will feel the difference on those busy nights when takeout sounds tempting. Keep a few smart staples around, cover your dish tightly, and let the oven do its thing. If you want even more ideas to add to your rotation, this list of 15 Dump-and-Bake Dinners for Busy Weeknights – Take Them A Meal is packed with practical options. And if you are in an orzo mood like I often am, you should also check out Sausage Orzo Bake (Dump-&-Bake w/ Butternut Squash!) for a cozy twist. Pick one recipe, make it this week, and give yourself the gift of an easier evening.

  • 7 Simple Tricks for Perfect AirFryerCrisp Every Time

    7 Simple Tricks for Perfect AirFryerCrisp Every Time

    AirFryerCrisp moments are the best… until they are not. You know the scene: you toss in fries or wings, hit start, and somehow they come out a little pale, or weirdly dry, or crisp on one side and soft on the other. I have been there more times than I want to admit, especially on busy weeknights when I just want something crunchy fast. The good news is you do not need fancy chef skills to get that golden crunch. You just need a few simple habits that make the air fryer work the way it is supposed to.
    AirFryerCrisp

    Air Fryer Lid Comparison and Review: Instant Pot vs Mealthy

    I get asked a lot if an air fryer lid is actually worth it, especially if you already own an Instant Pot. My honest take: if you love the idea of one pot meals but still want crispy tops, an air fryer lid can feel like a mini kitchen upgrade without buying a whole new appliance.

    Here is the main thing to understand. Both the Instant Pot air fryer lid and the Mealthy CrispLid basically turn your pressure cooker pot into a crispy finishing machine. They blow hot air down onto your food, so the surface dries and browns faster. That surface drying is the secret behind AirFryerCrisp results that do not taste soggy five minutes later.

    If you are the type who likes to dig into details before buying, I usually recommend reading a couple of different perspectives and then deciding based on what you cook most. Also, if you want to browse more air fryer friendly ideas on my site, you can click easy air fryer dinner recipes and save a few for later.

    Here are the quick, real life differences I notice when I use them:

    • Fit and feel: Instant Pot branded lids tend to feel very “matched” to their pots, while the Mealthy feels more universal.
    • How you cook: Instant Pot lids often come with more preset buttons, while Mealthy is more about simple time and temp control.
    • Storage: Both take up space, but the shape and handle design might matter if you have cramped cabinets like I do.

    One small tip that matters more than people think: whichever lid you use, make sure the pot and rack are dry before you start crisping. Moisture is the enemy of crunch, and it is the easiest thing to fix.

    7 Simple Tricks for Perfect AirFryerCrisp Every Time

    Mealthy CrispLid vs Instant Pot Air Fryer Lid

    This is the head to head question, so let us talk like friends at the kitchen counter. If you want plug and play convenience with lots of presets, the Instant Pot air fryer lid can feel easier. If you want flexibility and you might use it on different pot sizes, the Mealthy CrispLid is the one people tend to pick.

    In my own kitchen, the biggest difference shows up when I am trying to “finish” food. Think melty cheese on top of stuffed peppers, crisping the skin on chicken thighs, or getting frozen fries to actually taste like fries. Both can do it, but you will learn the personality of your lid after a few rounds.

    Here is my personal rule for better AirFryerCrisp every time: do not crowd the surface. Air needs space to move. If I stack wings or pile fries, I am basically begging for soft spots. I cook in batches and I shake or flip halfway. Yes, it takes a little longer, but the payoff is that crunch you can hear when you bite.

    “I switched to cooking wings in two batches and my kids finally stopped complaining about soggy skin. Now they actually crunch. Totally worth the extra ten minutes.”

    Also, keep an eye on the height of your food. If it sits too close to the heating element, you might get fast browning before the inside warms through. When that happens, I just lower the rack height or reduce the temperature and add a few more minutes.

    AirFryerCrisp

    Accessories

    Accessories are not required, but a few basics make crispy cooking so much easier. I used to roll my eyes at all the “must have” gadgets online, but I have found a small set that I actually use every week.

    Here is what I reach for most when I am chasing that AirFryerCrisp finish:

    • Perforated parchment for sticky foods like wings with sauce, so cleanup is not a nightmare.
    • A simple metal rack to lift food and let air hit all sides, especially for chicken pieces.
    • Silicone tongs so you can flip without scratching baskets or racks.
    • An instant read thermometer because guessing doneness is how you get dry chicken.

    One more thing that is not exactly an accessory, but it matters: a little oil. Not a lot. Just enough. If you want deep crunch, you need a thin coat to help browning. I usually use a quick spray or toss food in a teaspoon or two of oil before cooking. If you are watching calories, do not worry, you can still keep it light and get great texture.

    If you are building your air fryer setup from scratch, I also keep a running list of my favorite tools and add ons here: air fryer accessories I actually use. I made it because I got tired of buying things that ended up living in a drawer.

    Time and Temperature Settings

    Time and temperature is where most people get tripped up, and honestly it is because air fryers run a little different depending on the model and size. But you can still get consistent results with a few simple tricks.

    These are my 7 simple tricks for perfect AirFryerCrisp every time, using easy settings you can remember:

    1) Preheat for real, even if it is short

    I know some machines say you do not need to preheat, but I get better browning when I do. Even 3 to 5 minutes helps. Starting with hot air means the surface dries faster and you get crisp sooner.

    2) Start a little lower, then finish hotter

    This is my favorite move for chicken and thicker foods. I cook at a moderate temp first so the inside warms through, then I bump it up for the last few minutes to crisp the outside. It stops that “burn outside, raw inside” problem.

    3) Shake, flip, or rotate halfway

    Air fryers have hot spots. That is normal. If you flip wings or shake fries, you even out the browning and it comes out more consistently crunchy.

    4) Use a light oil coat, not a wet batter

    Wet coatings can drip and turn gummy. A light oil coat plus dry seasoning gives you the best texture. If you want breading, press it on firmly and spritz it lightly with oil.

    5) Do not overcrowd

    This tip is boring but it is the truth. If the basket is packed, steam gets trapped and crisping slows down. More space equals more crunch. If you want AirFryerCrisp results, give your food some breathing room.

    Some quick setting ranges I use all the time:

    Frozen fries: around 380 to 400 F, shake twice.
    Wings: around 375 F to cook through, then 400 F to finish.
    Veggies: around 360 to 390 F depending on how thick they are, toss halfway.

    And a small reminder: cook times on packages are a starting point, not a promise. Your basket size, how full it is, and even how cold your food is can change everything.

    Important Comparisons between Mealthy and Instant Pot

    Let us zoom out and make the decision easier if you are still stuck between the Mealthy and Instant Pot options. These are the comparisons that actually matter in daily use, not just on a spec sheet.

    Noise and airflow: Most lids are a bit loud. That is normal because the fan is doing the work. What matters is steady airflow and even browning.

    Capacity: If you cook for more than two people, capacity matters a lot. A cramped basket means you will do more batches, and that can get old fast.

    Ease of cleaning: If cleaning is annoying, you will use it less. Look for parts that wipe down easily and do not trap grease in weird corners.

    Consistency: This is the big one. The best lid is the one that gives you repeatable AirFryerCrisp results without you babysitting it every minute. Once you learn your lid, write down your favorite settings in your phone notes. I do this and it saves me from guessing every time.

    And here is my last honest thought: whichever one you pick, you will get better results from habits than from hardware. Preheat, do not crowd, flip halfway, and finish hot. That is the formula.

    Common Questions

    Do I need oil for crispy results?

    A little oil helps a lot, especially for browning. You do not need much. A light spray or a small toss in oil is enough for most foods.

    Why is my food crispy outside but dry inside?

    Your temperature is probably too high too soon. Try cooking at a lower temp first, then finish hotter for the last few minutes.

    Can I use parchment paper with an air fryer lid?

    Yes, but use perforated parchment and make sure it is weighed down by food so it does not fly up into the heating element.

    How do I stop fries from turning out soft?

    Do not overcrowd, shake twice, and cook a little hotter near the end. Also, if the fries are very icy, shake off extra frost first.

    What is the easiest way to avoid burning?

    Check early the first time you try a new food. Every machine runs a bit different, so your first run is basically your test batch.

    A crispy little pep talk before you cook

    If you take anything from this post, let it be this: consistent crunch comes from small repeatable steps, not luck. Once you get the hang of preheating, spacing your food, and finishing at a higher heat, AirFryerCrisp nights start feeling easy and fun again. If you want to know more about the people behind this kind of kitchen talk, you can peek at About Us – Air Fryer Crisp and see what we are cooking lately. And if you are still deciding between lids and want a detailed side by side read, this comparison is helpful: Instant Pot Air Fryer Crisp Lid vs Mealthy Air … – Lana Under Pressure. Now go make something crunchy, and do not be afraid to run a second batch if that is what it takes.

  • 7 Simple OneTrayDinner Ideas for Busy Weeknights

    7 Simple OneTrayDinner Ideas for Busy Weeknights

    OneTrayDinner nights basically saved my sanity the first time my schedule got packed with late meetings, laundry piles, and that classic question, “So what are we eating?” I used to overthink dinner like it had to be a whole production. Now I just want something warm, filling, and low effort with minimal cleanup. If you are also trying to feed yourself (and maybe a couple of other hungry humans) without living in the kitchen, you are in the right place. Below are my go to ideas that feel doable even on the busiest weeknights.
    7 Simple OneTrayDinner Ideas for Busy Weeknights

    What Makes a Great One-Tray Dinner Recipe?

    For me, a good OneTrayDinner has three things: it tastes like a real meal, it does not require fancy steps, and it comes out of the oven with zero stress. The magic is that everything cooks together, so flavors mingle and the tray does a lot of the work for you.

    Here is my little mental checklist when I am picking or building one:

    • One protein (tofu, chicken, sausage, chickpeas, salmon)
    • Two to three vegetables (whatever is in the fridge)
    • One bold sauce or seasoning (pesto, taco seasoning, soy sauce mix, lemon and garlic)
    • One carb add on (bread, rice, tortillas, couscous, or just extra veggies)

    Now for the fun part. Here are my 7 simple tray ideas that I actually make on repeat:

    1) Lemon garlic chicken with potatoes and green beans
    Toss chopped baby potatoes with olive oil, salt, pepper, and minced garlic. Roast 15 minutes, then add chicken thighs and green beans with lemon slices. It smells like you tried harder than you did.

    2) Honey mustard sausage and veggies
    Slice smoked sausage, toss with broccoli, bell peppers, and onions. Mix a quick sauce with honey, mustard, and a splash of vinegar. This one is sweet and tangy and disappears fast.

    3) Taco tray with peppers and black beans
    Toss sliced peppers, onions, and drained black beans with taco seasoning and oil. Roast, then stuff into tortillas. Add shredded cheese if you want, or keep it simple with salsa and avocado.

    4) Salmon with asparagus and cherry tomatoes
    Salmon goes in the middle, asparagus and tomatoes around it. I do olive oil, salt, pepper, and a quick squeeze of lemon. If you have dill, even better.

    5) Crispy tofu with broccoli and carrots
    This is my favorite when I want something lighter but still satisfying. Press tofu quickly with paper towels, cube it, and toss with soy sauce, a little oil, and cornstarch. Roast with broccoli and sliced carrots. Add a drizzle of spicy mayo or sesame sauce after.

    6) Sheet pan gnocchi with zucchini and tomatoes
    No boiling. Just toss shelf stable gnocchi with zucchini chunks, cherry tomatoes, olive oil, garlic powder, and parmesan. Roast until gnocchi gets chewy and a little crisp. It is dangerously snackable.

    7) Chickpea curry tray (yes, really)
    This is more of a roasted spiced chickpea and veggie situation that you serve over rice. Toss chickpeas, cauliflower, and onions with curry powder, oil, and salt. Roast, then finish with a spoon of yogurt or coconut yogurt and a squeeze of lime.

    Also, if you like having a few reliable sides ready to go, I keep a simple guide bookmarked for weeknight staples. Here is one I reference when I need ideas: quick weeknight side ideas.

    7 Simple OneTrayDinner Ideas for Busy Weeknights

    Benefits of Cooking with Tofu

    I know tofu can be a “maybe” food for some people, but hear me out. Once you find your method, it becomes one of the easiest proteins for a OneTrayDinner because it is hands off and it soaks up flavor like a sponge.

    Here is why I keep it in my fridge:

    It is fast. You do not need to marinate it for hours. Even a quick toss in soy sauce and garlic helps a lot.

    It is budget friendly. One block can feed a couple people when paired with veggies and rice.

    It plays well with big flavors. Think teriyaki, peanut sauce, barbecue, or even simple lemon pepper.

    If you are new to it, my best tip is this: dry it off really well and do not crowd the tray. Space equals crisp edges.

    “I tried your crispy tofu tray idea and my partner, who swore they hated tofu, went back for seconds. It was the first time tofu didn’t taste bland to us.”

    And if you want another tofu based dinner idea to rotate in, I keep one of my favorites here: easy tofu dinner recipe.

    OneTrayDinner,

    Best Vegetables for One-Tray Meals

    The best vegetables are the ones that roast nicely and do not turn sad and soggy. I usually aim for a mix of something hearty plus something quick cooking.

    These are my personal MVPs:

    Hearty veggies (great for longer roasting): potatoes, sweet potatoes, carrots, cauliflower, broccoli, Brussels sprouts, butternut squash.

    Quick veggies (add later or cut bigger): zucchini, bell peppers, asparagus, green beans, cherry tomatoes, mushrooms, onions.

    Two quick tricks that make a big difference:

    1) Cut things to similar sizes so dinner finishes together.

    2) If you are mixing potatoes with something delicate like asparagus, give the potatoes a head start, then add the asparagus later. It is not fussy, it is just smart.

    And please do not forget seasoning. Even just olive oil, salt, pepper, and garlic turns basic vegetables into something you actually look forward to.

    Tips for Meal Prep and Cooking Efficiently

    Busy weeknights do not need gourmet plans. They need a system you can repeat when you are tired. Here is what works in my kitchen without making me feel like I live in a meal prep factory.

    My weeknight tray system

    I keep it simple:

    Pick one sauce for the week (like pesto, teriyaki, or honey mustard) and use it in two different meals.

    Chop once, use twice. If I chop onions or bell peppers, I chop extra and store them in a container.

    Line the pan. Parchment paper or foil makes cleanup almost too easy.

    Use the oven time. While it roasts, I clean for 5 minutes or set the table. Future me is always grateful.

    If your family likes different spice levels, keep the tray mild and add heat at the end with hot sauce, chili crisp, or jalapenos.

    Creative Variations on One-Tray Dinner Recipes

    This is where OneTrayDinner cooking stays fun. Once you get the basic formula, you can swap flavors based on what you crave or what is on sale.

    Flavor ideas that change everything

    Try one of these quick combos:

    Mediterranean: chicken or chickpeas, zucchini, tomatoes, red onion, lemon, oregano, feta on top after roasting.

    BBQ: tofu or chicken, sweet potatoes, corn, red onion, barbecue sauce brushed on near the end.

    Asian inspired: broccoli, carrots, tofu, a simple sauce with soy sauce, sesame oil, and a little honey or brown sugar.

    Italian: sausage, peppers, onions, cherry tomatoes, plus a sprinkle of parmesan.

    Breakfast for dinner: chopped potatoes, onions, peppers, and sausage. Roast, then make little spaces and crack eggs in for the last few minutes.

    The biggest win is that you can keep the method the same and just change the vibe. Same tray, totally different dinner.

    Common Questions

    Can I make these OneTrayDinner ideas without meat?

    Absolutely. Tofu, chickpeas, and veggie sausages all work really well. Just make sure you season boldly and do not overcrowd the pan.

    What temperature should I roast most one tray meals at?

    I usually do 425°F. It helps vegetables caramelize and it gives tofu and gnocchi better texture.

    How do I stop everything from getting soggy?

    Use a big enough sheet pan so ingredients are in a single layer. Too much piled together makes steam, not roast.

    Can I prep a tray dinner earlier in the day?

    Yes. Chop veggies and mix your sauce ahead. Keep wetter items separate until you are ready to cook, then toss and bake.

    What is the best way to store leftovers?

    Cool them down, then store in airtight containers. Most leftovers keep well for 3 to 4 days, and they reheat nicely in the oven or air fryer.

    A Cozy Wrap Up for Your Next Weeknight

    If you take anything from this post, let it be this: OneTrayDinner cooking is not about perfection, it is about getting a real meal on the table with less stress and fewer dishes. Pick one protein, a couple veggies, and a sauce you love, then let the oven do the heavy lifting. If you want more inspiration, I genuinely like this One Tray Dinner Bake – Vegan Recipe – VegKit.com for a plant based option, and this round up of Useful one-tray dinner ideas – by Heather Taylor – The Frazzled Cook is packed with practical weeknight prompts. Now pick one tray idea for tomorrow night, put parchment on that pan, and make future you very, very happy.

  • 5 Must-Try ChaosCakes That Will Spark Your Next Celebration

    5 Must-Try ChaosCakes That Will Spark Your Next Celebration

    ChaosCakes are basically what I bake when I want a celebration cake but I do not want to stress about perfect edges, flawless piping, or straight lines. You know those weeks where you have a birthday, a friend coming over, and your brain is already full? Yep, that. These cakes look wild on purpose, which means they feel fun before you even cut a slice. And somehow, they still taste like a real treat, not a joke. If you have ever stared at a smooth frosted cake online and thought, I could never, you are in the right place.
    ChaosCakes

    What is a Chaos Cake?

    A Chaos Cake is a celebration cake that leans into messy, silly, loud, and a little unhinged in the best way. Instead of chasing perfect symmetry, you go for playful layers, bold colors, and decorations that look like they were added mid laugh. The whole point is that it looks like a party.

    When I make ChaosCakes, I still care about flavor and texture, but I stop obsessing over the visuals. I let sprinkles fall where they fall. I let frosting swirls overlap. If the cake leans slightly, I do not panic. I just add more fun stuff to distract everyone, and it works every time.

    My no stress ChaosCake base (the part that makes it taste legit)

    I usually build my ChaosCakes on a simple setup that is hard to mess up.

    • Cake: boxed mix is totally fine, or your favorite homemade vanilla or chocolate
    • Filling: jam, pudding, cookie butter, or whipped cream
    • Frosting: buttercream, cream cheese frosting, or store bought if life is busy
    • Crunch: crushed cookies, cereal, toasted nuts, or candy bits
    • Chaos layer: sprinkles, food coloring drips, random piping, and a topper that makes you smile

    One practical tip: chill your cake layers for 20 to 30 minutes before stacking. Cold cake is calmer cake. It crumbles less and makes frosting easier, even if you are going for messy on purpose.

    5 Must-Try ChaosCakes That Will Spark Your Next Celebration

    What Makes these Silly Cakes Pop?

    The best ChaosCakes have contrast. Not perfect design. Contrast. Think soft frosting with crunchy bits, sweet cake with a salty snack on top, bright colors next to chocolate crumbs. If the cake makes people lean in and say, what is that on top, you nailed it.

    Here are my 5 must try ChaosCakes that always spark a celebration, even if the celebration is just making it to Friday.

    1) Sprinkle Punch Confetti Cake

    This is my go to for birthdays. Vanilla cake, a thick swipe of frosting, then a ridiculous amount of rainbow sprinkles. The trick is adding sprinkles in layers, not just on top. Toss some between layers, press them onto the sides, and let extra fall onto the cake stand. It looks like the cake exploded with joy.

    Chocolate cake, cookies crushed into chunks, and frosting that is swirled like you stopped caring halfway through, in a good way. Add cookie crumbs at the bottom edge so it looks messy and dramatic. If you want it extra fun, drizzle melted chocolate on top and then immediately add more crumbs so it sticks.

    3) PB and Jelly Drip Party Cake

    This one is for the people who like sweet with a little nostalgia. Yellow cake layers, peanut butter frosting, and a thin layer of jam in the middle. Let the jam peek out a bit when you stack it. It looks chaotic and also makes the slices look amazing. Add crushed peanuts or even little PB cup pieces on top.

    4) Neon Citrus Sour Candy Cake

    Okay, this one is loud. I like a lemon or orange cake, then I tint some frosting with bright colors. You do not need a perfect palette. Just go bold. Then I pile sour gummy candies on top. The combo of fluffy cake and tangy candy is weirdly addictive. This is the cake people remember.

    5) Salty Snack Surprise Cake

    My friends laughed the first time I put pretzels and potato chips on a cake. Then they tried it. Chocolate cake or caramel cake works best here. Add a caramel drizzle, then stick salty snacks into the frosting on top like a crown. It is chaotic, it is crunchy, and it disappears fast.

    If you want more party dessert inspiration, I usually keep a running list of ideas, and I love revisiting it before big weekends. You can also check my other posts like easy birthday dessert ideas when you want something fun but not complicated.

    5 Must-Try ChaosCakes That Will Spark Your Next Celebration

    What Makes this Movement Stand Out?

    I think ChaosCakes took off because they match how people actually celebrate. Real parties are not perfectly styled. Kids run around. Music is too loud. Someone forgets the candles. So a cake that is proudly imperfect feels kind of freeing.

    Also, these cakes are super flexible. You can make them fancy without needing fancy skills. You can use store bought frosting and still get a cake that looks like a centerpiece. And if you are nervous about baking, this trend is basically permission to experiment.

    Here are a few reasons I trust ChaosCakes for real life celebrations:

    • They are forgiving. Smudges and crumbs become part of the vibe.
    • They photograph well. Color and texture read great in photos.
    • They are customizable. You can match any theme using toppings and color.
    • They reduce pressure. You focus on flavor and fun, not perfection.

    “I made a ChaosCake for my sister and everyone thought it was from a bakery. I told them it was just me leaning into the mess and adding extra sprinkles. Best compliment ever.”

    And if you are wondering about storage and leftovers, I have a simple guide in another post like how to store frosted cakes that helps a lot when you are juggling party timing.

    The Great Cake Conversation

    This is the part I love most. ChaosCakes get people talking. Someone will always ask what flavor it is, what the filling is, or why there are gummy worms on top. It turns dessert into a little moment.

    My advice is to pick one “conversation starter” topping and commit. A mini bag of chips. A handful of sour candy. A pile of cereal. A glittery topper with a funny phrase. Then keep everything else simple so the cake still tastes balanced.

    Also, do not underestimate the power of a good slice reveal. If you hide a layer of jam, cookie crumbs, or candy inside, people get excited when the knife goes in. That is why I keep making ChaosCakes. They feel playful, and play is kind of the point of celebration.

    What’s Next for These Wild Cakes? {video_youtube}

    I think the next wave is going to be even more personal. People are building ChaosCakes around inside jokes, nostalgic snacks, and whatever their friends are obsessed with right now. I have seen cakes topped with fast food fries, tiny toys, and candy that matches a sports team. And honestly, I love that.

    My prediction is we will also see more “mix and match” flavors, like strawberry cake with chocolate frosting, or vanilla cake with espresso filling. The chaos is not just the decoration. It is the bold combo that somehow works.

    If you want to try it at home, here is my simple rule: pick one base flavor you know you like, then add one unexpected topping. Do not add five weird things at once. One weird thing is charming. Five weird things can taste confusing.

    Common Questions

    Do ChaosCakes have to look messy?

    They do not have to look messy, but they should look relaxed. Think fun, layered, and a bit playful. If it is perfectly smooth, it starts to feel like a traditional cake again.

    Can I use boxed cake mix for ChaosCakes?

    Yes, absolutely. Boxed mix is reliable and it saves time. Add an extra egg or swap water for milk if you want it a bit richer, but it is not required.

    How do I keep the frosting from melting while I decorate?

    Chill the cake layers first and do quick decorating in steps. Frost a bit, chill 10 minutes, then add more. Also, avoid decorating next to a hot oven if you can.

    What flavors work best for beginners?

    Vanilla, chocolate, and funfetti are the easiest. For fillings, go with jam, pudding, or crushed cookies. They are hard to mess up and they taste great.

    How far ahead can I make a ChaosCake?

    I like making it 1 day ahead. Wrap it or store it in a cake container in the fridge, then let it sit out 30 to 60 minutes before serving so it tastes soft again.

    Wrap it up and make it fun

    If you take anything from this, let it be this: ChaosCakes are about flavor, laughter, and letting go of perfect. Pick one of the five ideas, keep the base simple, then add a bold topping that fits your celebration. If you want more trend context and extra inspiration, this article on Chaos Cakes: The Ultimate Guide to This Year’s Funniest Cake Trend is a fun read. And if you want to see what a dedicated shop does with the concept, peek at Chaos Cakes Bakery: Home for ideas you can totally recreate at home. Now go make one of these ChaosCakes, take a picture, slice it big, and celebrate something, even if it is just making time to bake.

  • 5 Fun Ways to Elevate Your ColorPopFood Game

    5 Fun Ways to Elevate Your ColorPopFood Game

    ColorPopFood has totally saved me on those days when my food tastes great but my photos look kind of sad and flat. You know the vibe, you made something cute, you’re hungry, the light is weird, and suddenly your plate looks like it needs a nap. I used to think I needed fancy gear, but honestly, it was more about a few simple tricks and a little planning. If you want your meals to pop on Instagram, your blog, or even a recipe card for friends, you’re in the right place. I’m going to walk you through five fun ways to level up your ColorPopFood game without making it complicated.
    5 Fun Ways to Elevate Your ColorPopFood Game

    Overview of ColorPOP Images

    ColorPOP images are basically photos where the main subject looks bold and bright, while everything else supports it without stealing the show. In food photos, that usually means your star ingredient gets the attention. Think ruby strawberries, neon green herbs, bright yellow lemon, or a glossy chocolate drizzle that looks like you want to dive into it.

    The reason this style works so well for food is simple. Our eyes love contrast. When there’s clear contrast between the food and the background, your brain instantly understands what it’s supposed to look at. And when you’re scrolling fast, that matters.

    When I’m doing ColorPopFood shots, I’m not trying to fake the food. I’m trying to show what I actually made, just in the most flattering way possible. It’s like putting on your favorite outfit before meeting friends. Same you, just a little more put together.

    One thing that helped me a lot was studying a few cafeteria style examples, because they’re designed to catch attention quickly. If you’re curious, here’s a good reference page: ColorPOP Food Photo Signs | Nutrition Education | Descon School …. It shows how bold color plus simple layout makes food stand out fast.

    5 Fun Ways to Elevate Your ColorPopFood Game

    Benefits of Using ColorPOP Images

    So why bother? Because ColorPopFood visuals do more than just look pretty. They help people actually notice your content, understand your recipe, and feel confident trying it.

    1) They make everyday food look exciting

    I’ve taken ColorPopFood style photos of basic stuff like yogurt bowls and leftover pasta, and people still asked for the recipe. Not because I did anything wild, but because the colors looked fresh and clear.

    2) They help your recipe feel easier

    When your ingredients look distinct, readers can tell what’s going on. Like, a bright green basil leaf on red sauce is way clearer than a muddy photo where everything blends together.

    3) They build a recognizable vibe

    If you post regularly, ColorPopFood images can become your signature. People start to recognize your style even before they read your caption.

    Here are a few practical benefits I’ve noticed personally:

    • More saves and shares because the image is easy to “get” at a glance
    • Less editing time once you learn a repeatable setup
    • Better meal appeal for picky eaters, especially kids who eat with their eyes first

    “I tried your tip about picking one hero color and suddenly my snack board photos looked like they belonged in a real blog. I didn’t even change my phone.”

    ColorPopFood

    How to Create and Implement ColorPOP Images

    Okay, now for the fun part. Here are my five favorite ways to elevate your ColorPopFood game, like the kind of tips you can try today, even if your kitchen is small and your counter is covered in life.

    Fun way 1: Pick one hero color first

    Before you cook, decide what the “hero” color will be. Maybe it’s bright red tomatoes, deep purple blueberries, or golden mango. Once you choose that, everything else can support it. I’ll often keep the plate and background neutral so the hero color wins.

    Example: if I’m making a strawberry toast, I’ll use a white plate, a pale wood board, and keep other toppings minimal so the strawberry red looks loud in the best way.

    Fun way 2: Use the simple background trick

    If your background is busy, your food has to fight for attention. My lazy, reliable setup is:

    • a white plate or light bowl
    • a plain cutting board or baking sheet
    • a neutral cloth napkin like beige, white, or soft gray

    This is the quickest “instant ColorPopFood” upgrade I know. Your food looks cleaner and brighter right away.

    Fun way 3: Add a fresh topper right before the photo

    This is my favorite little cheat because it feels like magic. Right before you shoot, add something fresh and colorful on top. It makes the dish look alive.

    Some easy toppers that photograph well:

    • chopped herbs like parsley, basil, cilantro
    • citrus zest like lemon or orange
    • something crunchy like toasted sesame seeds or chopped nuts
    • a drizzle of honey, olive oil, or yogurt sauce

    The key is timing. Add it at the end so it looks fresh, not wilted or melted.

    Fun way 4: Use window light and turn off the overheads

    I know you’ve heard this, but it’s true. Overhead kitchen lights make food look yellow or dull. I take most of my ColorPopFood photos next to a window, usually late morning or mid afternoon. If the sun is harsh, I soften it with a thin curtain. If it’s too dark, I move closer to the window rather than cranking up indoor lights.

    Fun way 5: Edit lightly but with one goal

    When I edit, I’m not trying to make the food neon or fake. My goal is to bring the photo back to what it looked like in real life. On my phone, I usually do:

    • slightly increase brightness
    • slightly increase contrast
    • a tiny boost to saturation
    • cool down warmth if it looks too yellow

    If you want to get consistent, save your favorite edit as a preset. That’s how you get that “oh, that’s so you” look across your feed.

    Also, quick note: implementing ColorPopFood images is not just for social media. You can use them in recipe printouts, menu boards, meal planning sheets, or even a little kitchen gallery wall if you’re into that kind of cozy home vibe.

    Since your instructions asked for internal links, I’d normally link to a couple related posts here, like “my favorite pantry color boosters” or “easy snack board ideas,” but your internal link list is empty: []. If you send 2 URLs (or even just slugs), I’ll place them naturally into this section and another section as clickable internal links.

    Best Practices for ColorPOP Images

    Once you get the hang of it, ColorPopFood photos start feeling really repeatable. Here are the best practices I stick to so I don’t overthink every single shot.

    Keep it honest. If the strawberries are a little messy, that’s fine. Real food is not perfect, and perfect is not the goal. Appetizing is the goal.

    Use fewer props. One fork, one napkin, maybe a glass in the background. Too many props can make the photo feel cluttered and distract from the color pop.

    Think in layers. Put your main subject in front, then add one soft background detail. Like a cutting board edge or a blurred bowl of extra sauce.

    Check your whites. If your “white” plate looks yellow, your whole photo looks off. Fixing white balance is one of the fastest ways to make ColorPopFood images look clean.

    Here is a quick checklist you can screenshot for your next shoot:

    • Is there one main hero color?
    • Is the background simple?
    • Is the light soft and coming from the side?
    • Do the toppings look fresh right now?
    • Did I edit just enough to match real life?

    Examples of Effective ColorPOP Images

    If you want ideas that are easy to recreate at home, here are a few ColorPopFood examples that work almost every time, even when the dish itself is simple.

    Example 1: Bright fruit on a neutral base
    Greek yogurt, honey, and a pile of blueberries or strawberries. White bowl, neutral spoon, done. It’s classic because it works.

    Example 2: Green garnish over warm food
    Tomato soup or pasta gets a glow up with a swirl of cream and a sprinkle of basil. The red and green contrast is basically a cheat code.

    Example 3: One bold sauce drizzle
    Tacos or grain bowls look instantly more “finished” with a bright green salsa or a pink pickled onion moment. The color tells a story before anyone reads a word.

    Example 4: Golden baked goods with one accent color
    Pancakes, waffles, or beignets look amazing when you add one pop like berries or a little jam. If you love that vibe, this print is a fun inspiration piece for a kitchen wall: New Orleans Beignet Print: Color Pop Food Art, French Quarter Sketch.

    Common Questions

    Q: Do I need a fancy camera for ColorPopFood photos?
    Nope. A phone works great. Good light and a simple background matter more than the camera.

    Q: What is the easiest food to practice with?
    Fruit, smoothies, salads, and anything with herbs. They naturally have bright colors and texture.

    Q: Why do my photos look yellow?
    Usually it’s overhead kitchen lighting. Turn it off and move near a window. You can also cool the warmth slightly in editing.

    Q: How do I keep my colors from looking fake?
    Edit lightly and compare the screen to the real food. If the berries look radioactive, pull saturation back.

    Q: Can I do ColorPopFood style with darker foods like chocolate?
    Yes. Use contrast. Put dark brownies on a light plate, add powdered sugar, and maybe a bright raspberry on the side.

    A little pep talk before you plate your next photo

    If you take anything from this, let it be this: ColorPopFood gets easier when you pick one hero color, keep the background calm, and use window light like it’s your best friend. A quick fresh topper and a light edit can turn an okay shot into one you actually want to post. And if you need extra inspiration, that New Orleans Beignet Print: Color Pop Food Art, French Quarter Sketch is a cute reminder that bold food visuals can feel like art, not just content. You can also peek at ColorPOP Food Photo Signs | Nutrition Education | Descon School … to see how strong color choices make food instantly readable. Now go make something tasty, snap the photo, and don’t stress it, your style will show up the more you practice.

  • Easy Fried Cabbage Hacks: Quick Tips for Flavorful Dishes

    Easy Fried Cabbage Hacks: Quick Tips for Flavorful Dishes

    Fried Cabbage Hacks are my go to move when it is 6:30 pm, I am hungry, and the fridge looks like it has nothing exciting in it. Cabbage just sits there looking innocent, but once it hits a hot pan, it turns sweet, toasty, and honestly kind of addictive. If you have ever made it and ended up with soggy strands or that sharp cabbage smell, I get it. I have done that too, more than once. Today I am sharing the little fixes that made my pan fried cabbage go from fine to can I have seconds.
    Fried Cabbage Hacks

    Key Benefits of Fried Cabbage

    I used to think cabbage was only for slaw, but frying it changed my mind fast. It is one of those cheap vegetables that can still feel like comfort food when cooked the right way. And it works with almost anything you already have lying around.

    Here is why I keep coming back to it:

    • Budget friendly: one head can stretch into multiple meals.
    • Quick cooking: you can be eating in about 10 to 15 minutes.
    • Big flavor potential: it soaks up seasoning like a champ.
    • Great for using leftovers: bits of sausage, bacon, rice, or even leftover chicken fit right in.
    • Flexible textures: you can keep it crisp tender or cook it softer if that is your vibe.

    One more thing: cabbage gets sweeter as it cooks, especially when you let it sit in the pan long enough to brown a little. That browning is the magic. If you like veggie dishes with a little edge, you will love it.

    Easy Fried Cabbage Hacks: Quick Tips for Flavorful Dishes

    Tips for Perfectly Cooking Fried Cabbage

    Let me save you from the two most common fried cabbage disappointments: watery cabbage and bland cabbage. Both are easy to fix with a few habits.

    Heat, pan space, and timing matter more than fancy ingredients

    First, use a big pan if you have one. If you crowd cabbage, it steams and turns limp. I like a wide skillet or a big sauté pan. Get it hot first, then add your fat, then the cabbage.

    My basic routine looks like this:

    • Slice cabbage into ribbons, not paper thin, not chunky.
    • Pat it dry if it was washed, water equals steaming.
    • Heat pan until it feels properly hot, then add oil or butter.
    • Add cabbage and let it sit for a minute before stirring.
    • Stir every so often, not constantly, so it can brown.

    If you want a little inspiration beyond the basic skillet move, I bookmarked this dish for days when I want crunch plus something tangy: crispy cabbage and broccolini with tangy endive slaw. It is a fun reminder that cabbage can be way more than a side.

    Now the flavor hacks. Salt is important, but timing is key. I salt lightly at the start, then finish with another pinch right at the end. This keeps it from dumping too much moisture early, but still tastes seasoned.

    My favorite flavor boosters for Fried Cabbage Hacks are simple:

    • Garlic: add it near the end so it does not burn.
    • Onion: start with it, let it soften and sweeten.
    • Smoked paprika or chili flakes: tiny amount, huge payoff.
    • Soy sauce: a little splash makes it taste restaurant-ish.
    • Vinegar or lemon: a few drops at the end wakes everything up.

    And please, do not skip the browned bits. If cabbage is starting to stick just a little, that is usually a sign you are close to the good stuff. Add a tablespoon of water or broth and scrape gently. That sticky layer is flavor.

    Also, if the smell of cabbage makes you nervous, here is what helped me: cook it hot and fast, and finish with something bright like lemon, vinegar, or pepper. The kitchen smells a lot fresher that way.

    Easy Fried Cabbage Hacks: Quick Tips for Flavorful Dishes

    Variations to Try with Fried Cabbage

    This is where Fried Cabbage Hacks really shine, because you can take the same pan and steer it in totally different directions. I do this depending on what I am craving, or what I need to use up before it goes sad in the fridge.

    Here are a few variations I actually make at home:

    Classic smoky bacon version

    Cook chopped bacon first, pull some out for topping, then fry cabbage in the bacon fat. Add black pepper, a pinch of sugar if you like it sweet, and finish with a tiny splash of apple cider vinegar. It tastes like cozy weekend food.

    Asian-ish ginger soy version

    Add a little ginger with the garlic, then soy sauce and a touch of sesame oil at the end. If you have a bag of frozen edamame or a leftover egg, toss it in. This one is great when you want something lighter but still bold.

    Sausage and onion one pan meal

    Sear sliced sausage first, remove it, fry onion and cabbage, then put the sausage back in. This is the one I make when I need dinner to feel like dinner, not just vegetables on a plate.

    And if you like crunchy cabbage recipes in general, I keep coming back to this for ideas when I want contrast and texture: crispy cabbage and broccolini with tangy endive slaw. It is a nice companion to skillet cabbage nights.

    ;

    One small note from experience: if you add sweet stuff like carrots or a sweet sauce, keep your heat a little lower near the end so it does not scorch. Cabbage can handle high heat, sugary add ons sometimes cannot.

    Fried cabbage is happy as a side, but it can also be the main event if you pair it right. I like to think of it as the thing that makes the plate feel complete. Here are my most used combos, the kind that actually happen on weeknights.

    Easy pairings that work:

    • With eggs: fried cabbage plus a runny egg is peak lazy dinner.
    • With rice: especially if you add soy sauce or sausage.
    • With mashed potatoes: comfort food energy, no effort.
    • With grilled chicken or rotisserie chicken: simple, reliable.
    • With beans: a bowl of beans and cabbage feels hearty and cheap in a good way.

    If you are serving people who think they do not like cabbage, pair it with something familiar like chicken thighs or pork chops. The browned cabbage tastes almost like caramelized onions, and it wins people over fast.

    Also, do not sleep on toppings. A sprinkle of grated cheese, toasted breadcrumbs, green onions, or even hot sauce can change the whole mood of the dish.

    User Reviews and Feedback

    I have shared these Fried Cabbage Hacks with friends and family because it is one of those recipes that makes you look like you tried harder than you did. The feedback is usually the same: people are surprised it tastes so good with so few ingredients.

    “I thought cabbage was going to be boring, but the browning tip changed everything. I made it with sausage and my kids asked for more. That never happens with vegetables.”

    A couple honest notes I hear a lot, plus my quick fixes:

    • If it is bland, you probably need more salt and a splash of acid at the end.
    • If it is soggy, your pan was crowded or not hot enough.
    • If it tastes too sharp, cook it a few minutes longer and add a touch of butter.

    I like that this dish is forgiving. Even if it is not perfect, you can usually rescue it with heat, seasoning, and one last stir. That is my kind of cooking.

    Common Questions

    Do I need to boil cabbage before frying it?

    Nope. Slice it and go straight to the hot pan. Boiling adds water and makes it harder to brown.

    How do I keep fried cabbage from getting watery?

    Use high heat, a wide pan, and do not crowd it. Also salt lightly at first, then adjust at the end.

    What is the best fat to use?

    Butter gives great flavor, oil handles higher heat, bacon fat gives smoky richness. I often do a mix of butter and oil.

    Can I make it ahead of time?

    Yes, but it is best fresh. If you reheat, use a hot pan to bring back a little browning, not the microwave if you can help it.

    What spices work best with it?

    Black pepper, smoked paprika, garlic, chili flakes, and a tiny bit of cumin are all solid. Finish with lemon or vinegar to brighten it up.

    A quick nudge to try it tonight

    If you remember anything from this post, let it be this: get your pan hot, give cabbage space, and chase those browned edges. That is the heart of all my Fried Cabbage Hacks, and it is what makes the flavor pop. If you want a cozy, smoky version, check out Simple Sides: 20 Minute Fried Cabbage with Bacon for another tasty angle. And if you are in an Asian flavor mood, this Trader Joe’s Vegetable Fried Rice Recipe Hack (with an Easy Asian … is a fun way to turn your cabbage night into a full meal situation. Now go grab that cabbage and make it sizzle, you have got this.

  • 5 Irresistible Ways to Enjoy Kimchi Butter Pasta at Home

    5 Irresistible Ways to Enjoy Kimchi Butter Pasta at Home

    Kimchi Butter Pasta is my go to dinner for those nights when I want something cozy, spicy, and a little bit indulgent without doing a whole sink full of dishes. You know the vibe: you are tired, you are hungry, and you still want food that feels exciting. This is the kind of bowl that smells amazing the second the kimchi hits the pan. It is fast enough for a weeknight, but it tastes like you actually planned your life. And once you learn a few small tricks, you can make it your own in a bunch of ways.

    5 Irresistible Ways to Enjoy Kimchi Butter Pasta at Home

    Understanding the Flavor Profile of Buttery Kimchi Noodles

    The reason Kimchi Butter Pasta works so well is that it hits all the big cravings at once. You get buttery richness, tangy funk from kimchi, and a gentle heat that wakes everything up. It is bold, but it is not complicated.

    Here is what I taste in every good bowl:

    • Butter: round and comforting, it smooths out the sharp edges of the kimchi.
    • Kimchi: sour, salty, and a little fermented in the best way.
    • Kimchi brine: this is the secret sauce. A spoon or two makes everything taste more “together.”
    • Garlic: not optional in my kitchen. It makes the whole thing smell like dinner is happening.
    • A touch of sugar or honey: tiny amount, big payoff. It helps the kimchi taste more rounded.

    One personal note: if you are new to kimchi, start with a smaller amount and build from there. Some brands are punchier than others. I learned that the hard way after buying a super funky jar and using it like it was mild salsa. Still ate it, just needed extra butter and a fried egg to calm it down.

    If you love the cozy pasta vibe in general, you might also like this garlic shrimp pasta for another quick dinner that feels restaurant worthy at home.

    Kimchi Butter Pasta

    Cooking Methods for Preparing Noodles

    Let us talk noodles, because the way you cook them changes everything. You do not need fancy techniques, but you do need one habit: save some noodle water. That starchy water helps the butter and kimchi turn into an actual sauce instead of an oily puddle.

    Here are my favorite methods depending on what I have in the pantry:

    Method 1: Classic pasta, fast and familiar

    Spaghetti, linguine, or even short shapes like penne all work. Boil in salted water, pull it about 1 minute before you think it is done, then finish it in the pan with butter, kimchi, and a splash of that noodle water. This is where it becomes glossy and clingy in the best way.

    Method 2: Udon for chewy comfort

    If you have vacuum packed udon, this turns into buttery kimchi noodles that feel extra cozy. Udon is thicker and chewier, so it holds onto the sauce really well. I rinse it quickly after heating (just to remove extra starch), then toss in the pan like pasta.

    Method 3: One pan shortcut when you are tired

    If you hate washing pots, cook the kimchi and butter first, then add water or broth and simmer the noodles right in the same pan. You have to stir more, but it is worth it when you want minimal cleanup. Keep the heat gentle so the noodles cook evenly.

    My small rule: do not overcook the noodles. This dish is saucy and rich, so mushy noodles make it feel heavy fast.

    Kimchi Butter Pasta

    Best Pantry Ingredients for Kimchi Dishes

    This is the outline where I get really practical, because Kimchi Butter Pasta is basically built for pantry cooking. You can make it feel “special” without running to the store, as long as you keep a few helpful ingredients around.

    What I like to stock for easy kimchi meals:

    • Kimchi: obviously. Look for a jar that tastes good on its own. If you would not snack on it, you will not love it in pasta.
    • Butter: salted or unsalted both work. If salted, taste before adding extra soy sauce.
    • Garlic: fresh is best, but garlic paste works in a pinch.
    • Soy sauce: for savory depth. Start small.
    • Gochujang (optional): adds a deeper, slightly sweet heat.
    • Sesame oil: just a few drops at the end makes it smell amazing.
    • Eggs: fried egg on top makes it feel like a full meal.
    • Cheese (optional): parmesan for salty bite, or mozzarella for melt. Yes, it sounds odd. Yes, it works.

    Also, if you are the kind of person who likes a little treat after spicy dinner, I have to point you to these peanut butter cheesecake truffles. I make them when I want something sweet without baking.

    “I tried your Kimchi Butter Pasta idea with udon and a fried egg, and it was honestly better than takeout. The brine tip was everything.”

    Tips for Balancing Spices

    This is where a lot of people get nervous, but it is actually easy. The goal is not to make it unbearably hot. The goal is to make it flavorful and balanced so you want another bite.

    My go to balancing moves:

    Too spicy? Add more butter, a splash of cream, or even a little cream cheese. A fried egg also calms heat.

    Too sour? Add a tiny pinch of sugar or a drizzle of honey. You can also cook the kimchi a bit longer to mellow it out.

    Too salty? Skip soy sauce and use unsalted butter next time. Add more noodles and a splash of plain noodle water to spread the seasoning out.

    Tastes flat? Add garlic, a little more kimchi brine, or a small squeeze of lime. A sprinkle of sesame seeds helps too.

    One extra tip: cook the kimchi in butter for a couple of minutes before adding noodles. That quick saute takes the raw edge off and brings out a slightly sweet, almost caramel vibe.

    Variations and Customizations for Buttery Kimchi Noodles

    This is the fun part. Once you have the basic idea down, you can remix it in ways that fit your mood and what is in your fridge. I make some version of Kimchi Butter Pasta all the time, and I rarely do it exactly the same way twice.

    Variation 1: The creamy comfort bowl

    Add a splash of cream or a spoon of cream cheese. It turns the sauce silky and a little less sharp. This is my choice when I want something extra cozy.

    Variation 2: The seafood upgrade

    Top with shrimp, scallops, or even canned tuna in a pinch. If you want a guide for shrimp timing and flavor, this garlic shrimp pasta is a handy reference and the method transfers well.

    Variation 3: The crispy topping version

    Toast panko in butter until golden, then sprinkle it over the noodles. It adds crunch and makes the bowl feel fancy with almost no effort.

    Variation 4: The veggie loaded pantry dinner

    Add spinach, frozen peas, mushrooms, or shredded cabbage. Mushrooms are especially good because they soak up the buttery kimchi sauce.

    Variation 5: The late night egg situation

    Fried egg, soft scrambled egg, or even a jammy boiled egg. The yolk mixes into the sauce and it is just ridiculously good.

    However you do it, remember the core: buttery base, kimchi for punch, and just enough noodle water to pull it all together. That is the heartbeat of buttery kimchi noodles at home.

    Common Questions

    1) What type of kimchi is best for Kimchi Butter Pasta?
    I like napa cabbage kimchi that is medium spicy and not overly fishy. If the jar tastes good straight from the fridge, it will taste good in the pan.

    2) Can I make it without gochujang?
    Yes. Kimchi plus butter already brings plenty of flavor. If you want more depth, use a tiny bit of soy sauce or a pinch of sugar instead.

    3) How do I keep the sauce from getting greasy?
    Use reserved noodle water and add it a little at a time while tossing. That starchy water helps the butter turn into a smooth sauce.

    4) Is Kimchi Butter Pasta good as leftovers?
    It is best fresh, but leftovers are still tasty. Reheat gently with a splash of water and a small knob of butter to bring the sauce back.

    5) Can I make it vegetarian?
    Absolutely, just check that your kimchi is vegetarian since some have fish sauce or shrimp paste. Then load up on mushrooms or tofu for protein.

    A cozy bowl you will want on repeat

    If you take one thing from this post, let it be this: Kimchi Butter Pasta is flexible, fast, and way more comforting than it has any right to be. Keep kimchi and butter on hand, save your noodle water, and you can build a dinner that tastes bold without being hard. If you want more inspiration, I loved reading Caramelized Kimchi Pasta – The World According to Tausch for that deeper cooked kimchi flavor idea, and this Bon Appetit piece, These Buttery Kimchi Noodles Are My Desert-Island Pantry Dinner, is such a good reminder that pantry meals can still feel exciting. Try it once, tweak it to your taste, and I swear you will start craving that buttery, spicy tang on random weekdays like I do.