Tag: food

  • Crispy Cabbage and Broccolini with Tangy Endive Slaw

    Crispy Cabbage and Broccolini with Tangy Endive Slaw

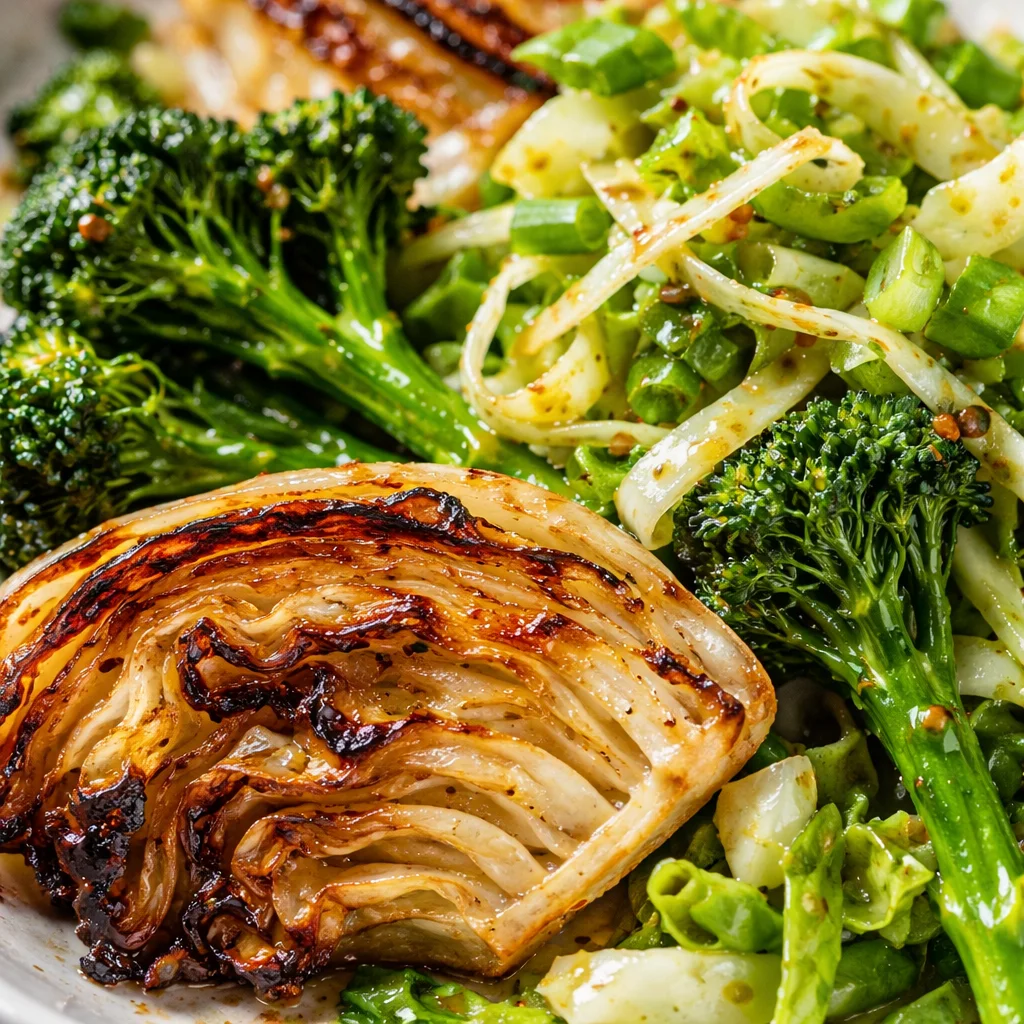
    Cabbage / Broccolini / Endive is one of those combos that sounds a little fancy, but honestly it solves a very real weeknight problem for me: I want something crunchy and fresh, but I also want something hot and crispy on the plate. This is the recipe I make when I am tired of sad salads and boring roasted veggies. You get crispy edges, a little char, and then that tangy endive slaw that wakes everything up. It is simple food with big payoff, and it is easy to tweak based on what is in your fridge. If you have ever stared at a head of cabbage and thought, now what, this one is for you.

    {image_1}

    Health Benefits of Salad Ingredients

    Before we get into the crunchy bits, I want to quickly talk about why this bowl feels so good to eat. This is not diet talk. It is more like, you finish the meal and you do not feel weighed down. The base here is Crispy Cabbage and Broccolini with Tangy Endive Slaw, and each ingredient brings something useful, not just flavor.

    Cabbage is one of my favorite budget veggies because it lasts forever in the fridge and it is packed with fiber. I notice I stay full longer when cabbage is part of dinner, especially when it is roasted until the edges get browned and a little sweet.

    Broccolini cooks fast and has that tender stem that you actually want to eat. It is a great source of vitamins, and it has a slightly bitter green taste that balances the sweeter notes you get once it roasts.

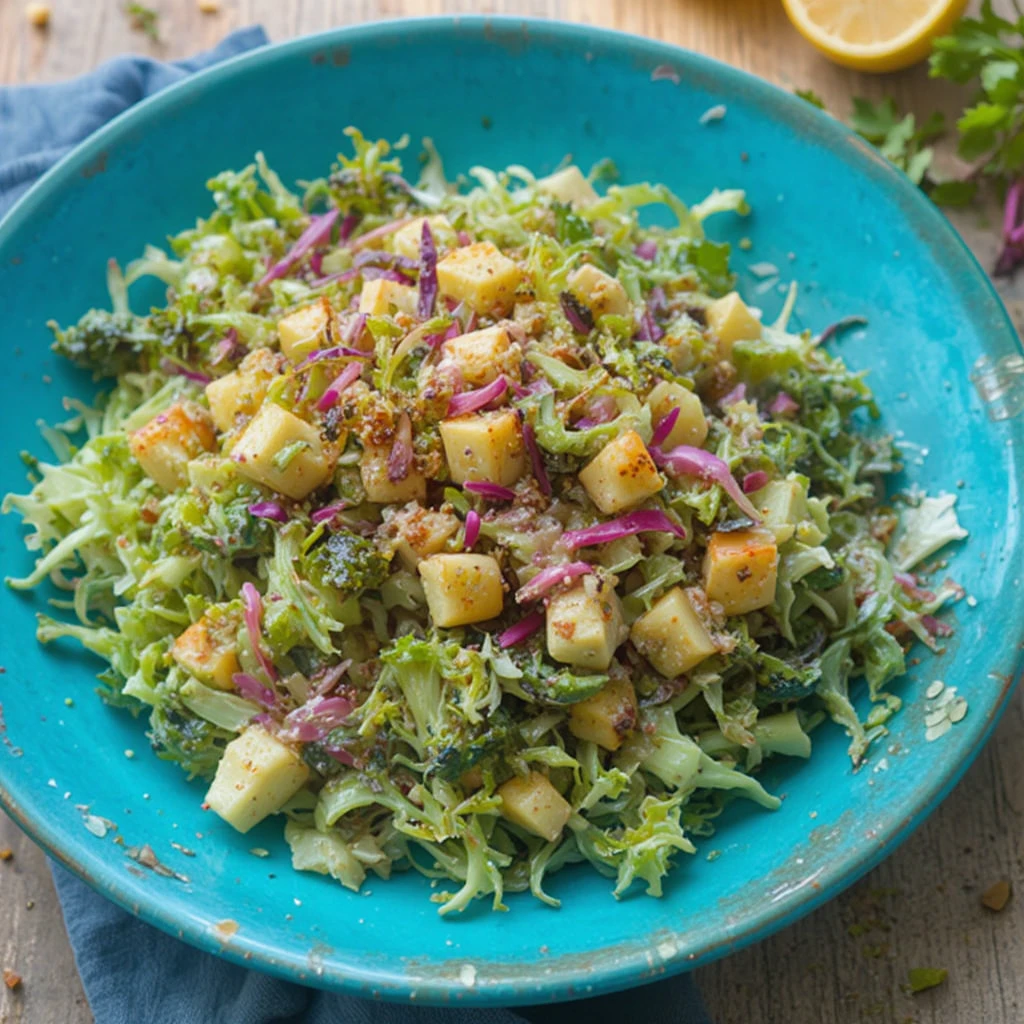
    Endive is the secret weapon here. It is crisp, a little bitter, and perfect for slaw because it does not get soggy quickly. When you toss it in a tangy dressing, it becomes bright and snappy, like the friend who tells you the truth but still makes you laugh.

    And since the dressing usually includes lemon or vinegar and a bit of olive oil, you are also getting that satisfying richness without needing heavy sauces. This whole plate is basically crunchy vegetables plus a bold dressing, which is a pretty solid habit to have.

    How to Customize Your Salad

    This is where the recipe becomes your recipe. I make Crispy Cabbage and Broccolini with Tangy Endive Slaw one way when I want it light, and another way when I want it to feel more like a full dinner bowl. The best part is you can keep the core idea the same: roast the veggies until crispy, then top with slaw.

    My go to ingredient list

    • Green cabbage cut into wedges or thick slices
    • Broccolini trimmed
    • Endive sliced into thin strips
    • Olive oil
    • Salt and pepper
    • Lemon juice or vinegar for tang
    • Mustard for bite
    • Honey or maple syrup just a little
    • Garlic grated or minced

    Now for fun add ons, depending on your mood:

    To make it more filling: add chickpeas, crispy tofu, shredded rotisserie chicken, or a couple of fried eggs on top.

    To make it extra crunchy: throw on toasted almonds, sunflower seeds, or crushed pita chips.

    To make it more savory: sprinkle parmesan, feta, or a salty crumble like cotija.

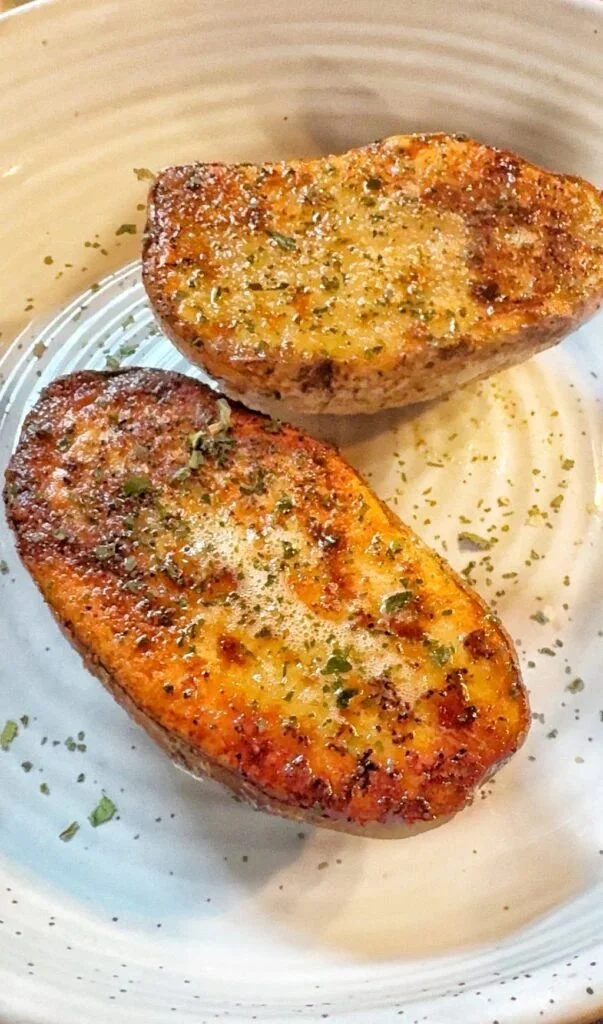
    Also, if you love a cozy side with a crispy main, I often serve this with something potato based. These baked garlic parmesan potato wedges are especially good next to the tangy slaw because you can drag the wedges through any extra dressing on your plate. No shame.

    If you are sensitive to bitterness, use a little less endive and add shredded romaine or even thin sliced cucumber. The dressing will still carry the whole thing.

    Tips for Making the Perfect Salad Dressing

    The dressing is what turns this from roasted vegetables to the kind of meal you keep thinking about the next day. For Crispy Cabbage and Broccolini with Tangy Endive Slaw, I like a dressing that is sharp but not harsh, with enough sweetness to smooth it out.

    Here is my simple method that never fails:

    1) Start with acid. Lemon juice makes it bright. Vinegar makes it punchy. I usually do lemon plus a small splash of apple cider vinegar.

    2) Add mustard. Dijon is my favorite. It gives flavor and helps the dressing cling to the endive.

    3) Add a little sweet. Honey or maple syrup. Not enough to make it sweet, just enough to balance the bitterness from endive and the sharpness from the acid.

    4) Add olive oil. Pour it in slowly while whisking. If you do not feel like whisking, put it in a jar and shake it like you mean it.

    5) Taste, then adjust. If it tastes flat, add salt. If it is too sharp, add a tiny bit more sweet or oil.

    I also like adding grated garlic because it disappears into the dressing and makes it taste like you tried harder than you did. If raw garlic feels too strong, use a pinch of garlic powder instead.

    “I made this on a random Tuesday and it somehow tasted like restaurant food. The crispy cabbage edges plus the tangy slaw is such a good combo. Even my partner, who claims he hates cabbage, went back for seconds.”

    Popular Salad Variations to Try

    Once you have the core recipe down, you can switch the vibe without changing the effort level. I love recipes like this because you can cook the same way but change the flavor direction.

    Here are a few variations I actually make:

    1) Sesame ginger twist
    Swap the mustard for a little tahini or sesame oil, use rice vinegar, and add grated ginger. Top with sesame seeds.

    2) Mediterranean style
    Use red wine vinegar and lemon, add oregano, and finish with feta and chopped olives. It tastes bold and salty in a really good way.

    3) Spicy crunchy version
    Add chili crisp or a spoon of sriracha into the dressing. Top with peanuts or cashews for crunch.

    4) Creamy but still bright
    Add a spoonful of Greek yogurt to the dressing. It becomes creamy without turning heavy, and it still keeps that tangy bite.

    If you are meal prepping, keep the slaw and the roasted veggies separate until you are ready to eat. That way the endive stays crisp and the cabbage stays roasty, not steamy.

    Common Mistakes to Avoid When Making Salads

    I have made every salad mistake there is, usually when I am hungry and rushing. So here are the big ones to avoid so your Crispy Cabbage and Broccolini with Tangy Endive Slaw turns out exactly how you want.

    Little things that make a big difference

    Overcrowding the pan. If you pile cabbage and broccolini on top of each other, they steam instead of crisp. Use two pans if you need to. It is worth it.

    Cutting cabbage too thin. Thin shreds are great for slaw, but for roasting you want wedges or thick slabs so the edges caramelize and the center stays tender.

    Not drying your greens. If the endive is wet, the dressing gets watered down and the slaw goes limp faster. Pat it dry after washing.

    Skipping the taste test. Dressing needs a quick taste. It takes ten seconds and saves the whole bowl.

    Adding slaw too early. Hot veggies plus slaw is amazing, but do not toss them together in the pan. Plate the crispy veggies first, then pile the slaw on top so it stays crunchy.

    The last tip is emotional as much as practical: do not aim for perfection. If the cabbage gets a little extra char, it is still delicious. If the dressing is a bit more tangy than planned, you will probably love it anyway.

    Common Questions

    Can I use regular broccoli instead of broccolini?

    Yes. Just cut it into smaller florets and keep an eye on it so it does not overcook. Broccolini is a bit more tender, but broccoli works great.

    How do I get the cabbage really crispy?

    High heat, enough oil, and space on the pan. Roast it cut side down for a while so it browns, then flip if you want more color on top.

    Is endive necessary? What can I swap it with?

    Endive gives that crisp bitter bite, but you can use romaine, radicchio, or even shredded green cabbage for the slaw if that is what you have.

    Can I make the dressing ahead of time?

    Totally. Keep it in a jar in the fridge for up to about a week. Shake before using since it will separate a little.

    What protein goes best with this?

    Chicken thighs, salmon, tofu, or chickpeas all work. I pick based on what I have, and it is great either way.

    A crunchy dinner you will actually crave again

    If you try this, I think you will understand why I keep coming back to it. The whole point of Crispy Cabbage and Broccolini with Tangy Endive Slaw is that you get hot, crispy roasted veggies and a cold, tangy crunch in the same bite, and it never feels boring. Keep the dressing bold, do not crowd your pan, and let the endive stay crisp until the very end. And if you are on a salad kick and want another colorful, fresh idea, check out Rice Noodle Rainbow Salad – Food: A Love Story for a totally different but equally fun vibe. Now go grab that cabbage, crank your oven up, and make this once, because I am pretty sure you will make it again.

  • Best 10 Delicious Recipes For Flavorful Weeknight Dinners

    Best 10 Delicious Recipes For Flavorful Weeknight Dinners

    After a long day, the last thing I want is to spend hours in the kitchen, which is why I’m always on the lookout for delicious, quick, and satisfying weeknight dinner ideas. In this roundup, I’ve gathered ten mouthwatering recipes that not only save me time but are also packed with flavor, ensuring my family enjoys every bite. From savory beer-braised carnitas to indulgent peanut butter cheesecake truffles, there's something here that will delight everyone's taste buds. Get ready to elevate your weeknight dinners and discover exciting new favorites that will have you looking forward to mealtime all week long!

    1. beer-braised-carnitas

    beer-braised-carnitas

    Get ready to elevate your taco nights with mouthwatering beer-braised carnitas! This recipe takes tender pork butt or shoulder and infuses it with the rich flavors of Mexican beer and warm spices, creating a perfect filling for tacos, burritos, or even nachos. In this article, you’ll discover a step-by-step guide on how to achieve that delightful melt-in-your-mouth texture, guaranteeing that every bite will leave your taste buds singing. Try it out and impress your family and friends with this irresistible dish that’s perfect for any gathering!

    View Recipe →

    2. peanut-butter-cheesecake-truffles

    peanut-butter-cheesecake-truffles

    Indulge your sweet tooth with the ultimate dessert delight: peanut butter cheesecake truffles! These bite-sized treats combine the creamy richness of Philadelphia cream cheese and smooth peanut butter, all wrapped in a luscious chocolate shell. Perfect for parties or a cozy night in, this recipe is not only simple to whip up but also guaranteed to impress your friends and family. Get ready to discover how to create these decadent bites that offer a delightful crunch of graham cracker and the option of a nutty finish—your dessert game is about to level up!

    View Recipe →

    3. best Amazing Vegan Mac and Cheese

    best Amazing Vegan Mac and Cheese

    If you think vegan mac and cheese can't deliver the same creamy comfort as its dairy counterpart, think again! Our roundup of the best Amazing Vegan Mac and Cheese recipes proves that plant-based dining can be both indulgent and wholesome. With simple ingredients like whole-grain macaroni, fresh broccoli, and savory spices, these delightful dishes are not only packed with flavor but also nourish your body. Dive into our list to discover how easy it is to whip up a comforting bowl of vegan goodness that will satisfy both vegans and cheese lovers alike!

    View Recipe →

    4. pork-chop-supreme

    pork-chop-supreme

    Looking for a hearty meal that effortlessly impresses without keeping you in the kitchen for hours? Meet Pork Chop Supreme: a delightful one-pan dish that combines succulent boneless pork chops and tender, buttery potatoes with a savory mushroom cream sauce. In just a few simple steps, you can create a comforting dinner that your family will love, making it perfect for busy weeknights or casual gatherings. Dive into this easy recipe and elevate your dinner game!

    View Recipe →

    5. strawberry-cheesecake-chimichangas

    strawberry-cheesecake-chimichangas

    Get ready to indulge your sweet tooth with a delectable twist on a classic dessert! These strawberry cheesecake chimichangas combine the creamy richness of cheesecake filling with the crispy crunch of fried tortillas, making them the perfect treat for any occasion. In this article, you’ll discover a simple, step-by-step recipe to create these mouthwatering delights, along with serving suggestions that will impress your friends and family. Don’t miss out on this sweet adventure—your taste buds will thank you!

    View Recipe →

    6. bad pineapples and best pineapples

    bad pineapples and best pineapples

    Are you ready to elevate your pineapple game? In our latest article, we dive into the world of pineapples, uncovering which varieties deserve a spot in your kitchen and which ones to avoid at all costs. Whether you're a pineapple aficionado or a casual consumer, knowing the difference between bad and best pineapples can transform your culinary adventures and ensure you enjoy every juicy bite. Click through to discover our top picks and tips for selecting the perfect pineapple that will elevate your dishes and delight your taste buds!

    View Recipe →

    7. fresh-pineapple-peach-smoothie

    fresh-pineapple-peach-smoothie

    Looking for a delicious way to cool off this summer? This fresh pineapple peach smoothie is your go-to recipe for a refreshing treat that’s packed with flavor and nutrition. With ripe peaches, juicy pineapple, and creamy Greek yogurt, this smoothie is not only easy to make but also a fantastic way to boost your fruit intake while satisfying your taste buds. Ready to blend up something fabulous? Dive into the full recipe to discover how to whip up this vibrant drink that’s perfect for breakfast or an afternoon snack!

    View Recipe →

    8. BAKED GARLIC PARMESAN POTATO WEDGES

    BAKED GARLIC PARMESAN POTATO WEDGES

    If you're on the hunt for a mouthwatering snack that pairs perfectly with any meal or makes for a delicious appetizer, look no further than Baked Garlic Parmesan Potato Wedges! These crispy, golden wedges are tossed in a savory blend of olive oil, garlic powder, and Italian seasoning, then finished with a sprinkle of melted parmesan cheese for that irresistible cheesy crunch. Whether enjoyed solo or dipped in your favorite sauce, this simple recipe guarantees flavor-packed satisfaction that will leave you coming back for seconds. Dive into the full article to uncover the easy steps to elevate your potato game!

    View Recipe →

    9. gingerbread-cake-with-cinnamon-molasses-frosting

    gingerbread-cake-with-cinnamon-molasses-frosting

    Get ready to warm your kitchen with the irresistible aroma of gingerbread cake topped with a luscious cinnamon molasses frosting! This delightful dessert combines the rich flavors of ginger, cinnamon, and molasses to create a festive indulgence that's perfect for any occasion. Whether you're serving it up for the holidays or simply craving something sweet, this recipe is sure to impress your family and friends. Dive into our article to discover the simple steps to create this mouthwatering treat that will not only satisfy your sweet tooth but also elevate your baking game!

    View Recipe →

    10. sweet-sticky-chicken-wings

    sweet-sticky-chicken-wings

    Get ready to tantalize your taste buds with a dish that's as fun to make as it is to eat! Our sweet and sticky chicken wings are the ultimate crowd-pleaser, perfect for game day, family gatherings, or a cozy night in. This irresistible recipe combines succulent chicken wings with a mouthwatering blend of soy sauce, honey, and apricot jam, delivering a burst of flavor in every bite. Dive into our step-by-step guide and discover how easy it is to bring this finger-licking favorite to your dining table!

    View Recipe →

  • Easy Cherry Pie

    Easy Cherry Pie

    why make this recipe

    This Easy Cherry Pie recipe is quick and simple. It uses few ingredients. You can make it with fresh, canned, or frozen cherries. The pie has a sweet, tart filling and a golden crust. It is a good choice for a fast dessert any day. For more simple ideas, see easy Mexican cassero recipes.

    introduction

    This pie is easy to make and tastes great. You do not need special skills. The filling cooks on the stove and the pie bakes in one pan. The almond and vanilla give a warm flavor. Serve it warm or cold.

    how to make Easy Cherry Pie

    Follow the simple steps below. The filling thickens on the stove. Then you bake the pie until the crust is golden.

    Ingredients :

    • 2 cups fresh, canned, or frozen cherries
    • 1 cup sugar
    • 2 tablespoons cornstarch
    • 1 tablespoon lemon juice
    • 1 teaspoon vanilla extract
    • 1 teaspoon almond extract
    • 1 pie crust (store-bought or homemade)
    • 1 tablespoon butter (optional)

    Directions :

    1. Preheat your oven to 425°F (220°C).
    2. In a medium saucepan, combine cherries, sugar, cornstarch, lemon juice, vanilla extract, and almond extract. Cook over medium heat until the mixture starts to bubble and thicken.
    3. Pour the cherry filling into the pie crust, spreading it evenly.
    4. Dot the filling with small pieces of butter, if desired.
    5. Cover with a top crust, seal the edges, and cut slits in the top to allow steam to escape.
    6. Bake in the preheated oven for 30-35 minutes or until the crust is golden brown.
    7. Let cool before serving.

    how to serve Easy Cherry Pie

    Let the pie cool a bit so the filling sets. Serve warm with vanilla ice cream or plain whipped cream. You can also serve slices at room temperature. Cut with a sharp knife for clean slices.

    how to store Easy Cherry Pie

    Cover the pie with plastic wrap or foil. Store at room temperature for one day. For longer storage, keep in the fridge up to 4 days. To freeze, wrap well and freeze for up to 2 months. Thaw in the fridge before reheating.

    tips to make Easy Cherry Pie

    • Use fresh, canned, or frozen cherries. Drain canned cherries well.
    • If filling is too thin, add a little more cornstarch.
    • Blind-bake the crust for a firmer bottom if you like.
    • Cut steam vents in the top crust to avoid overflow.
    • Let the pie cool so the filling firms up before slicing.

    variation (if any)

    • Add a pinch of cinnamon for warm spice.
    • Use lemon zest for brighter flavor.
    • Make a lattice top crust instead of a full top crust.
    • Mix half cherries and half berries for a mixed fruit pie.

    FAQs

    Q: Can I use frozen cherries without thawing?
    A: You can use frozen cherries. Thawing first helps the filling thicken evenly, but you can add them frozen and cook a little longer.

    Q: How can I make the filling less sweet?
    A: Reduce the sugar by 1/4 cup or add a bit more lemon juice to balance sweetness.

    Q: Can I use a gluten-free pie crust?
    A: Yes. Use a gluten-free crust and follow the same baking time, but check the crust for doneness as recipes vary.

    Q: Do I need to peel cherries?
    A: No. Cherry skins are fine and help the filling hold together.

    Q: How do I stop the crust from burning?
    A: If the crust browns too fast, cover the edges with foil after 15–20 minutes.

    Conclusion

    This Easy Cherry Pie is a simple, tasty dessert you can make any day. For another simple guide and more tips, see Simple Cherry Pie – Wyse Guide.

  • Baked Potato Halves

    Baked Potato Halves

    why make this recipe

    Baked Potato Halves are easy and quick. You get a warm, soft inside and a light butter crust. This recipe needs only a few ingredients. It fits weeknight dinners and simple sides. If you like potato sides, try a similar flavored option like baked garlic parmesan potato wedges for more ideas.

    introduction

    This recipe uses plain potatoes, salt, and butter. You bake the potatoes cut side down in melted butter. The butter gives a rich taste and a soft texture. The steps are short and clear. You can change the salt or add herbs if you want.

    how to make Baked Potato Halves

    Follow the steps below to make the dish. Work in a plain oven-safe dish. Melt the butter first, then place the potatoes cut side down. Bake until the inside is soft. Drizzle any extra butter over the potatoes before serving.

    Ingredients :

    4-6 medium sized potatoes, 3 tbsp. salted butter, Seasoned salt

    Directions :

    Pre-heat the oven to 350 degrees Fahrenheit, and place the butter in your baking dish and put the dish in the oven to melt the butter., Wash the potatoes, then cut them in half lengthwise. Sprinkle each cut side with seasoned salt., Once the butter is melted in the pan, (make sure the whole bottom of the pan is covered with melted butter) then lay the potatoes cut side down in the butter., Bake at 350 degrees for thirty minutes. Transfer the potatoes to a serving bowl and drizzle any extra butter over top., Serve and enjoy.?

    how to serve Baked Potato Halves

    Serve warm. Put them in a bowl or on a plate. You can add more seasoned salt, chopped herbs, or a spoon of sour cream. They pair well with grilled meat, salad, or steamed vegetables.

    how to store Baked Potato Halves

    Let the potatoes cool to room temperature. Put them in an airtight container. Store in the fridge for up to 3 days. Reheat in the oven at 350°F for 10–15 minutes or until hot. You can also reheat in a microwave, but the texture may change.

    tips to make Baked Potato Halves

    • Use medium potatoes so they cook evenly.
    • Dry the potatoes well before cutting.
    • Make sure the butter covers the pan bottom so each potato gets butter on the cut side.
    • Check doneness with a fork; it should go in easily.
    • If you like a crisp edge, place cut side up for the last 5 minutes of baking.

    variation (if any)

    • Add garlic powder or chopped fresh garlic to the butter for more flavor.
    • Sprinkle grated cheese on top after baking for a cheesy finish.
    • Use olive oil instead of butter for a lighter taste.
    • Add fresh herbs like parsley or chives before serving.

    FAQs

    Q: Can I use larger or smaller potatoes?
    A: Yes. Adjust bake time. Small potatoes take less time; large ones take more.

    Q: Do I need to peel the potatoes?
    A: No. Keep the skin on for texture and ease.

    Q: Can I use unsalted butter?
    A: Yes. Taste and add more seasoned salt if needed.

    Q: Can I bake these in a foil pan?
    A: Yes, as long as it is oven safe and the butter can melt across the bottom.

    Q: Can I make this ahead?
    A: You can bake and cool, then store in the fridge. Reheat before serving.

    Conclusion

    For a quick twist on baked potatoes, see this quick baked potatoes guide for more simple ideas and tips.

  • Flaky Scones

    Flaky Scones

    why make this recipe

    These scones are quick and simple. They bake up light and flaky. You can make them with easy pantry ingredients. They work for breakfast, tea, or a snack.

    introduction

    Flaky Scones are tender, buttery, and crisp on the outside. The dough stays simple and you can mix it by hand. They bake in about 15–20 minutes and taste best warm with marmalade butter.

    how to make Flaky Scones

    Follow simple steps and keep the butter cold. Work gently so the dough stays flaky. Cut the dough into shapes and bake until golden.

    Ingredients :

    • 2 cups all-purpose flour
    • 1/4 cup sugar
    • 1 tablespoon baking powder
    • 1/2 teaspoon salt
    • 1/2 cup unsalted butter, cold and cubed
    • 3/4 cup heavy cream
    • 1 teaspoon vanilla extract
    • Marmalade butter (for serving)

    Directions :

    1. Preheat your oven to 400°F (200°C) and line a baking sheet with parchment paper.
    2. In a large bowl, mix flour, sugar, baking powder, and salt.
    3. Add cold butter and mix until the mixture resembles coarse crumbs.
    4. Stir in heavy cream and vanilla extract until just combined.
    5. Turn the dough out onto a floured surface and gently knead it a few times.
    6. Roll the dough out to about 1-inch thickness and cut into desired shapes.
    7. Place scones on prepared baking sheet and bake for 15-20 minutes or until golden brown.
    8. Serve warm with marmalade butter.

    how to serve Flaky Scones

    Serve warm from the oven. Spread marmalade butter or your favorite jam. Pair with tea or coffee. You can split them and fill with cream or lemon curd.

    how to store Flaky Scones

    Cool fully before storing. Keep in an airtight container at room temperature for 1–2 days. For longer storage, freeze wrapped scones for up to 1 month. Reheat in a low oven until warm.

    tips to make Flaky Scones

    • Keep the butter very cold. This makes the scones flaky.
    • Do not overmix the dough. Mix just until it comes together.
    • Use a light hand when kneading. A few turns are enough.
    • Chill the cut scones briefly if your kitchen is warm before baking.
    • Bake on a hot sheet for a better rise.

    variation (if any)

    • Add 1/2 cup dried fruit like raisins or currants.
    • Fold in 1/2 cup grated cheddar for savory scones.
    • Replace vanilla with lemon zest for citrus flavor.

    FAQs

    Q: Can I use milk instead of heavy cream?
    A: Yes. Milk will work, but the scones may be a bit less rich and tender.

    Q: How do I know when scones are done?
    A: They are done when the tops are golden brown and a toothpick comes out clean.

    Q: Can I make the dough ahead?
    A: Yes. Make the dough, cut the shapes, and freeze the raw scones on a tray. Transfer to a bag and bake from frozen, adding a few extra minutes.

    Conclusion

    For another clear and reliable guide to flaky scones and more tips, see Never-fail Flaky Scones | The only Scone Recipe you’ll ever need!

  • Easy Irish Soda Bread Scones

    Easy Irish Soda Bread Scones

    introduction

    This simple recipe makes soft, slightly sweet Irish soda bread scones. They bake fast and taste warm and homey. If you like quick breads, you may also enjoy other easy recipes like these easy Mexican casserole ideas.

    why make this recipe

    • It is quick and uses no yeast.
    • The scones are tender and flaky.
    • You can change flavors with fruit, citrus, or spices.
    • Good for a fast breakfast or a snack.

    how to make Easy Irish Soda Bread Scones

    1. Preheat the oven and line a baking sheet with parchment.
    2. Mix dry ingredients in a bowl: flour, sugars, baking soda, baking powder, and salt.
    3. Cut cold butter into the dry mix until it looks like coarse crumbs.
    4. Whisk buttermilk, egg, and vanilla in a small bowl. Stir in zest.
    5. Pour wet into dry and fold gently. Add currants or raisins. Do not overmix.
    6. Shape dough on a floured surface into a round about 1 inch thick. Cut into 8 wedges.
    7. Place wedges on the baking sheet. Brush with egg wash and sprinkle turbinado sugar.
    8. Bake until golden and a toothpick comes out clean, about 15–20 minutes.
    9. Cool a little on a rack before serving.

    Ingredients :

    • 2 cups all-purpose flour, spooned and leveled
    • 2 teaspoon sugar
    • 2 teaspoon brown sugar
    • 1 teaspoon baking soda
    • 2 teaspoons baking powder
    • 1/2 teaspoon salt
    • 1 stick (8 tablespoons) cold unsalted butter, cut into small cubes
    • 1/2 cup buttermilk
    • 1 egg
    • 1 teaspoon vanilla
    • 1 to 2 teaspoons lemon or orange zest, depending on your taste preference
    • 2/3 to 3/4 cup currants or raisins
    • Egg wash (1 egg plus 1 tablespoon of water) Optional, and is for brushing scones before baking.
    • Turbinado sugar for sprinkling. Optional. You can substitute brown or white sugar.

    Directions :

    For the Irish soda bread scones

    • Preheat oven to 400°F (200°C). Line a baking sheet.
    • Combine dry ingredients in a bowl. Cut in butter until mixture is crumbly.
    • Mix wet ingredients and add to dry. Fold in currants or raisins and zest.
    • Form dough into a disk and cut into wedges. Brush with egg wash and sprinkle sugar.
    • Bake 15–20 minutes until golden. Cool slightly before serving.

    how to serve Easy Irish Soda Bread Scones

    Serve warm with butter, jam, or clotted cream. They pair well with tea or coffee. Split and toast lightly for a firmer texture.

    how to store Easy Irish Soda Bread Scones

    • Room temperature: Keep in an airtight container for up to 2 days.
    • Refrigerator: Up to 5 days in a sealed container.
    • Freezer: Wrap well and freeze up to 2 months. Thaw and warm in oven.

    tips to make Easy Irish Soda Bread Scones

    • Keep the butter cold for flakier scones.
    • Do not overwork the dough; mix until just combined.
    • Use fresh baking powder and baking soda for best rise.
    • Chill the shaped dough for 10 minutes if it gets too soft.
    • Measure flour by spooning and leveling for accuracy.

    variation (if any)

    • Savory: add 1 cup grated cheddar and 1 tablespoon chopped chives, omit sugar.
    • Citrus-free: skip zest and add 1/2 teaspoon cinnamon for warm flavor.
    • Fruit swap: use dried cranberries or chopped apricots instead of currants.

    FAQs

    Q: Can I make these with regular milk?
    A: For best texture, use buttermilk. You can use milk plus 1 teaspoon vinegar as a substitute.

    Q: Can I make smaller scones?
    A: Yes. Reduce baking time by a few minutes and watch until golden.

    Q: Why did my scones come out dense?
    A: Likely overmixing or old leavening. Mix gently and use fresh baking soda/powder.

    Q: Can I skip the egg wash?
    A: Yes. The egg wash adds shine and helps sugar stick, but scones bake fine without it.

    Conclusion

    For another version and extra tips, see this detailed recipe from Irish Soda Bread Scones – Strawberry Blondie Kitchen.

  • Irish Soda Bread Muffins

    Irish Soda Bread Muffins

    A quick, easy muffin version of Irish soda bread. These bake fast and taste warm and soft.

    introduction

    This recipe turns classic Irish soda bread into small muffins you can make any day. They bake in about 15 to 18 minutes and need no yeast. If you like warm quick breads, try a related recipe for gingerbread cake with cinnamon molasses for another simple treat.

    why make this recipe

    • It is fast. The batter mixes in one bowl.
    • It needs no yeast or long rise time.
    • Muffins are easy to share and store.
    • Raisins add sweet bites and a good texture.

    how to make Irish Soda Bread Muffins

    These steps give a clear view of what to do. Mix dry ingredients, mix wet, fold together, add raisins, pour into a tin, and bake.

    Ingredients :

    • 2 cups all-purpose flour
    • 1 teaspoon baking soda
    • 1/2 teaspoon salt
    • 1 cup buttermilk
    • 1/2 cup raisins
    • 1/4 cup sugar
    • 1 large egg
    • 2 tablespoons melted butter

    Directions :

    1. Preheat your oven to 400°F (200°C) and line a muffin tin with paper liners.
    2. In a large bowl, combine the flour, baking soda, salt, and sugar.
    3. In a separate bowl, whisk together the buttermilk, egg, and melted butter.
    4. Pour the wet ingredients into the dry ingredients and stir until just combined.
    5. Gently fold in the raisins.
    6. Divide the batter evenly among the muffin cups.
    7. Bake for 15-18 minutes, or until golden brown and a toothpick inserted in the center comes out clean.
    8. Let cool slightly before serving.

    how to serve Irish Soda Bread Muffins

    • Serve warm with butter or jam.
    • Offer with a hot drink for breakfast or tea time.
    • Split and toast them lightly for a crisp edge.

    how to store Irish Soda Bread Muffins

    • At room temperature: keep in an airtight container for 2 days.
    • In the fridge: store up to 5 days in a sealed container. Warm before serving.
    • In the freezer: wrap each muffin and freeze up to 3 months. Thaw at room temperature or warm in the oven.

    tips to make Irish Soda Bread Muffins

    • Do not overmix the batter. Mix until just combined for tender muffins.
    • Measure flour by spooning it into the cup and leveling it for best results.
    • If you do not have buttermilk, mix 1 cup milk with 1 tablespoon lemon juice or vinegar and let sit 5 minutes.
    • Check muffins at 12 minutes; ovens vary, and you want golden tops but not dry centers.

    variation (if any)

    • Swap raisins for currants or dried cranberries.
    • Add 1 teaspoon ground cinnamon for warm spice.
    • Stir in 1/2 cup grated cheddar and 1 teaspoon caraway seeds for a savory twist.
    • Use whole wheat pastry flour for a nuttier flavor (may need a splash more buttermilk).

    FAQs

    Q: Can I skip the raisins?
    A: Yes. Leave them out or replace with other dried fruit or chocolate chips.

    Q: My muffins are dense. What went wrong?
    A: You may have overmixed or used too much flour. Mix until just combined and measure flour correctly.

    Q: Can I make these dairy-free?
    A: Yes. Use a plant milk plus 1 tablespoon vinegar for buttermilk and a dairy-free butter.

    Q: Can I make a larger loaf instead of muffins?
    A: Yes. Bake in a greased loaf pan at 375°F (190°C) for about 30-40 minutes, until a toothpick comes out clean.

    Conclusion

    For another take on this recipe and more notes, see Irish Soda Bread Muffins (not so traditional but oh so delicious!).

  • Best Baked Potato

    Best Baked Potato

    why make this recipe

    A baked potato is warm, simple, and filling. It needs little time and few ingredients. You can use it as a main dish or a side. It works any day of the week.

    introduction

    This Best Baked Potato recipe gives a crisp skin and soft inside. It uses russet potatoes, olive oil, salt, and simple toppings. If you want a different potato side, try these baked garlic parmesan potato wedges for a change.

    how to make Best Baked Potato

    Follow clear steps and use hot oven heat. Rub the potatoes with oil and salt. Bake them directly on the oven rack so the skin gets crispy. Open the top and fluff the inside before adding butter and toppings.

    Ingredients :

    Large russet potatoes, Olive oil, Salt, Pepper, Butter, Sour cream, Cheese, Chives

    Directions :

    1. Preheat the oven to 425°F (220°C).
    2. Scrub the potatoes clean and pat them dry.
    3. Pierce each potato several times with a fork.
    4. Rub the potatoes with olive oil and sprinkle with salt and pepper.
    5. Place the potatoes directly on the oven rack and bake for about 45-60 minutes, until the skin is crispy and a fork easily goes through the flesh.
    6. Remove from the oven and let cool for a few minutes.
    7. Cut the tops open and fluff the insides with a fork.
    8. Add butter, sour cream, cheese, chives, or any of your favorite toppings.
    9. Serve warm.

    how to serve Best Baked Potato

    Serve the potato hot. Cut it open and add butter first so it melts. Add sour cream, cheese, and chives. You can add bacon bits, steamed broccoli, or chili for a fuller meal. Serve with a salad or roast vegetables.

    how to store Best Baked Potato

    Cool any leftover potato to room temperature. Wrap in foil or store in an airtight container. Keep in the fridge up to 3–4 days. Reheat in the oven at 350°F (175°C) for 10–15 minutes or until hot. Avoid microwaving for long, it can make the skin soggy.

    tips to make Best Baked Potato

    • Choose russet potatoes for a fluffy inside and crisp skin.
    • Dry the potatoes well before oiling to get a better crust.
    • Pierce the skin so steam escapes and the potato cooks evenly.
    • Bake directly on the oven rack for the best crisp skin.
    • Use hot oven heat (425°F) for a shorter, crisper bake.
    • Let them rest a few minutes before cutting to keep the steam inside.

    variation (if any)

    • Stuffed potato: scoop a bit of the inside and mix with cheese and herbs, then put back and bake briefly.
    • Herb butter: mix butter with garlic and parsley and add on top.
    • Loaded: add chili, bacon, green onions, and extra cheese.
    • Sweet potato version: use sweet potatoes and adjust bake time to get a soft center.

    FAQs

    Q: How do I know the potato is done?
    A: A fork should slide into the potato easily and the skin should feel crisp.

    Q: Can I cook potatoes at a lower temperature?
    A: Yes, you can bake at 375°F but it will take longer and the skin may not be as crisp.

    Q: Can I microwave potatoes first then bake?
    A: Yes. Microwave for 5–8 minutes to speed cooking, then rub with oil and bake 10–15 minutes to crisp the skin.

    Q: Do I need to oil the potatoes?
    A: Oil helps the skin crisp and hold the salt. It is recommended.

    Q: How long do baked potatoes last in the fridge?
    A: Store up to 3–4 days in an airtight container.

    Conclusion

    For a step-by-step alternative idea and more tips, see this Perfect Baked Potato Recipe – Love and Lemons.

  • Classic Marry Me Chicken Orzo

    Classic Marry Me Chicken Orzo

    introduction

    This Classic Marry Me Chicken Orzo is a simple, creamy one-pan meal with chicken, orzo, spinach, and sun-dried tomatoes. It makes a cozy dinner any night. If you want a simple side, try baked garlic parmesan potato wedges to go with it.

    why make this recipe

    Make this recipe because it cooks fast, uses one pan, and fills the plate with protein and pasta. The cream and sun-dried tomatoes give rich flavor without a lot of work. It is great for busy weeknights or for when you want a comforting dinner.

    how to make Classic Marry Me Chicken Orzo

    Start by sautéing onions and garlic. Brown the chicken until it is cooked through. Add the orzo and chicken broth, cook until the pasta is tender. Stir in cream, spinach, and sun-dried tomatoes. Heat until the spinach wilts and everything is warm. Finish with Parmesan on top.

    Ingredients :

    • 4 boneless, skinless chicken breasts
    • 1 tablespoon olive oil
    • 1 onion, chopped
    • 3 garlic cloves, minced
    • 1 cup orzo pasta
    • 2 cups chicken broth
    • 1 cup heavy cream
    • 1 cup spinach, chopped
    • 1/2 cup sun-dried tomatoes, chopped
    • Salt and pepper to taste
    • Parmesan cheese for garnish

    Directions :

    1. In a large skillet, heat olive oil over medium heat. Add chopped onion and garlic; sauté until softened.
    2. Add chicken breasts to the skillet, season with salt and pepper, and brown each side until cooked through.
    3. Stir in the orzo pasta and chicken broth; bring to a boil. Reduce the heat and simmer until the orzo is tender (about 8-10 minutes).
    4. Stir in heavy cream, spinach, and sun-dried tomatoes; cook until the spinach is wilted and everything is heated through.
    5. Serve hot, garnished with Parmesan cheese.

    how to serve Classic Marry Me Chicken Orzo

    Serve hot from the pan. Sprinkle extra Parmesan and a little black pepper. A green side salad or steamed vegetables make a good balance. Crusty bread also works for dipping in the creamy sauce.

    how to store Classic Marry Me Chicken Orzo

    Let the dish cool to room temperature. Put it in an airtight container and store in the refrigerator for up to 3–4 days. Reheat on the stove over low heat, stirring and adding a splash of broth or water if the sauce is too thick. You can freeze in a sealed container for up to 2 months, but cream may change texture after thawing.

    tips to make Classic Marry Me Chicken Orzo

    • Pound chicken breasts to even thickness so they cook evenly.
    • Brown chicken well for more flavor.
    • Taste and adjust salt near the end after adding broth and cream.
    • If the sauce is too thick, add a bit more chicken broth.
    • Use fresh spinach for best texture; frozen spinach can be used but drain well.

    variation (if any)

    • Add mushrooms or bell peppers with the onions for extra vegetables.
    • Use half-and-half instead of heavy cream for a lighter sauce.
    • Swap orzo for small pasta like ditalini or small shells, but adjust cooking time.
    • Add red pepper flakes for a little heat.

    FAQs

    Q: Can I use chicken thighs instead of breasts?
    A: Yes. Boneless thighs work well and stay moist. Cook time may change slightly.

    Q: Can I make this dairy-free?
    A: Use coconut cream or a dairy-free cream substitute and skip the Parmesan or use a dairy-free cheese.

    Q: How do I know when the chicken is done?
    A: Cut into the thickest part to check there is no pink, or use a meat thermometer—165°F (74°C) is safe.

    Q: Can I cook the orzo separately?
    A: Yes. If you cook it separately, drain it and add at the end. You may need less broth when cooking separately.

    Conclusion

    For a tested one-pan version and more tips, see Kalejunkie’s one-pan Marry Me Chicken Orzo recipe.

  • Weeknight Baked Potatoes

    Weeknight Baked Potatoes

    why make this recipe

    This recipe gives you soft, caramelized potato halves in under an hour. It uses a little butter and oil and simple spices you likely have at home. It is fast, easy, and good for weeknights when you want a warm side with little work.

    introduction

    Weeknight Baked Potatoes cook fast and taste rich without much fuss. They crisp on the cut side and stay tender inside. If you want a similar easy side, try the baked garlic parmesan potato wedges recipe at baked garlic parmesan potato wedges for another simple idea.

    how to make Weeknight Baked Potatoes

    You prepare the potatoes, place them cut side down on butter pats, season, and bake at a high temperature. Halfway through baking, brush them with the melted butter in the pan. Bake until fork tender and caramelized on the cut side.

    Ingredients :

    • 3 Medium sized Russet Potatoes, cut in half lengthwise
    • 4 tablespoons of butter, cut into about 1/2 inch slices, you need two pats for each potato, 1 tablespoon of olive oil
    • 2 to 3 teaspoons of coarse salt *or to taste
    • 1 teaspoon of black pepper
    • 1/2 teaspoon of paprika
    • 1 teaspoon of garlic powder
    • 1 teaspoon onion powder
    • 1 teaspoon of lemon pepper *optional
    • 1 teaspoon of dried parsley
    • Weeknight Baked Potatoes

    Directions :

    1. Scrub your potatoes and dry them with paper towels, then cut them in half lengthwise.
    2. Prepare a baking sheet with foil or parchment paper, and place your butter pats together in groups of two, so that each potato half will rest on two pats of butter, like little butter legs.
    3. Season each butter pat with salt, pepper, garlic and onion powder, paprika, and lemon pepper.
    4. Rub the cut potatoes all over with the olive oil and place cut side down on the pats of butter. Each potato should have 2 pats under it.
    5. Salt and pepper the skin. You can use the other seasonings on here as well.
    6. Heat your oven to 425 degrees and bake the potatoes on the top rack for 25 to 35 minutes. Halfway through baking, I take them out and brush them all over with the melted butter from the pan. *every oven is different, cooking times will vary, the potatoes should be fork tender when done and caramelized on the cut side.
    7. Sprinkle with a little more salt and the dried parsley.

    how to serve Weeknight Baked Potatoes

    Serve hot, cut side up or down. Top with sour cream, shredded cheese, chopped chives, bacon bits, or steamed vegetables. They make a good side for chicken, steak, or a simple salad.

    how to store Weeknight Baked Potatoes

    Cool to room temperature, then store in an airtight container in the fridge for up to 3 days. Reheat in a 375°F oven for 10–15 minutes or until hot. You can also reheat in a skillet over medium heat to keep a crisp edge.

    tips to make Weeknight Baked Potatoes

    • Use similar-sized russets so they cook evenly.
    • Pat the potatoes dry so the cut side caramelizes.
    • Place the potatoes cut side down on the butter pats to get a rich, browned surface.
    • Brush with melted butter once during baking for extra flavor.
    • Check with a fork for doneness; times vary by oven.

    variation (if any)

    • Swap russets for Yukon gold for a creamier texture.
    • Add grated Parmesan on top before the last 5 minutes of baking for a cheesy crust.
    • Use smoked paprika or cayenne for more heat.
    • Make them vegetarian by omitting bacon-style toppings.

    FAQs

    Q: Can I make these ahead and reheat?
    A: Yes. Bake, cool, and store in the fridge. Reheat in the oven to keep the cut side caramelized.

    Q: Can I use foil instead of parchment?
    A: Yes. Foil works fine and helps catch melted butter for brushing.

    Q: What if my potatoes are not fork tender at 35 minutes?
    A: Bake longer in 5-minute increments until fork tender. Cover loosely with foil if the tops brown too much.

    Q: Can I cut potatoes smaller to speed cooking?
    A: Yes. Smaller pieces will cook faster. Reduce baking time and watch for fork tenderness.

    Conclusion

    For the original recipe and extra tips, visit Weeknight Baked Potatoes – The Tipsy Housewife.